1.什么是TFserving
当你训好你的模型,需要提供给外部使用的时候,你就需要把模型部署到线上,并提供合适的接口给外部调用。你可能会考虑一些问题:
- 用什么来部署
- 怎么提供api接口
- 多个模型GPU资源如何分配
- 线上模型如何更新而服务不中断
目前流行的深度学习框架Tensorflow和Pytorch, Pytorch官方并没有提供合适的线上部署方案;Tensorflow则提供了TFserving方案来部署线上模型推理。另外,Model Server for Apache MXNet 为MXNet模型提供推理服务。
本文为TFServing的使用指南。如果你是pytorch或者MXNet模型,也可以通过ONNX转成TFserving的模型,部署在TFServing上。
那什么是TFserving?
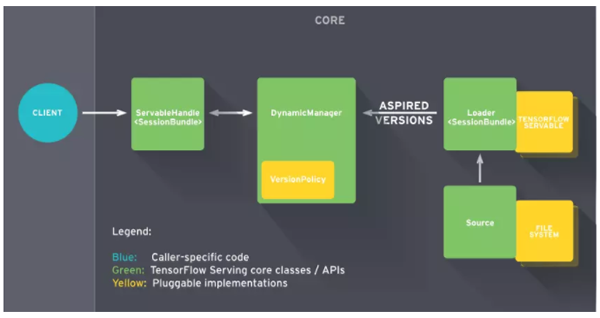
TFserving是Google 2017推出的线上推理服务;采用C/S架构,客户端可通过gRPC和RESTfull API与模型服务进行通信。
TFServing的特点:
- 支持模型版本控制和回滚:Manager会进行模型的版本的管理
- 支持并发,实现高吞吐量
- 开箱即用,并且可定制化
- 支持多模型服务
- 支持批处理
- 支持热更新:Source加载本地模型,通知Manager有新的模型需要加载,Manager检查模型的版本,通知Source创建的Loader进行加载模型
- 支持分布式模型
2.TFserving安装
强烈建议采用docker方式安装TFserving,安装依赖docker和nvidia-docker(TFserving的gpu需要)
- docker 安装
#安装yum-utils工具和device-mapper相关依赖包
yum install -y yum-utils \
device-mapper-persistent-data \
lvm2
#添加docker-ce stable版本的仓库
yum-config-manager \
--add-repo \
https://download.docker.com/linux/centos/docker-ce.repo
#更新yum缓存文件
yum makecache fast
#查看所有可安装的docker-ce版本
yum list docker-ce --showduplicates | sort -r
# 安装docker-ce
yum install docker-ce-17.12.1.ce-1.el7.centos
#允许开机启动docker-ce服务
systemctl enable docker.service
#启动Docker-ce服务
systemctl start docker
#运行测试容器hello-world
docker run --rm hello-world
- 1.
- 2.
- 3.
- 4.
- 5.
- 6.
- 7.
- 8.
- 9.
- 10.
- 11.
- 12.
- 13.
- 14.
- 15.
- 16.
- 17.
- 18.
- 19.
- 20.
- nvidia-docker 安装
# 安装nvidia-docker2
yum install -y nvidia-docker2-2.0.3-1.docker17.12.1.ce
# 重启docker服务
service docker restart
- 1.
- 2.
- 3.
- 4.
- 安装TFserving
docker pull tensorflow/serving:latest-gpu
# 可以选择其他版本如 docker pull tensorflow/serving:1.14.0-rc0-gpu
- 1.
- 2.
注意:docker版本和nvidia-docker要匹配
- 目前最新的nvidia-docker需要Docker为19.03 可参考官方https://github.com/NVIDIA/nvidia-docker
- nvidia-docker2 支持Docker版本低于19.03的其他版本(需>=1.12),现有服务器有18.09,1.17,1.13 https://github.com/NVIDIA/nvidia-docker/wiki/Installation-(version-2.0)
3.TFserving使用说明
3.1 模型转换
TFserving的模型需要转换成TFserving的格式, 不支持通常的checkpoint和pb格式。
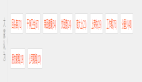
TFserving的模型包含一个.pb文件和variables目录(可以为空),导出格式如下:.
├── 1
│   ├── saved_model.pb
│   └── variables
├── 2
│   ├── saved_model.pb
│   └── variables
- 1.
- 2.
- 3.
- 4.
- 5.
- 6.
不同的深度学习框架的转换路径:
(1) pytorch(.pth)--> onnx(.onnx)--> tensorflow(.pb) --> TFserving
(2) keras(.h5)--> tensorflow(.pb) --> TFserving
(3) tensorflow(.pb) --> TFserving
- 1.
- 2.
- 3.
这里详细介绍下pb转换成TFserving模型
import tensorflow as tf
def create_graph(pb_file):
    """Creates a graph from saved GraphDef file and returns a saver."""
    # Creates graph from saved graph_def.pb.
    with tf.gfile.FastGFile(pb_file, 'rb') as f:
        graph_def = tf.GraphDef()
        graph_def.ParseFromString(f.read())
        _ = tf.import_graph_def(graph_def, name='')
def pb_to_tfserving(pb_file, export_path, pb_io_name=[], input_node_name='input', output_node_name='output', signature_name='default_tfserving'):
    # pb_io_name 为 pb模型输入和输出的节点名称,
    # input_node_name为转化后输入名
    # output_node_name为转化后输出名
    # signature_name 为签名
    create_graph(pb_file)
     # tensor_name_list = [tensor.name for tensor in tf.get_default_graph().as_graph_def().node]
    input_name = '%s:0' % pb_io_name[0]
    output_name = '%s:0' % pb_io_name[1]
    with tf.Session() as sess:
        in_tensor = sess.graph.get_tensor_by_name(input_name)
        out_tensor = sess.graph.get_tensor_by_name(output_name)
        builder = tf.saved_model.builder.SavedModelBuilder(export_path)  ## export_path导出路径
        inputs = {input_node_name: tf.saved_model.utils.build_tensor_info(in_tensor)}
        outputs = {output_node_name: tf.saved_model.utils.build_tensor_info(out_tensor)}
        signature = tf.saved_model.signature_def_utils.build_signature_def(
            inputs, outputs, method_name=tf.saved_model.signature_constants.PREDICT_METHOD_NAME)
        builder.add_meta_graph_and_variables(
            sesssess=sess, tags=[tf.saved_model.tag_constants.SERVING],
            signature_def_map={signature_name: signature}, clear_devices=True)  ## signature_name为签名,可自定义
        builder.save()
pb_model_path = 'test.pb'
pb_to_tfserving(pb_model_path, './1', pb_io_name=['input_1_1','output_1'],signature_name='your_model')
- 1.
- 2.
- 3.
- 4.
- 5.
- 6.
- 7.
- 8.
- 9.
- 10.
- 11.
- 12.
- 13.
- 14.
- 15.
- 16.
- 17.
- 18.
- 19.
- 20.
- 21.
- 22.
- 23.
- 24.
- 25.
- 26.
- 27.
- 28.
- 29.
- 30.
- 31.
3.2 TFserving配置和启动
模型导出后,同一个模型可以导出不同的版本(版本后数字),可以TFserving配置中指定模型和指定版本。TFserving的模型是通过模型名称和签名来唯一定位。TFserving 可以配置多个模型,充分利用GPU资源。
- 模型配置
# models.config
model_config_list {
  config {
    name: 'your_model'
    base_path: '/models/your_model/'
    model_platform: 'tensorflow'
#     model_version_policy {
#       specific {
#         versions: 42
#         versions: 43
#       }
#     }
#     version_labels {
#       key: 'stable'
#       value: 43
#     }
#     version_labels {
#       key: 'canary'
#       value: 43
#     }
  }
  config {
    name: "mnist",
    base_path: "/models/mnist",
    model_platform: "tensorflow",
    model_version_policy: {
       specific: {
        versions: 1,
        versions: 2
       }
  }
}
# 可以通过model_version_policy 进行版本的控制
- 1.
- 2.
- 3.
- 4.
- 5.
- 6.
- 7.
- 8.
- 9.
- 10.
- 11.
- 12.
- 13.
- 14.
- 15.
- 16.
- 17.
- 18.
- 19.
- 20.
- 21.
- 22.
- 23.
- 24.
- 25.
- 26.
- 27.
- 28.
- 29.
- 30.
- 31.
- 32.
- 33.
- 启动服务
# 建议把模型和配置文件放在docker外的本地路径,如/home/tfserving/models, 通过-v 挂载到docker内部
# --model_config_file: 指定模型配置文件
# -e NVIDIA_VISIBLE_DEVICES=0: 指定GPU
# -p 指定端口映射 8500为gRpc 8501为restful api端口
# -t 为docker镜像
nvidia-docker run  -it --privileged  -d -e NVIDIA_VISIBLE_DEVICES=0  -v /home/tfserving/models:/models  -p 8500:8500 -p 8501:8501 \
 -t tensorflow/serving:latest-gpu \
--model_config_file=/models/models.config
# /home/tfserving/models 结构
├── models.config
└── your_model
    ├── 1
    │   ├── saved_model.pb
    │   └── variables
    └── 2
        ├── saved_model.pb
        └── variables
# test
curl http://192.168.0.3:8501/v1/models/your_model
{
    "model_version_status": [
        {
            "version": "2",
            "state": "AVAILABLE",
            "status": {
            "error_code": "OK",
            "error_message": ""
            }
        }
    ]
}
# 其他启动方式
# 如果多个模型在不同的目录,可以通过-mount 单独加载
nvidia-docker run  -it --privileged  -d -e NVIDIA_VISIBLE_DEVICES=0 \
--mount type=bind,source=/home/tfserving/models/your_model,target=/models/your_model \
--mount type=bind,source=/home/tfserving/models/your_model/models.config,target=/models/models.config \
-p 8510:8500 -p 8501:8501 \
-t tensorflow/serving:latest-gpu \
--model_config_file=/models/models.config
- 1.
- 2.
- 3.
- 4.
- 5.
- 6.
- 7.
- 8.
- 9.
- 10.
- 11.
- 12.
- 13.
- 14.
- 15.
- 16.
- 17.
- 18.
- 19.
- 20.
- 21.
- 22.
- 23.
- 24.
- 25.
- 26.
- 27.
- 28.
- 29.
- 30.
- 31.
- 32.
- 33.
- 34.
- 35.
- 36.
- 37.
- 38.
- 39.
3.3 TFserving服务调用
客户端可以通过gRpc和http方式调用TFserving服务模型,支持多种客户端语言,这里提供python的调用方式; 调用都是通过模型名称和签名来唯一对应一个模型
- gRpc调用, gRpc的端口是8500
#
# -*-coding:utf-8 -*-
import tensorflow as tf
from tensorflow_serving.apis import predict_pb2
from tensorflow_serving.apis import prediction_service_pb2_grpc
import grpc
import time
import numpy as np
import cv2
class YourModel(object):
    def __init__(self, socket):
        """
        Args:
            socket: host and port of the tfserving, like 192.168.0.3:8500
        """
        self.socket = socket
        start = time.time()
        self.request, selfself.stub = self.__get_request()
        end = time.time()
        print('initialize cost time: ' + str(end - start) + ' s')
    def __get_request(self):
        channel = grpc.insecure_channel(self.socket, options=[('grpc.max_send_message_length', 1024 * 1024 * 1024),
                                                              ('grpc.max_receive_message_length', 1024 * 1024 * 1024)]) # 可设置大小
        stub = prediction_service_pb2_grpc.PredictionServiceStub(channel)
        request = predict_pb2.PredictRequest()
        request.model_spec.name = "your_model"  # model name
        request.model_spec.signature_name = "your_model"  # model signature name
        return request, stub
    def run(self, image):
        """
        Args:
            image: the input image(rgb format)
        Returns: embedding is output of model
        """
        img = image[..., ::-1]
        self.request.inputs['input'].CopyFrom(tf.contrib.util.make_tensor_proto(img))  # images is input of model
        result = self.stub.Predict(self.request, 30.0)
        return tf.make_ndarray(result.outputs['output'])
    def run_file(self, image_file):
        """
        Args:
            image_file: the input image file
        Returns:
        """
        image = cv2.imread(image_file)
        image = cv2.cvtColor(image, cv2.COLOR_BGR2RGB)
        return self.run(image)
if __name__ == '__main__':
     model = YourModel('192.168.0.3:8500')
    test_file = './test.jpg'
    result = model.run_file(test_file)
    print(result)
    # [8.014745e-05 9.999199e-01]
- 1.
- 2.
- 3.
- 4.
- 5.
- 6.
- 7.
- 8.
- 9.
- 10.
- 11.
- 12.
- 13.
- 14.
- 15.
- 16.
- 17.
- 18.
- 19.
- 20.
- 21.
- 22.
- 23.
- 24.
- 25.
- 26.
- 27.
- 28.
- 29.
- 30.
- 31.
- 32.
- 33.
- 34.
- 35.
- 36.
- 37.
- 38.
- 39.
- 40.
- 41.
- 42.
- 43.
- 44.
- 45.
- 46.
- 47.
- 48.
- 49.
- 50.
- 51.
- 52.
- 53.
- restful api调用: restful端口是8501
import cv2
import requests
class SelfEncoder(json.JSONEncoder):
    def default(self, obj):
        if isinstance(obj, np.ndarray):
            return obj.tolist()
        elif isinstance(obj, np.floating):
            return float(obj)
        elif isinstance(obj, bytes):
            return str(obj, encoding='utf-8');
        return json.JSONEncoder.default(self, obj)
image_file = '/home/tfserving/test.jpg'
image = cv2.imread(image_file)
image = cv2.cvtColor(image, cv2.COLOR_BGR2RGB)
img = image[..., ::-1]
input_data = {
    "signature_name": "your_model",
    "instances": img
}
data = json.dumps(input_data, cls=SelfEncoder, indent=None)
result = requests.post("http://192.168.0.3:8501/v1/models/your_model:predict", datadata=data)
eval(result .content)
# {'predictions': [8.01474525e-05, 0.999919891]}
- 1.
- 2.
- 3.
- 4.
- 5.
- 6.
- 7.
- 8.
- 9.
- 10.
- 11.
- 12.
- 13.
- 14.
- 15.
- 16.
- 17.
- 18.
- 19.
- 20.
- 21.
- 22.
- 23.
5.总结
本文介绍了TFserving部署线上推理服务,从模型的转换,部署启动和调用推理,欢迎交流,希望对你有帮助。我们来回答下开篇提出的问题
- 用什么来部署:当然是TFserving
- 怎么提供api接口:TFserving有提供restful api接口,现实部署时会在前面再加一层如flask api
- 多个模型GPU资源如何分配:TFserving支持部署多模型,通过配置
- 线上模型如何更新而服务不中断:TFserving支持模型的不同的版本,如your_model中1和2两个版本,当你新增一个3模型时,TFserving会自动判断,自动加载模型3为当前模型,不需要重启