最近平台EFK版本均作了升级,平台采用EFK(ElasticSearch-7.6.2 + FileBeat-7.6.2 + Kibana-7.6.2)架构。这里建议三个组件主次版本保持一致。考虑到服务器比较多,所以写成脚本来批量部署。
脚本内容大家看一下function就行了..
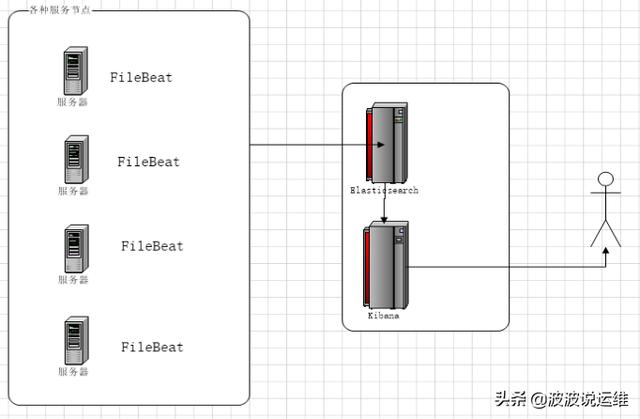
架构
EFK采用集中式的日志管理架构
- elasticsearch:一个开源分布式搜索引擎,提供搜集、分析、存储数据三大功能。它的特点有:分布式,零配置,自动发现,索引自动分片,索引副本机制,restful风格接口,多数据源,自动搜索负载等。
- kibana:可以为Logstash 、Beats和ElasticSearch提供友好的日志分析Web 界面,可以帮助汇总、分析和搜索重要数据日志。
- filebeat:轻量级日志采集器。需要在每个应用服务器配置filebeat,来采集日志,并输出到elasticsearch
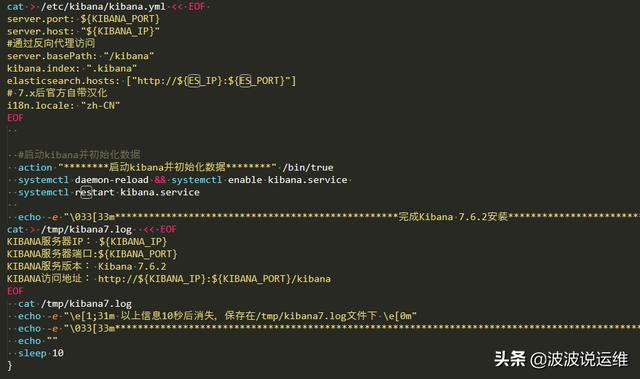
一键部署KIBANA脚本
- function install_es7_el7()
- {
- echo ""
- echo -e "\033[33m****************************************************安装ElasticSearch 7.6.2*****************************************************\033[0m"
- #action "********初始化JAVA环境********" /bin/true
- #install_jdk
- #下载包
- if [ -f /opt/elasticsearch-7.6.2-x86_64.rpm ] && [ -f /opt/elasticsearch-analysis-ik-7.6.2.zip ] ;then
- echo "*****存在ElasticSearch 7.6.2安装包,无需下载*****"
- else
- ping -c 4 artifacts.elastic.co >/dev/null 2>&1
- if [ $? -eq 0 ];then
- wget https://artifacts.elastic.co/downloads/elasticsearch/elasticsearch-7.6.2-x86_64.rpm -O /opt/elasticsearch-7.6.2-x86_64.rpm
- wget https://github.com/medcl/elasticsearch-analysis-ik/releases/download/v7.6.2/elasticsearch-analysis-ik-7.6.2.zip -O /opt/elasticsearch-analysis-ik-7.6.2.zip
- else
- echo "please download ES7 package manual !"
- exit $?
- fi
- fi
- #安装es7.6
- action "********安装ElasticSearch 7.6.2服务********" /bin/true
- chmod u+x /opt/elasticsearch-7.6.2-x86_64.rpm && rpm -ivh /opt/elasticsearch-7.6.2-x86_64.rpm
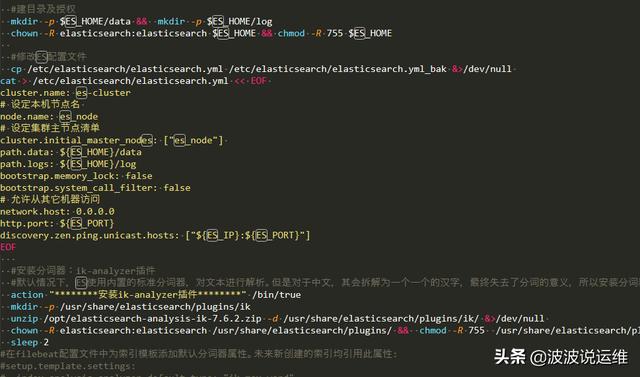
- #建目录及授权
- mkdir -p $ES_HOME/data && mkdir -p $ES_HOME/log
- chown -R elasticsearch:elasticsearch $ES_HOME && chmod -R 755 $ES_HOME
- #修改ES配置文件
- cp /etc/elasticsearch/elasticsearch.yml /etc/elasticsearch/elasticsearch.yml_bak &>/dev/null
- cat > /etc/elasticsearch/elasticsearch.yml << EOF
- cluster.name: es-cluster
- # 设定本机节点名
- node.name: es_node
- # 设定集群主节点清单
- cluster.initial_master_nodes: ["es_node"]
- path.data: ${ES_HOME}/data
- path.logs: ${ES_HOME}/log
- bootstrap.memory_lock: false
- bootstrap.system_call_filter: false
- # 允许从其它机器访问
- network.host: 0.0.0.0
- http.port: ${ES_PORT}
- discovery.zen.ping.unicast.hosts: ["${ES_IP}:${ES_PORT}"]
- EOF
- #安装分词器:ik-analyzer插件
- #默认情况下,ES使用内置的标准分词器,对文本进行解析。但是对于中文,其会拆解为一个一个的汉字,最终失去了分词的意义,所以安装分词器:ik-analyzer插件
- action "********安装ik-analyzer插件********" /bin/true
- mkdir -p /usr/share/elasticsearch/plugins/ik
- unzip /opt/elasticsearch-analysis-ik-7.6.2.zip -d /usr/share/elasticsearch/plugins/ik/ &>/dev/null
- chown -R elasticsearch:elasticsearch /usr/share/elasticsearch/plugins/ && chmod -R 755 /usr/share/elasticsearch/plugins/
- sleep 2
- #在filebeat配置文件中为索引模板添加默认分词器属性。未来新创建的索引均引用此属性:
- #setup.template.settings:
- # index.analysis.analyzer.default.type: "ik_max_word"
- # index.analysis.analyzer.default_search.type: "ik_max_word"
- #setup.template.overwrite: true
- #在Linux终端中执行如下命令,为现有所有索引,设置默认分词器属性:
- #curl -X POST "172.16.20.143:9200/_all/_close"
- #curl -X PUT -H'Content-Type: application/json' 'http://172.16.20.143:9200/_all/_settings?preserve_existing=true' -d '{
- # "index.analysis.analyzer.default.type" : "ik_max_word",
- # "index.analysis.analyzer.default_search.type" : "ik_max_word"
- #}'
- #curl -X POST "172.16.20.143:9200/_all/_open"
- #启动ES并初始化数据
- action "********启动es并初始化数据********" /bin/true
- systemctl daemon-reload && systemctl enable elasticsearch.service
- systemctl restart elasticsearch.service
- es_version=`curl -XGET ${ES_IP}:${ES_PORT}`
- echo -e "\033[33m**************************************************完成ElasticSearch 7.6.2安装***************************************************\033[0m"
- cat > /tmp/es7.log << EOF
- ES服务器IP: ${ES_IP}
- ES服务器端口:${ES_PORT}
- ES数据目录: ${ES_HOME}/data
- ES日志目录: ${ES_HOME}/log
- ES详细信息: ${es_version}
- EOF
- cat /tmp/es7.log
- echo -e "\e[1;31m 以上信息10秒后消失,保存在/tmp/es7.log文件下 \e[0m"
- echo -e "\033[33m************************************************************************************************************************\033[0m"
- echo ""
- sleep 10
- }
一键部署Elasticsearch脚本
- function install_es7_el7()
- {
- echo ""
- echo -e "\033[33m****************************************************安装ElasticSearch 7.6.2*****************************************************\033[0m"
- #action "********初始化JAVA环境********" /bin/true
- #install_jdk
- #下载包
- if [ -f /opt/elasticsearch-7.6.2-x86_64.rpm ] && [ -f /opt/elasticsearch-analysis-ik-7.6.2.zip ] ;then
- echo "*****存在ElasticSearch 7.6.2安装包,无需下载*****"
- else
- ping -c 4 artifacts.elastic.co >/dev/null 2>&1
- if [ $? -eq 0 ];then
- wget https://artifacts.elastic.co/downloads/elasticsearch/elasticsearch-7.6.2-x86_64.rpm -O /opt/elasticsearch-7.6.2-x86_64.rpm
- wget https://github.com/medcl/elasticsearch-analysis-ik/releases/download/v7.6.2/elasticsearch-analysis-ik-7.6.2.zip -O /opt/elasticsearch-analysis-ik-7.6.2.zip
- else
- echo "please download ES7 package manual !"
- exit $?
- fi
- fi
- #安装es7.6
- action "********安装ElasticSearch 7.6.2服务********" /bin/true
- chmod u+x /opt/elasticsearch-7.6.2-x86_64.rpm && rpm -ivh /opt/elasticsearch-7.6.2-x86_64.rpm
- #建目录及授权
- mkdir -p $ES_HOME/data && mkdir -p $ES_HOME/log
- chown -R elasticsearch:elasticsearch $ES_HOME && chmod -R 755 $ES_HOME
- #修改ES配置文件
- cp /etc/elasticsearch/elasticsearch.yml /etc/elasticsearch/elasticsearch.yml_bak &>/dev/null
- cat > /etc/elasticsearch/elasticsearch.yml << EOF
- cluster.name: es-cluster
- # 设定本机节点名
- node.name: es_node
- # 设定集群主节点清单
- cluster.initial_master_nodes: ["es_node"]
- path.data: ${ES_HOME}/data
- path.logs: ${ES_HOME}/log
- bootstrap.memory_lock: false
- bootstrap.system_call_filter: false
- # 允许从其它机器访问
- network.host: 0.0.0.0
- http.port: ${ES_PORT}
- discovery.zen.ping.unicast.hosts: ["${ES_IP}:${ES_PORT}"]
- EOF
- #安装分词器:ik-analyzer插件
- #默认情况下,ES使用内置的标准分词器,对文本进行解析。但是对于中文,其会拆解为一个一个的汉字,最终失去了分词的意义,所以安装分词器:ik-analyzer插件
- action "********安装ik-analyzer插件********" /bin/true
- mkdir -p /usr/share/elasticsearch/plugins/ik
- unzip /opt/elasticsearch-analysis-ik-7.6.2.zip -d /usr/share/elasticsearch/plugins/ik/ &>/dev/null
- chown -R elasticsearch:elasticsearch /usr/share/elasticsearch/plugins/ && chmod -R 755 /usr/share/elasticsearch/plugins/
- sleep 2
- #在filebeat配置文件中为索引模板添加默认分词器属性。未来新创建的索引均引用此属性:
- #setup.template.settings:
- # index.analysis.analyzer.default.type: "ik_max_word"
- # index.analysis.analyzer.default_search.type: "ik_max_word"
- #setup.template.overwrite: true
- #在Linux终端中执行如下命令,为现有所有索引,设置默认分词器属性:
- #curl -X POST "172.16.20.143:9200/_all/_close"
- #curl -X PUT -H'Content-Type: application/json' 'http://172.16.20.143:9200/_all/_settings?preserve_existing=true' -d '{
- # "index.analysis.analyzer.default.type" : "ik_max_word",
- # "index.analysis.analyzer.default_search.type" : "ik_max_word"
- #}'
- #curl -X POST "172.16.20.143:9200/_all/_open"
- #启动ES并初始化数据
- action "********启动es并初始化数据********" /bin/true
- systemctl daemon-reload && systemctl enable elasticsearch.service
- systemctl restart elasticsearch.service
- es_version=`curl -XGET ${ES_IP}:${ES_PORT}`
- echo -e "\033[33m**************************************************完成ElasticSearch 7.6.2安装***************************************************\033[0m"
- cat > /tmp/es7.log << EOF
- ES服务器IP: ${ES_IP}
- ES服务器端口:${ES_PORT}
- ES数据目录: ${ES_HOME}/data
- ES日志目录: ${ES_HOME}/log
- ES详细信息: ${es_version}
- EOF
- cat /tmp/es7.log
- echo -e "\e[1;31m 以上信息10秒后消失,保存在/tmp/es7.log文件下 \e[0m"
- echo -e "\033[33m************************************************************************************************************************\033[0m"
- echo ""
- sleep 10
- }
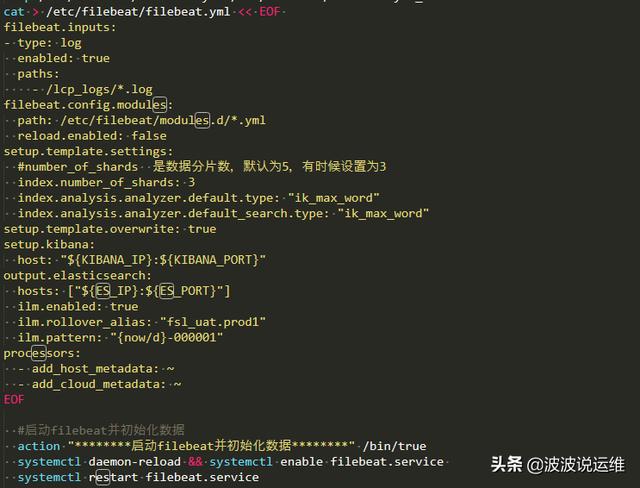
一键部署filebeat脚本
- function install_filebeat7_el7()
- {
- echo ""
- echo -e "\033[33m****************************************************安装Filebeat 7.6.2*****************************************************\033[0m"
- #下载包
- if [ -f /opt/filebeat-7.6.2-x86_64.rpm ] ;then
- echo "*****存在Filebeat 7.6.2安装包,无需下载*****"
- else
- ping -c 4 artifacts.elastic.co >/dev/null 2>&1
- if [ $? -eq 0 ];then
- wget https://artifacts.elastic.co/downloads/beats/filebeat/filebeat-7.6.2-x86_64.rpm -O /opt/filebeat-7.6.2-x86_64.rpm
- else
- echo "please download Filebeat7.6 package manual !"
- exit $?
- fi
- fi
- #安装filebeat7.6
- action "********安装filebeat 7.6.2服务********" /bin/true
- chmod u+x /opt/filebeat-7.6.2-x86_64.rpm && rpm -ivh /opt/filebeat-7.6.2-x86_64.rpm
- #修改kibana配置文件
- cp /etc/filebeat/filebeat.yml /etc/filebeat/filebeat.yml_bak
- cat > /etc/filebeat/filebeat.yml << EOF
- filebeat.inputs:
- - type: log
- enabled: true
- paths:
- - /lcp_logs/*.log
- filebeat.config.modules:
- path: /etc/filebeat/modules.d/*.yml
- reload.enabled: false
- setup.template.settings:
- #number_of_shards 是数据分片数,默认为5,有时候设置为3
- index.number_of_shards: 3
- index.analysis.analyzer.default.type: "ik_max_word"
- index.analysis.analyzer.default_search.type: "ik_max_word"
- setup.template.overwrite: true
- setup.kibana:
- host: "${KIBANA_IP}:${KIBANA_PORT}"
- output.elasticsearch:
- hosts: ["${ES_IP}:${ES_PORT}"]
- ilm.enabled: true
- ilm.rollover_alias: "fsl_uat.prod1"
- ilm.pattern: "{now/d}-000001"
- processors:
- - add_host_metadata: ~
- - add_cloud_metadata: ~
- EOF
- #启动filebeat并初始化数据
- action "********启动filebeat并初始化数据********" /bin/true
- systemctl daemon-reload && systemctl enable filebeat.service
- systemctl restart filebeat.service
- #nohup ./filebeat -e -c filebeat.yml >/dev/null 2>&1 &
- echo -e "\033[33m**************************************************完成Filebeat 7.6.2安装***************************************************\033[0m"
- cat > /tmp/filebeat7.log << EOF
- filebeat版本: 7.6.2
- filebeat路径: /usr/bin/filebeat
- filebeat配置kibana: ${KIBANA_IP}:${KIBANA_PORT}
- filebeat配置elasticsearch: ${ES_IP}:${ES_PORT}
- EOF
- cat /tmp/filebeat7.log
- echo -e "\e[1;31m 以上信息10秒后消失,保存在/tmp/filebeat7.log文件下 \e[0m"
- echo -e "\033[33m************************************************************************************************************************\033[0m"
- echo ""
- sleep 10
- }