从自动驾驶汽车检测路上的物体,到通过复杂的面部及身体语言识别发现可能的犯罪活动。多年来,研究人员一直在探索让机器通过视觉识别物体的可能性。
这一特殊领域被称为计算机视觉 (Computer Vision, CV),在现代生活中有着广泛的应用。
目标检测 (ObjectDetection) 也是计算机视觉最酷的应用之一,这是不容置疑的事实。
现在的CV工具能够轻松地将目标检测应用于图片甚至是直播视频。本文将简单地展示如何用TensorFlow创建实时目标检测器。
建立一个简单的目标检测器
1. 设置要求:
- TensorFlow版本在1.15.0或以上
- 执行pip install TensorFlow安装最新版本
一切就绪,现在开始吧!
2. 设置环境
第一步:从Github上下载或复制TensorFlow目标检测的代码到本地计算机
在终端运行如下命令:
- git clonehttps://github.com/tensorflow/models.git
第二步:安装依赖项
下一步是确定计算机上配备了运行目标检测器所需的库和组件。
下面列举了本项目所依赖的库。(大部分依赖都是TensorFlow自带的)
- Cython
- contextlib2
- pillow
- lxml
- matplotlib
若有遗漏的组件,在运行环境中执行pip install即可。
第三步:安装Protobuf编译器
谷歌的Protobuf,又称Protocol buffers,是一种语言无关、平台无关、可扩展的序列化结构数据的机制。Protobuf帮助程序员定义数据结构,轻松地在各种数据流中使用各种语言进行编写和读取结构数据。
Protobuf也是本项目的依赖之一。点击这里了解更多关于Protobufs的知识。接下来把Protobuf安装到计算机上。
打开终端或者打开命令提示符,将地址改为复制的代码仓库,在终端执行如下命令:
- cd models/research
- wget -Oprotobuf.zip https://github.com/protocolbuffers/protobuf/releases/download/v3.9.1/protoc-3.9.1-osx-x86_64.zip
- unzipprotobuf.zip
注意:请务必在models/research目录解压protobuf.zip文件。
来源:Pexels
第四步:编辑Protobuf编译器
从research/ directory目录中执行如下命令编辑Protobuf编译器:
- ./bin/protoc object_detection/protos/*.proto--python_out=.
用Python实现目标检测
现在所有的依赖项都已经安装完毕,可以用Python实现目标检测了。
在下载的代码仓库中,将目录更改为:
- models/research/object_detection
这个目录下有一个叫object_detection_tutorial.ipynb的ipython notebook。该文件是演示目标检测算法的demo,在执行时会用到指定的模型:
- ssd_mobilenet_v1_coco_2017_11_17
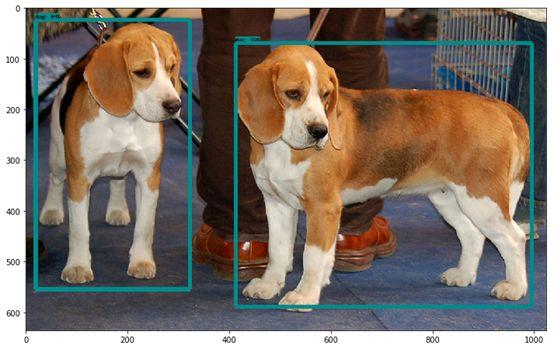
这一测试会识别代码库中提供的两张测试图片。下面是测试结果之一:

要检测直播视频中的目标还需要一些微调。在同一文件夹中新建一个Jupyter notebook,按照下面的代码操作:
[1]:
- import numpy as np
- import os
- import six.moves.urllib as urllib
- import sys
- import tarfile
- import tensorflow as tf
- import zipfile
- from distutils.version import StrictVersion
- from collections import defaultdict
- from io import StringIO
- from matplotlib import pyplot as plt
- from PIL import Image
- # This isneeded since the notebook is stored in the object_detection folder.
- sys.path.append("..")
- from utils import ops as utils_ops
- if StrictVersion(tf.__version__) < StrictVersion( 1.12.0 ):
- raise ImportError( Please upgrade your TensorFlow installation to v1.12.*. )
[2]:
- # This isneeded to display the images.
- get_ipython().run_line_magic( matplotlib , inline )
[3]:
- # Objectdetection imports
- # Here arethe imports from the object detection module.
- from utils import label_map_util
- from utils import visualization_utils as vis_util
[4]:
- # Modelpreparation
- # Anymodel exported using the `export_inference_graph.py` tool can be loaded heresimply by changing `PATH_TO_FROZEN_GRAPH` to point to a new .pb file.
- # Bydefault we use an "SSD with Mobilenet" model here.
- #See https://github.com/tensorflow/models/blob/master/research/object_detection/g3doc/detection_model_zoo.md
- #for alist of other models that can be run out-of-the-box with varying speeds andaccuracies.
- # Whatmodel to download.
- MODEL_NAME= ssd_mobilenet_v1_coco_2017_11_17
- MODEL_FILE= MODEL_NAME + .tar.gz
- DOWNLOAD_BASE= http://download.tensorflow.org/models/object_detection/
- # Path tofrozen detection graph. This is the actual model that is used for the objectdetection.
- PATH_TO_FROZEN_GRAPH= MODEL_NAME + /frozen_inference_graph.pb
- # List ofthe strings that is used to add correct label for each box.
- PATH_TO_LABELS= os.path.join( data , mscoco_label_map.pbtxt )
[5]:
- #DownloadModel
- opener =urllib.request.URLopener()
- opener.retrieve(DOWNLOAD_BASE+ MODEL_FILE, MODEL_FILE)
- tar_file =tarfile.open(MODEL_FILE)
- for file in tar_file.getmembers():
- file_name= os.path.basename(file.name)
- if frozen_inference_graph.pb in file_name:
- tar_file.extract(file,os.getcwd())
[6]:
- # Load a(frozen) Tensorflow model into memory.
- detection_graph= tf.Graph()
- with detection_graph.as_default():
- od_graph_def= tf.GraphDef()
- withtf.gfile.GFile(PATH_TO_FROZEN_GRAPH, rb ) as fid:
- serialized_graph= fid.read()
- od_graph_def.ParseFromString(serialized_graph)
- tf.import_graph_def(od_graph_def,name= )
[7]:
- # Loadinglabel map
- # Labelmaps map indices to category names, so that when our convolution networkpredicts `5`,
- #we knowthat this corresponds to `airplane`. Here we use internal utilityfunctions,
- #butanything that returns a dictionary mapping integers to appropriate stringlabels would be fine
- category_index= label_map_util.create_category_index_from_labelmap(PATH_TO_LABELS,use_display_name=True)
[8]:
- defrun_inference_for_single_image(image, graph):
- with graph.as_default():
- with tf.Session() as sess:
- # Get handles to input and output tensors
- ops= tf.get_default_graph().get_operations()
- all_tensor_names= {output.name for op in ops for output in op.outputs}
- tensor_dict= {}
- for key in [
- num_detections , detection_boxes , detection_scores ,
- detection_classes , detection_masks ]:
- tensor_name= key + :0
- if tensor_name in all_tensor_names:
- tensor_dict[key]= tf.get_default_graph().get_tensor_by_name(tensor_name)
- if detection_masks in tensor_dict:
- # The following processing is only for single image
- detection_boxes= tf.squeeze(tensor_dict[ detection_boxes ], [0])
- detection_masks= tf.squeeze(tensor_dict[ detection_masks ], [0])
- # Reframe is required to translate mask from boxcoordinates to image coordinates and fit the image size.
- real_num_detection= tf.cast(tensor_dict[ num_detections ][0], tf.int32)
- detection_boxes= tf.slice(detection_boxes, [0, 0], [real_num_detection, -1])
- detection_masks= tf.slice(detection_masks, [0, 0, 0], [real_num_detection, -1, -1])
- detection_masks_reframed= utils_ops.reframe_box_masks_to_image_masks(
- detection_masks,detection_boxes, image.shape[1],image.shape[2])
- detection_masks_reframed= tf.cast(
- tf.greater(detection_masks_reframed,0.5),tf.uint8)
- # Follow the convention by adding back the batchdimension
- tensor_dict[ detection_masks ] =tf.expand_dims(
- detection_masks_reframed,0)
- image_tensor= tf.get_default_graph().get_tensor_by_name( image_tensor:0 )
- # Run inference
- output_dict= sess.run(tensor_dict, feed_dict={image_tensor: image})
- # all outputs are float32 numpy arrays, so convert typesas appropriate
- output_dict[ num_detections ] =int(output_dict[ num_detections ][0])
- output_dict[ detection_classes ] =output_dict[
- detection_classes ][0].astype(np.int64)
- output_dict[ detection_boxes ] =output_dict[ detection_boxes ][0]
- output_dict[ detection_scores ] =output_dict[ detection_scores ][0]
- if detection_masks in output_dict:
- output_dict[ detection_masks ] =output_dict[ detection_masks ][0]
- return output_dict
[9]:
- import cv2
- cam =cv2.cv2.VideoCapture(0)
- rolling = True
- while (rolling):
- ret,image_np = cam.read()
- image_np_expanded= np.expand_dims(image_np, axis=0)
- # Actual detection.
- output_dict= run_inference_for_single_image(image_np_expanded, detection_graph)
- # Visualization of the results of a detection.
- vis_util.visualize_boxes_and_labels_on_image_array(
- image_np,
- output_dict[ detection_boxes ],
- output_dict[ detection_classes ],
- output_dict[ detection_scores ],
- category_index,
- instance_masks=output_dict.get( detection_masks ),
- use_normalized_coordinates=True,
- line_thickness=8)
- cv2.imshow( image , cv2.resize(image_np,(1000,800)))
- if cv2.waitKey(25) & 0xFF == ord( q ):
- break
- cv2.destroyAllWindows()
- cam.release()
在运行Jupyter notebook时,网络摄影系统会开启并检测所有原始模型训练过的物品类别。


