一、端口隔离简介
为了实现端口间的二层隔离,可以将不同的端口加入不同的 VLAN,但 VLAN 资源有限。采用端口隔离特性,用户只需要将端口加入到隔离组中,就可以实现隔离组内端口之间二层隔离,而不关心这些端口所属 VLAN,从而节省 VLAN 资源。
隔离组内的端口与未加入隔离组的端口之间二层流量双向互通。
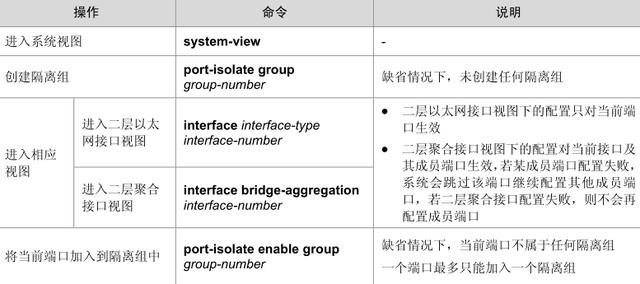
1. 配置隔离组
设备支持多个隔离组,用户可以手工配置。隔离组内可以加入的端口数量没有限制。
2. 端口隔离显示和维护
在完成上述配置后,在任意视图下执行 display 命令可以显示配置后端口隔离的运行情况,通过查看显示信息验证配置的效果。
display port-isolate group [ group-number ]
- 1.
二、端口隔离典型配置举例
1. 组网需求
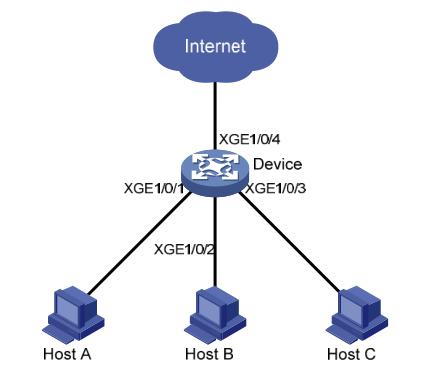
小区用户Host A、Host B、Host C分别与Device的端口Ten-GigabitEthernet1/0/1、Ten-GigabitEthernet1/0/2 、 Ten-GigabitEthernet1/0/3 相 连 , Device 设 备 通 过Ten-GigabitEthernet1/0/4 端口与外部网络相连。现需要实现小区用户Host A、Host B和Host C彼此之间二层报文不能互通,但可以和外部网络通信。
2. 组网图
3. 配置步骤
# 创建隔离组 2。
<Device> system-view
[Device] port-isolate group 2
# 将端口 Ten-GigabitEthernet1/0/1、Ten-GigabitEthernet1/0/2、Ten-GigabitEthernet1/0/3 加入隔离组 2。
[Device] interface ten-gigabitethernet 1/0/1
[Device-Ten-GigabitEthernet1/0/1] port-isolate enable group 2
[Device-Ten-GigabitEthernet1/0/1] quit
[Device] interface ten-gigabitethernet 1/0/2
[Device-Ten-GigabitEthernet1/0/2] port-isolate enable group 2
[Device-Ten-GigabitEthernet1/0/2] quit
[Device] interface ten-gigabitethernet 1/0/3
[Device-Ten-GigabitEthernet1/0/3] port-isolate enable group 2
- 1.
- 2.
- 3.
- 4.
- 5.
- 6.
- 7.
- 8.
- 9.
- 10.
- 11.
- 12.
4. 验证配置
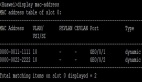
# 显示隔离组 2 中的信息。
[Device] display port-isolate group 2
Port isolation group information:
Group ID: 2
Group members:
Ten-GigabitEthernet1/0/1
Ten-GigabitEthernet1/0/2
Ten-GigabitEthernet1/0/3
- 1.
- 2.
- 3.
- 4.
- 5.
- 6.
- 7.
- 8.
以 上 信 息 显 示 Device 上 的 端 口 Ten-GigabitEthernet1/0/1 、 Ten-GigabitEthernet1/0/2 、Ten-GigabitEthernet1/0/3 已经加入隔离组 2,从而实现二层隔离,分别对应的 Host A、Host B 和Host C 彼此之间不能 Ping 通。