当我学习 React 的时候,我觉得它所做的一切都是魔术,然后我就开始思考这种魔术究竟是什么。我感到非常惊讶,当我发现 React 所做的一切非常简单,甚至如果我们不是下一家大型初创公司增加筹码,仅需要很少的JS代码就可以构建它。这也是促使我写这篇文章的动力,希望你读完这篇文章也有相同的感觉。
我们将构建什么功能?
- JSX
- 函数组件
- 类组件
- 生命周期钩子函数
我们不会构建什么?
虚拟DOM
再次为了简单起见,我们不会在本文中实现我们自己的虚拟DOM,我们将使用 snabbdom ,有趣的是,Vue.js 虚拟DOM借鉴了它,你可以在这里读更多关于 snabbdom 的内容: https://github.com/snabbdom/s...
React Hooks
有些人可能对此感动失望,但是,一口吃不成一个胖子,我们需要一步一步来,因此让我们首先构建基本的东西,然后再在此基础上加以补充。我计划后续文章中在我们此次构建的内容之上,编写我们自己的 React Hooks 以及虚拟DOM,
可调试性
这是增加任何库或框架的复杂度的关键部分之一,由于我们只是出于娱乐目的而做,因此我们可以放心地忽略 React 提供的可调试性功能,例如 dev tools 和分析器。
性能和兼容性
我们不会过于关注我们的库的性能,我们只想构建能正常运行的库。让我们也不要费力地确保它可以在市场上的所有浏览器上使用,只有能够在某些现代浏览器上可以使用,那就已经很好了。
让我们开始动手
在开始之前,我们需要一个支持ES6,自动热更新的脚手架。我已经创建了一个非常基础的 webpack 脚手架,你可以进行克隆和设置: https://github.com/ameertheha...
JSX
JSX 是一个开放标准,不仅限于 React,我们可以在没有 React 的情况下使用它,它比你想象得还有容易。想要了解如何让我们的库支持 JSX ,我们首先需要看看在我们使用 JSX 时背后究竟发生了什么。
- const App = (
- <div>
- <h1 className="primary">QndReact is Quick and dirty react</h1>
- <p>It is about building your own React in 90 lines of JavsScript</p>
- </div>
- );
- // 上面的 jsx 被转换成下面这样:
- /**
- * React.createElement(type, attributes, children)
- */
- var App = React.createElement(
- "div",
- null,
- React.createElement(
- "h1",
- {
- className: "primary"
- },
- "QndReact is Quick and dirty react"
- ),
- React.createElement(
- "p",
- null,
- "It is about building your own React in 90 lines of JavsScript"
- )
- );
正如你看到的,每个 JSX 元素都通过 @babel/plugin-transform-react-jsx 插件转换为了 React.createElement(...) 函数调用的形式,你可以在这里使用 JSX 进行更多的转换
为了使上述转换运行正常,在编写 JSX 时,你需要引入 React,你就是为什么当你不引入 React 时,编写 JSX 会出现错误的原因。 @babel/plugin-transform-react-jsx 插件已经添加在了我们的项目依赖中,下面我们先安装一下依赖
- npm install
把项目的配置增加到 .babelrc 文件中:
- {
- "plugins": [
- [
- "@babel/plugin-transform-react-jsx",
- {
- "pragma": "QndReact.createElement", // default pragma is React.createElement
- "throwIfNamespace": false // defaults to true
- }
- ]
- ]
- }
此后,只要 Babel 看到 JSX ,它就会调用 QntReact.createElement(...),但是我们还未定义此函数,现在我们将其写到 src/qnd-react.js 中。
- const createElement = (type, props = {}, ...children) => {
- console.log(type, props, children);
- };
- // 像 React.createElement 一样导出
- const QndReact = {
- createElement
- };
- export default QndReact;
我们在控制台打印出了传递给我们的 type 、 props、 children。为了测试我们的转换是否正常,我们可以在 src/index.js 中编写一些 JSX 。
- // QndReact 需要被引入
- import QndReact from "./qnd-react";
- const App = (
- <div>
- <h1 className="primary">
- QndReact is Quick and dirty react
- </h1>
- <p>It is about building your own React in 90 lines of JavsScript</p>
- </div>
- );
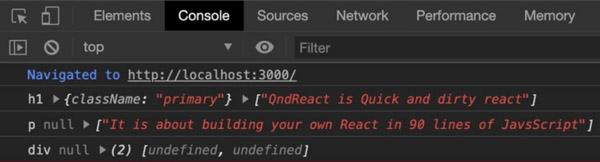
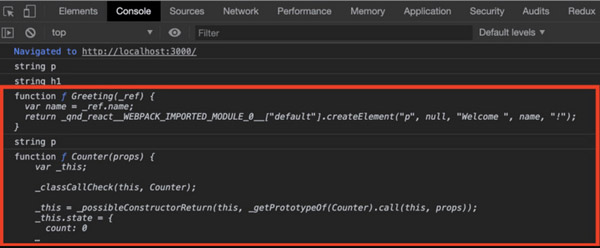
启动项目: npm start,在浏览器输入localhost:3000,现在你的控制台看起来应该与下图类似:
根据以上信息,我们可以使用 snabbdom 创建我们内部的 虚拟DOM节点 ,然后我们才能将其用于我们的协调(reconciliation) 过程,可以使用如下的命令安装 snabbdom:
- npm install snabbdom
当 QndReact.createElement(...) 被调用时吗,创建和返回 虚拟DOM节点。
- //src/qnd-react.js
- import { h } from 'snabbdom';
- const createElement = (type, props = {}, ...children) => {
- return h(type, { props }, children);
- };
- const QndReact = {
- createElement
- };
- export default QndReact;
很好,现在我们可以解析 JSX 并创建自己的虚拟DOM节点,但是仍然无法在浏览器中呈现出来。为此,我们在 src/qnd-react-dom.js 添加一个 render 方法。
- //src/qnd-react-dom.js
- //React.render(<App />, document.getElementById('root'));
- const render = (el, rootElement) => {
- //将el渲染到rootElement的逻辑
- }
- const QndReactDom = {
- render
- }
与其我们自己去处理将元素放到 DOM 上的繁重工作,不如让 snabbdom 去处理。为此我们可以引入模块去初始化 snabbdom。snabbdom 中的模块可以看做是插件,可以支持 snabbdom 做更多的事。
- //src/qnd-react-dom.js
- import * as snabbdom from 'snabbdom';
- import propsModule from 'snabbdom/modules/props';
- const reconcile = snabbdom.init([propsModule]);
- const render = (el, rootDomElement) => {
- //将el渲染到rootElement
- reconcile(rootDomElement, el);
- }
- const QndReactDom = {
- render
- }
- export default QndReactDom;
我们使用这个新的 render 函数去 src/index 中去做一些魔法。
- //src/index.js
- import QndReact from "./qnd-react";
- import QndReactDom from './qnd-react-dom';
- const App = (
- <div>
- <h1 className="primary">
- QndReact is Quick and dirty react
- </h1>
- <p>It is about building your own React in 90 lines of JavsScript</p>
- </div>
- );
- QndReactDom.render(App, document.getElementById('root'));
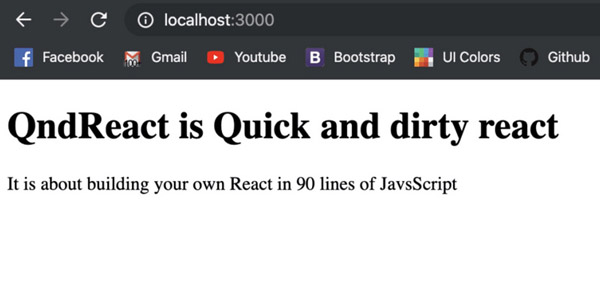
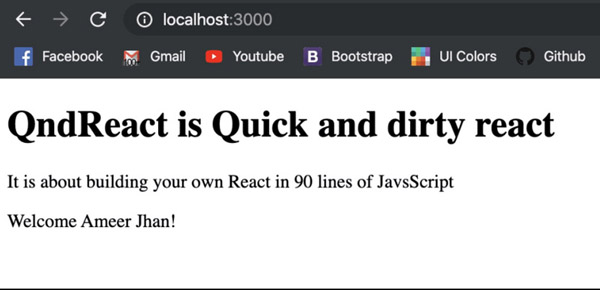
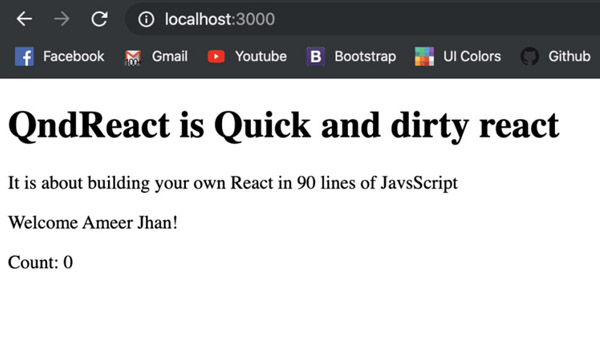
瞧,我们的JSX已经可以渲染到屏幕上了。
等下,这个有一个小问题,当我们两次调用 render 时,我们会在控制台看到一些奇怪的错误(译者注: 可以在 index.js 中多次调用 render,查看控制台错误),背后的原因是我们只有在第一次渲染时,可以在真实的DOM节点上调用 reconcile 方法,然后,我们应该在之前返回的虚拟DOM节点上调用。
- //src/qnd-react-dom.js
- import * as snabbdom from 'snabbdom';
- import propsModule from 'snabbdom/modules/props';
- const reconcile = snabbdom.init([propsModule]);
- let rootVNode;
- //QndReactDom.render(App, document.getElementById('root'))
- const render = (el, rootDomElement) => {
- if(rootVNode == null) {
- //第一次调用 render 时
- rootVNode = rootDomElement;
- }
- rootVNode = reconcile(rootVNode, el);
- }
- const QndReactDom = {
- render
- }
- export default QndReactDom;
很开心,我们的应用程序中有一个能正常工作的 JSX 渲染,现在让我们开始渲染一个函数组件,而不仅仅是一些普通的 HTML。
让我们向 src/index.js 添加一个 Greeting 函数组件,如下所示:
- //src/index.js
- import QndReact from "./qnd-react";
- import QndReactDom from './qnd-react-dom';
- const Greeting = ({ name }) => <p>Welcome {name}!</p>;
- const App = (
- <div>
- <h1 className="primary">
- QndReact is Quick and dirty react
- </h1>
- <p>It is about building your own React in 90 lines of JavsScript</p>
- <Greeting name={"Ameer Jhan"} />
- </div>
- );
- QndReactDom.render(App, document.getElementById('root'));
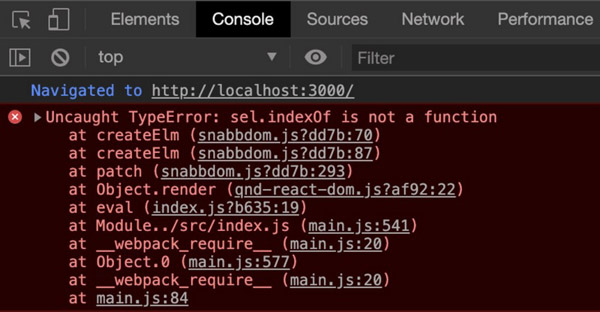
此时,在控制台会出现以下错误:
我们可以在 QndReact.createElement(...) 方法中打印出数据看一下原因。
- //src/qnd-react.js
- import { h } from 'snabbdom';
- const createElement = (type, props = {}, ...children) => {
- console.log(type, props, children);
- return h(type, { props }, children);
- };
- ...
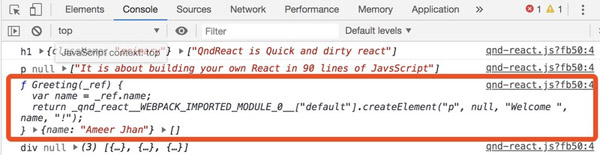
如果可以看到,函数组件传递过来的 type 是一个JS函数。如果我们调用这个函数,就能获得组件希望渲染的 HTML 结果。
我们根据 type 参数的类型,如果是函数类型,我们就调用这个函数,并将 props 作为参数传给它,如果不是函数类型,我们就当作普通的 HTML 元素处理。
- //src/qnd-react.js
- import { h } from 'snabbdom';
- const createElement = (type, props = {}, ...children) => {
- //如果是函数组件,那么调用它,并返回执行结果
- if (typeof (type) == 'function') {
- return type(props);
- }
- return h(type, { props }, children);
- };
- const QndReact = {
- createElement
- };
- export default QndReact;
欢呼!我们的函数组件已经可以正常工作了。
我们已经完成了很多,让我们深吸一口气,喝杯咖啡,因为我们已经差不多实现了 React,不过我们还需要攻克类组件。
我们首先在 src/qnd-react.js 中创建 Component 基类:
- //src/qnd-react.js
- import { h } from 'snabbdom';
- const createElement = (type, props = {}, ...children) => {
- //如果是函数组件,那么调用它,并返回执行结果
- if (typeof (type) == 'function') {
- return type(props);
- }
- return h(type, { props }, children);
- };
- class Component {
- constructor() { }
- componentDidMount() { }
- setState(partialState) { }
- render() { }
- }
- const QndReact = {
- createElement,
- Component
- };
- export default QndReact;
现在我们在 src/counter.js 中编写我们的第一个 Counter 类组件:
- //src/counter.js
- import QndReact from './qnd-react';
- export default class Counter extends QndReact.Component {
- constructor(props) {
- super(props);
- this.state = {
- count: 0
- }
- }
- componentDidMount() {
- console.log('Component mounted');
- }
- render() {
- return <p>Count: {this.state.count}</p>
- }
- }
是的,我知道我们尚未在计数器中实现任何逻辑,但是别担心,一旦我们的状态管理系统运行正常,我们就会添加这些内容。现在,让我们尝试在 src/index.js 中渲染它。
- //src/index.js
- import QndReact from "./qnd-react";
- import QndReactDom from './qnd-react-dom';
- import Counter from "./counter";
- const Greeting = ({ name }) => <p>Welcome {name}!</p>;
- const App = (
- <div>
- <h1 className="primary">
- QndReact is Quick and dirty react
- </h1>
- <p>It is about building your own React in 90 lines of JavsScript</p>
- <Greeting name={"Ameer Jhan"} />
- <Counter />
- </div>
- );
- QndReactDom.render(App, document.getElementById('root'));
和料想中的一样,又又又报错了。
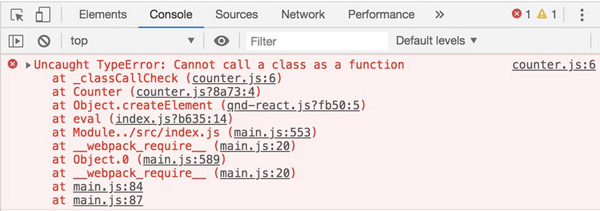
上面的错误看起来是不是很熟悉,当你尝试使用类组件而不集成自 React.Component 时,可能遇到过以上错误。要知道为什么会这样,我们可以在 React.createElement(...) 中添加一个 console.log,如下所示:
- //src/qnd-react.js
- import { h } from 'snabbdom';
- const createElement = (type, props = {}, ...children) => {
- console.log(typeof (type), type);
- //如果是函数组件,那么调用它,并返回执行结果
- if (typeof (type) == 'function') {
- return type(props);
- }
- return h(type, { props }, children);
- };
我们来看看控制台打印了什么内容。
你可以看出 Counter 的 type 类型也是函数,这是因为 Babel 会将 ES6 类转换为普通的 JS 函数,那么我们该如何类组件的情况呢。其实,我们可以在我们的 Component 基类中添加一个静态属性,这样我们利用该属性去检查 type 参数是否是一个类。React 中也是相同的处理逻辑,你可以阅读 Dan的博客
- //src/qnt-react.js
- import { h } from 'snabbdom';
- const createElement = (type, props = {}, ...children) => {
- console.log(typeof (type), type);
- //如果是函数组件,那么调用它,并返回执行结果
- if (typeof (type) == 'function') {
- return type(props);
- }
- return h(type, { props }, children);
- };
- class Component {
- constructor() { }
- componentDidMount() { }
- setState(partialState) { }
- render() { }
- }
- //给 Component 组件添加静态属性来区分是函数还是类
- Component.prototype.isQndReactClassComponent = true;
- const QndReact = {
- createElement,
- Component
- };
- export default QndReact;
现在,我们在 QndReact.createElement(...) 中增加一些代码来处理类组件。
- //src/qnd-react.js
- import { h } from 'snabbdom';
- const createElement = (type, props = {}, ...children) => {
- console.log(type.prototype);
- /**
- * 如果是类组件
- * 1.创建一个实例
- * 2.调用实例的 render 方法
- */
- if (type.prototype && type.prototype.isQndReactClassComponent) {
- const componentInstance = new type(props);
- return componentInstance.render();
- }
- //如果是函数组件,那么调用它,并返回执行结果
- if (typeof (type) == 'function') {
- return type(props);
- }
- return h(type, { props }, children);
- };
- class Component {
- constructor() { }
- componentDidMount() { }
- setState(partialState) { }
- render() { }
- }
- //给 Component 组件添加静态属性来区分是函数还是类
- Component.prototype.isQndReactClassComponent = true;
- const QndReact = {
- createElement,
- Component
- };
- export default QndReact;
现在,我们的类组件已经能够渲染到浏览器上了:
我们向类组件中增加 state,在此之前,我们需要知道,每次调用 this.setState({}) 时,如何更新 DOM 的责任是 react-dom 包,而不是 React 的责任。这是为了使 React 的核心部分,例如Component 类与平台分离,从而提升代码的可重用性。即在 ReactNative 中,你也可以使用同样的 Component 类,react-native 负责如何更新UI。你可能会问自己:当调用 this.setState(...) 时,React 如何知道该怎么做,答案就是 react-dom 通过在 React 上设置了一个 __updater 属性与 React 进行通信。Dan 对此也有出色的文章,你可以点击阅读。现在让我们在 QndReactDom 中为 QndReact 添加 __updater 属性。
- //src/qnd-react-dom.js
- import QndReact from './qnd-react';
- import * as snabbdom from 'snabbdom';
- import propsModule from 'snabbdom/modules/props';
- ...
- //QndReactDom 告诉 QndReact 如何更新 DOM
- QndReact.__updater = () => {
- //当调用 this.setState 的时候更新 DOM 逻辑
- }
无论何时我们调用 this.setState({...}),我们都需要比较组件的 oldVNode 和在组件上调用了 render 方法之后生成的 newVNode。为了进行比较,我们在类组件上添加 __vNode 属性,以维护该组件当前的 VNode 实例。
- //src/qnd-react.js
- ...
- const createElement = (type, props = {}, ...children) => {
- /**
- * 如果是类组件
- * 1.创建一个实例
- * 2.调用实例的 render 方法
- */
- if (type.prototype && type.prototype.isQndReactClassComponent) {
- const componentInstance = new type(props);
- componentInstancecomponentInstance.__vNode = componentInstance.render();
- return componentInstance.__vNode;
- }
- //如果是函数组件,那么调用它,并返回执行结果
- if (typeof (type) == 'function') {
- return type(props);
- }
- return h(type, { props }, children);
- };
- ...
现在我们来在 Component 的基类中实现 setState 方法。
- //src/qnd-react.js
- ...
- class Component {
- constructor() { }
- componentDidMount() { }
- setState(partialState) {
- this.state = {
- ...this.state,
- ...partialState
- }
- //调用 QndReactDom 提供的 __updater 方法
- QndReact.__updater(this);
- }
- render() { }
- }
- ...
处理 QndReactDom 中的 __updater 方法。
- //src/qnd-react-dom.js
- ...
- QndReact.__updater = (componentInstance) => {
- //当调用 this.setState 的时候更新 DOM 逻辑
- //获取在 __vNode 上存储的 oldVNode
- const oldVNode = componentInstance.__vNode;
- //获取 newVNode
- const newVNode = componentInstance.render();
- //更新 __vNode
- componentInstance.__vNode = reconcile(oldVNode, newVNode);
- }
- ...
- export default QndReactDom;
OK,我们在 Counter 组件中增加 state 来检验我们的 setState 实现是否生效。
- //src/counter.js
- import QndReact from './qnd-react';
- export default class Counter extends QndReact.Component {
- constructor(props) {
- super(props);
- this.state = {
- count: 0
- }
- // update the count every second
- setInterval(() => {
- this.setState({
- count: this.state.count + 1
- })
- }, 1000);
- }
- componentDidMount() {
- console.log('Component mounted');
- }
- render() {
- return <p>Count: {this.state.count}</p>
- }
- }
太棒啦,现在 Counter 组件运行情况与我们预期完全一致。
我们继续添加 componentDidMount 的生命周期钩子函数。 Snabbdom 提供了一些钩子函数,通过他们,我们可以知道真实DOM上面是否有添加,删除或是更新了虚拟DOM节点,你可以在此处了解更多信息。
- //src/qnd-react.js
- import { h } from 'snabbdom';
- const createElement = (type, props = {}, ...children) => {
- /**
- * 如果是类组件
- * 1.创建一个实例
- * 2.调用实例的 render 方法
- */
- if (type.prototype && type.prototype.isQndReactClassComponent) {
- const componentInstance = new type(props);
- componentInstancecomponentInstance.__vNode = componentInstance.render();
- return componentInstance.__vNode;
- //增加钩子函数(当虚拟DOM被添加到真实DOM节点上时)
- componentInstance.__vNode.data.hook = {
- create: () => {
- componentInstance.componentDidMount()
- }
- }
- }
- //如果是函数组件,那么调用它,并返回执行结果
- if (typeof (type) == 'function') {
- return type(props);
- }
- return h(type, { props }, children);
- };
- ...
- export default QndReact;
至此,我们已经在类组件上支持了 componentDidMount 生命周期钩子函数。
结束之前,我们再添加下事件绑定的支持。为此,我们可以在 Counter 组件中增加一个按钮,点击的时候,计数器的数字增加。请注意,我们遵循的是基于常规的JS事件命名约定,而非基于 React,即双击事件使用 onDblClick,而非 onDoubleClick。
- import QndReact from './qnd-react';
- export default class Counter extends QndReact.Component {
- constructor(props) {
- super(props);
- this.state = {
- count: 0
- }
- }
- componentDidMount() {
- console.log('Component mounted');
- }
- render() {
- return (
- <div>
- <p>Count: {this.state.count}</p>
- <button onClick={() => this.setState({
- count: this.state.count + 1
- })}>Increment</button>
- </div>
- )
- }
- }
上面的组件不会正常工作,因为我们没有告诉我们的 VDom 如何去处理它。首先,我们给 Snabdom 增加事件监听模块。
- //src/qnd-react-dom.js
- import QndReact from './qnd-react';
- import * as snabbdom from 'snabbdom';
- import propsModule from 'snabbdom/modules/props';
- import eventlistenersModule from 'snabbdom/modules/eventlisteners';
- const reconcile = snabbdom.init([propsModule, eventlistenersModule]);
- ...
Snabdom 希望将文本属性和事件属性作为两个单独的对象,我们我们需要这样做:
- //src/qnd-react.js
- import { h } from 'snabbdom';
- const createElement = (type, props = {}, ...children) => {
- ...
- let dataProps = {};
- let eventProps = {};
- for (let propKey in props) {
- // event 属性总是以 `on` 开头
- if (propKey.startsWith('on')) {
- const event = propKey.substring(2).toLowerCase();
- eventProps[event] = props[propKey];
- } else {
- dataProps[propKey] = props[propKey];
- }
- }
- return h(type, { props: dataProps, on: eventProps }, children);
- };
- ...
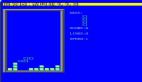
现在当我们点击 Counter 组件的按钮的时候,计数器加1。
太棒了,我们终于完成了一个React的简陋的实现。但是,我们还不能呈现列表,我想把它作为有趣的小任务交给您。我建议您尝试在 src/index.js 中呈现一个列表,然后调试 QndReact.createElement(...) 方法找出问题所在。
感谢您一直陪伴我,希望您喜欢构建自己的 React ,并了解了 React 在此过程中是如何工作的。如果您在任何地方卡住了,请随时参考我共享的代码: https://github.com/ameertheha...