近些年来借着NodeJS的春风,前端经历了一波大洗牌式得的发展。使得前端开发在效率,质量上有了质的飞跃。可以说NodeJS已经是前端不可欠缺的技能了。但是是事实上大部分的前端对于本地安装的NodeJS的使用可能仅限于node -v和npm了😂。其实NodeJS作为真正意义上的服务端语言,在我们开发的时候可以运用NodeJS强大的模块和众多的npm包来为我们自己服务。
写在前面
注意:这篇文章基本上不会去将一些非常基础的东西,希望大家自备ES6+语法, NodeJS基础, 简单的Linux操作等知识。还有这篇文章侧重点不会放在技术的实现细节,主要是提供一些思路和方向。更加深层次的使用,还是要各位朋友自己去挖掘。而且这篇文章会有点长🎫
快速创建模块
这个部分我之前在加快Vue项目的开发速度中提到过,不过那个版本写的比较简单(糙),而且基本全都都是通过Node写的。说白了就是用NodeJS去代替我们生成需要复制粘贴的代码。
在大型的项目中,尤其是中后台项目在开发一个新的业务模块的时候可能离不开大量的复制粘贴,像中后台项目中可能很多模块都是标准的CURD模块,包括了列表,新增,详情,编辑这些页面。那么这就意味着有大量的重复代码存在,每次复制粘贴完之后还有修修改改删删等一大堆麻烦事儿,最重要的是复制粘贴很容易忘记哪一部分就忘记改了,导致项目做的很糙而且也会浪费不少时间。那我们的需求就是把人工复制粘贴的那部分交给Node去做,力求时间和质量得到双重的保障。
之前在Vue项目中写过这个模块,那接下来的demo我们以一个Vue项目来做示例,项目地址。
前期准备
- 文件结构划分:视图文件,路由文件,Controler文件该怎么放一定要划分清楚。这个就像是地基,可以根据自己项目的业务去划分,我们的项目目录是下面这样划分
- vue-base-template
- │ config // webpack配置config/q其他一些config文件
- │ scripts // 帮助脚本文件 ===> 这里存放我们的项目脚本文件
- │ │ template // 模块文件
- │ │ build-module.js // build构建脚本
- │ │
- └───src // 业务逻辑代码
- │ │ api // http api 层
- │ └── router // 路由文件
- │ │ │ modules // 业务路由文件夹 ==> 业务模块路由生成地址
- │ │ │ module.js // 制定模块
- │ │ store // vuex
- │ └── views // 视图文件
- │ │ │ directory // 抽象模块目录
- │ │ │ │ module // 具体模块文件夹
- │ │ │ │ │ index.vue // 视图文件
- │ │ global.js // 全局模块处理
- │ │ main.js // 入口文件
业务模块我基本上是通过抽象模块+具体模块的方式去划分:
- 抽象模块:在这里指的是没有具体的功能页面只是一系列业务模块的汇总,相当于一个包含各个具体模块的目录。
- 具体模块:指的是有具体功能页面的模块,包含着各个具体的页面。
这个划分方式很灵活,主要是根据自己的需求来。
- 定制模板文件:主要是用于生成文件的模板 比如.vue这种文件
- 技术准备:
理论上来讲我们需要用到以下一些npm模块, 起码要知道这个都是干什么的
- dotenv: 配置文件管理
- inquirer: 命令行交互
- chalk: 美化命令行输出
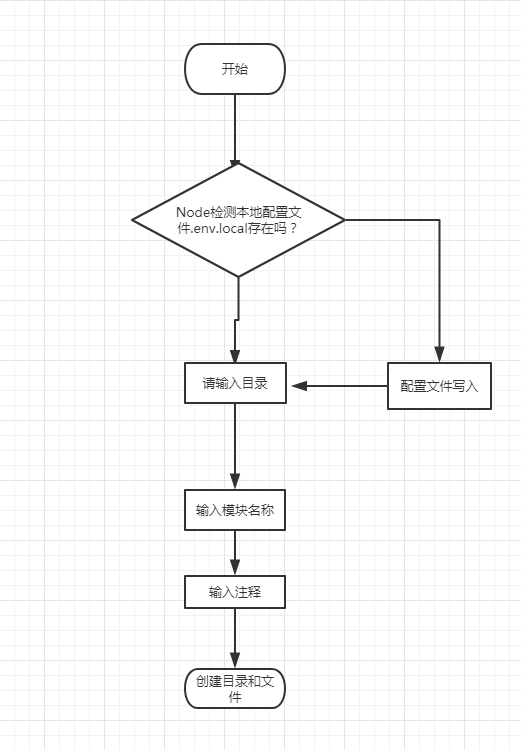
- 创建流程
流程很简单我画的也不好,凑合看吧。抽空我会重新画的😂
开始撸
自从有了这个想法之后, 这个脚本到现在已经是我第三遍撸了。从第一次的单一简单,到现在的功能完善。我最大的感触就是这个东西开发起来好像没有什么尽头,每一次都能找到不一样的需求点,每次都能找到可以优化的部分。针对自己的项目,脚本可以很简单也可以很复杂。很魔性, 对我来说肯定还有第四次第五次的重构。
为了后期的维护,我把所有的脚本相关NodeJS代码放到了根目录下的scripts文件夹中:
- scripts // 帮助脚本文件 ===> 这里存放我们的项目脚本文件
- └───template // template管理文件夹
- │ │ index.js // 模块文件处理中心
- │ │ api.template.js // api模块文件
- │ │ route.template.js // route模块文件
- │ │ template.vue // view模块文件
- │ build-module.js // 创建脚本入口文件
- │ │
- | .env.local // 本地配置文件
- │ │
- │ util.js // 工具文件
下面我们一个部分一个部分的来讲这些文件的作用(<font color="red">大量代码预警</font>)
- build-module.js: 入口文件, 与使用者进行交互的脚本。 通过问答的方式得到我们需要的三个核心变量目录(抽象模块), 模块(具体模块), 注释。如果是第一次执行这个脚本, 那么还会有配置相关的问题, 第一次设置完之后接下来的使用将不会再询问,若想修改可自己修改.env.local文件。这里我不详细描述了, 大部分解释都写在注释里面了。
第一部分 配置文件已经输入项处理部分
- const inquirer = require('inquirer')
- const path = require('path')
- const { Log, FileUtil, LOCAL , ROOTPATH} = require('./util')
- const { buildVueFile, buildRouteFile, buildApiFile, RouteHelper } = require('./template')
- const EventEmitter = require('events');
- // file options
- const questions = [
- {
- type: 'input',
- name: 'folder',
- message: "请输入所属目录名称(英文,如果检测不到已输入目录将会默认新建,跳过此步骤将在Views文件夹下创建新模块):"
- },
- {
- type: 'input',
- name: 'module',
- message: "请输入模块名称(英文)",
- // 格式验证
- validate: str => ( str !== '' && /^[A-Za-z0-9_-]+$/.test(str))
- },
- {
- type: 'input',
- name: 'comment',
- message: "请输入模块描述(注释):"
- },
- ]
- // local configs
- const configQuestion = [
- {
- type: 'input',
- name: 'AUTHOR',
- message: "请输入作者(推荐使用拼音或者英文)",
- // 格式验证
- validate: str => ( str !== '' && /^[\u4E00-\u9FA5A-Za-z]+$/.test(str)),
- when: () => !Boolean(process.env.AUTHOR)
- },
- {
- type: 'input',
- name: 'Email',
- message: "请输入联系方式(邮箱/电话/钉钉)"
- }
- ]
- // Add config questions if local condfig does not exit
- if (!LOCAL.hasEnvFile()) {
- questions.unshift(...configQuestion)
- }
- // 获取已经完成的答案
- inquirer.prompt(questions).then(answers => {
- // 1: 日志打印
- Log.logger(answers.folder == '' ? '即将为您' : `即将为您在${answers.folder}文件夹下` + `创建${answers.module}模块`)
- // 2: 配置文件的相关设置
- if (!LOCAL.hasEnvFile()) {
- LOCAL.buildEnvFile({
- AUTHOR: answers.AUTHOR,
- Email: answers.Email
- })
- }
- // 3: 进入文件和目录创建流程
- const {
- folder, // 目录
- module, // 模块
- comment // 注释
- } = answers
- buildDirAndFiles(folder, module, comment)
- })
- // 事件处理中心
- class RouteEmitter extends EventEmitter {}
- // 注册事件处理中心
- const routeEmitter = new RouteEmitter()
- routeEmitter.on('success', value => {
- // 创建成功后正确退出程序
- if (value) {
- process.exit(0)
- }
- })
第二部分 实际操作部分
- // module-method map
- // create module methods
- const generates = new Map([
- // views部分
- // 2019年6月12日17:39:29 完成
- ['view', (folder, module, isNewDir , comment) => {
- // 目录和文件的生成路径
- const folderPath = path.join(ROOTPATH.viewsPath,folder,module)
- const vuePath = path.join(folderPath, '/index.vue')
- // vue文件生成
- FileUtil.createDirAndFile(vuePath, buildVueFile(module, comment), folderPath)
- }],
- // router is not need new folder
- ['router', (folder, module, isNewDir, comment) => {
- /**
- * @des 路由文件和其他的文件生成都不一样, 如果是新的目录那么生成新的文件。
- * 但是如果module所在的folder 已经存在了那么就对路由文件进行注入。
- * @reason 因为我们当前项目的目录分层结构是按照大模块来划分, 即src下一个文件夹对应一个router/modules中的一个文件夹
- * 这样做使得我们的目录结构和模块划分都更加的清晰。
- */
- if (isNewDir) {
- // 如果folder不存在 那么直接使用module命名 folder不存在的情况是直接在src根目录下创建模块
- const routerPath = path.join(ROOTPATH.routerPath, `/${folder || module}.js`)
- FileUtil.createDirAndFile(routerPath, buildRouteFile(folder, module, comment))
- } else {
- // 新建路由helper 进行路由注入
- const route = new RouteHelper(folder, module, routeEmitter)
- route.injectRoute()
- }
- }],
- ['api', (folder, module, isNewDir, comment) => {
- // inner module will not add new folder
- // 如果当前的模块已经存在的话那么就在当前模块的文件夹下生成对应的模块js
- const targetFile = isNewDir ? `/index.js` : `/${module}.js`
- // 存在上级目录就使用上级目录 不存在上级目录的话就是使用当前模块的名称进行创建
- const filePath = path.join(ROOTPATH.apiPath, folder || module)
- const apiPath = path.join(filePath, targetFile)
- FileUtil.createDirAndFile(apiPath, buildApiFile(comment), filePath)
- }]
- ])
- /**
- * 通过我们询问的答案来创建文件/文件夹
- * @param {*} folder 目录名称
- * @param {*} module 模块名称
- * @param {*} comment 注释
- */
- function buildDirAndFiles (folder, module, comment) {
- let _tempFloder = folder || module // 临时文件夹 如果当前的文件是
- let isNewDir
- // 如果没有这个目录那么就新建这个目录
- if (!FileUtil.isPathInDir(_tempFloder, ROOTPATH.viewsPath)) {
- rootDirPath = path.join(ROOTPATH.viewsPath, _tempFloder)
- // create dir for path
- FileUtil.createDir(rootDirPath)
- Log.success(`已创建${folder ? '目录' : "模块"}${_tempFloder}`)
- isNewDir = true
- } else {
- isNewDir = false
- }
- // 循环操作进行
- let _arrays = [...generates]
- _arrays.forEach((el, i) => {
- if (i < _arrays.length) {
- el[1](folder, module, isNewDir, comment)
- } else {
- Log.success("模块创建成功!")
- process.exit(1)
- }
- })
- }
注: 这里我用了一个generates这个Map去管理了所有的操作,因为上一个版本是这么写我懒得换了,你也可以用一个二维数组或者是对象去管理, 也省的写条件选择了。
- template: 管理着生成文件使用的模板文件(vue文件,路由文件, api文件),我们只看其中的route.template.js,其他的部分可以参考项目
- /*
- * @Author: _author_
- * @Email: _email_
- * @Date: _date_
- * @Description: _comment_
- */
- export default [
- {
- path: "/_mainPath",
- component: () => import("@/views/frame/Frame"),
- redirect: "/_filePath",
- name: "_mainPath",
- icon: "",
- noDropdown: false,
- children: [
- {
- path: "/_filePath",
- component: () => import("@/views/_filePath/index"),
- name: "_module",
- meta: {
- keepAlive: false
- }
- }
- ]
- }
- ]
在template中最重要的要属index.js了, 这个文件主要是包含了模板文件的读取和重新生成出我们需要的模板字符串, 以及生成我们需要的特定路由代码。template/index.js,文件模板的生成主要是通过读取各个模板文件并转化成字符串,并把的指定的字符串用我们期望的变量去替换, 然后返回新的字符串给生成文件使用。
- const fs = require('fs')
- const path = require('path')
- const os = require('os')
- const readline = require('readline')
- const {Log, DateUtil, StringUtil , LOCAL, ROOTPATH} = require('../util')
- /**
- * 替换作者/时间/日期等等通用注释
- * @param {*string} content 内容
- * @param {*string} comment 注释
- * @todo 这个方法还有很大的优化空间
- */
- const _replaceCommonContent = (content, comment) => {
- if (content === '') return ''
- // 注释对应列表 comments = [ [文件中埋下的锚点, 将替换锚点的目标值] ]
- const comments = [
- ['_author_', LOCAL.config.AUTHOR],
- ['_email_', LOCAL.config.Email],
- ['_comment_', comment],
- ['_date_', DateUtil.getCurrentDate()]
- ]
- comments.forEach(item => {
- contentcontent = content.replace(item[0], item[1])
- })
- return content
- }
- /**
- * 生成Vue template文件
- * @param {*} moduleName 模块名称
- * @returns {*string}
- */
- module.exports.buildVueFile = (moduleName, comment) => {
- const VueTemplate = fs.readFileSync(path.resolve(__dirname, './template.vue'))
- const builtTemplate = StringUtil.replaceAll(VueTemplate.toString(), "_module_", moduleName)
- return _replaceCommonContent(builtTemplate, comment)
- }
- /**
- * @author: etongfu
- * @description: 生成路由文件
- * @param {string} folder 文件夹名称
- * @param {string} moduleName 模块名称
- * @returns {*string}
- */
- module.exports.buildRouteFile = (folder,moduleName, comment) => {
- const RouteTemplate = fs.readFileSync(path.resolve(__dirname, './route.template.js')).toString()
- // 因为路由比较特殊。路由模块需要指定的路径。所以在这里重新生成路由文件所需要的参数。
- const _mainPath = folder || moduleName
- const _filePath = folder == '' ? `${moduleName}` : `${folder}/${moduleName}`
- // 进行替换
- let builtTemplate = StringUtil.replaceAll(RouteTemplate, "_mainPath", _mainPath) // 替换模块主名称
- builtTemplate = StringUtil.replaceAll(builtTemplate, "_filePath", _filePath) // 替换具体路由路由名称
- builtTemplate = StringUtil.replaceAll(builtTemplate, "_module", moduleName) // 替换模块中的name
- return _replaceCommonContent(builtTemplate, comment)
- }
- /**
- * @author: etongfu
- * @description: 生成API文件
- * @param {string} comment 注释
- * @returns: {*}
- */
- module.exports.buildApiFile = comment => {
- const ApiTemplate = fs.readFileSync(path.resolve(__dirname, './api.template.js')).toString()
- return _replaceCommonContent(ApiTemplate, comment)
- }
路由注入, 当输入的目录已存在的时候就不会新建目录文件, 这个时候就会把新模块的路由注入到已存在的目录的路由文件中,效果如下:

这里我们通过RouteHelper来完成对已存在的路由文件进行新模块的路由注入操作,主要通过了stream(流),readline(逐行读取)来实现的。
接下来是干货部分 ==> 首先通过参数找到我们的目标路由文件,然后通过generateRouter()来拼接生成我们需要注入的路由。通过injectRoute方法开始注入路由,在injectRoute中我们首先来生成一个名字为_root临时路径的文件并根据这个路径创建一个writeStream, 然后根据旧的路由文件地址root创建一个readStream并通过readline读写接口去读取原来的路由文件,用一个数组收集旧的路由每一行的数据。读取完毕之后开始遍历temp这个数组并找到第一个children然后把generateRouter()方法返回的数组插入到这个位置。最后使用拼接完成的temp遍历逐行写入writeStream中。最后把原来的root文件删除,把_root重命名为root。一个路由注入的流程就完了。大体的流程就是这样, 关于代码细节不懂得朋友们可以私信我😁。
- /**
- * @author: etongfu
- * @description: 路由注入器
- * @param {string} dirName
- * @param {string} moduleName
- * @param {event} event
- * @returns: {*}
- */
- module.exports.RouteHelper = class {
- constructor (dirName, moduleName, event) {
- // the dir path for router file
- this.dirName = dirName
- // the path for router file
- this.moduleName = moduleName
- // 事件中心
- this.event = event
- // route absolute path
- this.modulePath = path.join(ROOTPATH.routerPath, `${dirName}.js`)
- }
- /**
- * Generate a router for module
- * The vue file path is @/name/name/index
- * The default full url is http:xxxxx/name/name
- * @param {*} routeName url default is router name
- * @param {*string} filePath vue file path default is ${this.dirName}/${this.moduleName}/index
- * @returns {*Array} A string array for write line
- */
- generateRouter (routeName = this.moduleName, filePath = `${this.dirName}/${this.moduleName}/index`) {
- let temp = [
- ` // @Author: ${LOCAL.config.AUTHOR}`,
- ` // @Date: ${DateUtil.getCurrentDate()}`,
- ` {`,
- ` path: "/${this.dirName}/${routeName}",`,
- ` component: () => import("@/views/${filePath}"),`,
- ` name: "${routeName}"`,
- ` },`
- ]
- return temp
- }
- /**
- * add router to file
- */
- injectRoute () {
- try {
- const root = this.modulePath
- const _root = path.join(ROOTPATH.routerPath, `_${this.dirName}.js`)
- // temp file content
- let temp = []
- // file read or write
- let readStream = fs.createReadStream(root)
- // temp file
- let writeStream = fs.createWriteStream(_root)
- let readInterface = readline.createInterface(
- {
- input: readStream
- // output: writeStream
- }
- )
- // collect old data in file
- readInterface.on('line', (line) => {
- temp.push(line)
- })
- // After read file and we begin write new router to this file
- readInterface.on('close', async () => {
- let _index
- temp.forEach((line, index) => {
- if (line.indexOf('children') !== -1) {
- _index = index + 1
- }
- })
- temptemp = temp.slice(0, _index).concat(this.generateRouter(), temp.slice(_index))
- // write file
- temp.forEach((el, index) => {
- writeStream.write(el + os.EOL)
- })
- writeStream.end('\n')
- // 流文件读写完毕
- writeStream.on('finish', () => {
- fs.unlinkSync(root)
- fs.renameSync(_root, root)
- Log.success(`路由/${this.dirName}/${this.moduleName}注入成功`)
- //emit 成功事件
- this.event.emit('success', true)
- })
- })
- } catch (error) {
- Log.error('路由注入失败')
- Log.error(error)
- }
- }
- }
关于路由注入这一块我自己这么设计其实并不是很满意,有更好的方法还请大佬告知一下。
- env.local: 配置文件, 这个是第一次使用脚本的时候生成的。没啥特别的,就是记录本地配置项。
- AUTHOR = etongfu
- Email = 13583254085@163.com
- util.js: 各种工具方法,包含了date, file, fs, string, Log, ROOTPATH等等工具方法, 篇幅有限我就贴出来部分代码, 大家可以在项目中查看全部代码:
- const chalk = require('chalk')
- const path = require('path')
- const dotenv = require('dotenv')
- const fs = require('fs')
- // 本地配置相关
- module.exports.LOCAL = class {
- /**
- * env path
- */
- static get envPath () {
- return path.resolve(__dirname, './.env.local')
- }
- /**
- * 配置文件
- */
- static get config () {
- // ENV 文件查找优先查找./env.local
- const ENV = fs.readFileSync(path.resolve(__dirname, './.env.local')) || fs.readFileSync(path.resolve(__dirname, '../.env.development.local'))
- // 转为config
- const envConfig = dotenv.parse(ENV)
- return envConfig
- }
- /**
- * 创建.env配置文件文件
- * @param {*} config
- * @description 创建的env文件会保存在scripts文件夹中
- */
- static buildEnvFile (config = {AUTHOR: ''}) {
- if (!fs.existsSync(this.envPath)) {
- // create a open file
- fs.openSync(this.envPath, 'w')
- }
- let content = ''
- // 判断配置文件是否合法
- if (Object.keys(config).length > 0) {
- // 拼接内容
- for (const key in config) {
- let temp = `${key} = ${config[key]}\n`
- content += temp
- }
- }
- // write content to file
- fs.writeFileSync(this.envPath, content, 'utf8')
- Log.success(`local env file ${this.envPath} create success`)
- }
- /**
- * 检测env.loacl文件是否存在
- */
- static hasEnvFile () {
- return fs.existsSync(path.resolve(__dirname, './.env.local')) || fs.existsSync(path.resolve(__dirname, '../.env.development.local'))
- }
- }
- // 日志帮助文件
- class Log {
- // TODO
- }
- module.exports.Log = Log
- // 字符串Util
- module.exports.StringUtil = class {
- // TODO
- }
- // 文件操作Util
- module.exports.FileUtil = class {
- // TODO
- /**
- * If module is Empty then create dir and file
- * @param {*} filePath .vue/.js 文件路径
- * @param {*} content 内容
- * @param {*} dirPath 文件夹目录
- */
- static createDirAndFile (filePath, content, dirPath = '') {
- try {
- // create dic if file not exit
- if (dirPath !== '' && ! fs.existsSync(dirPath)) {
- // mkdir new dolder
- fs.mkdirSync(dirPath)
- Log.success(`created ${dirPath}`)
- }
- if (!fs.existsSync(filePath)) {
- // create a open file
- fs.openSync(filePath, 'w')
- Log.success(`created ${filePath}`)
- }
- // write content to file
- fs.writeFileSync(filePath, content, 'utf8')
- } catch (error) {
- Log.error(error)
- }
- }
- }
- // 日期操作Util
- module.exports.DateUtil = class {
- // TODO
- }
在Util文件中需要注意的部分可能是.env文件的生成和读取这一部分和FileUtil中createDirAndFile, 这个是我们用来生成文件夹和文件的方法,全部使用node文件系统完成。熟悉了API之后不会有难度。
Util文件中有一个ROOTPATH要注意一下指的是我们的路由,views, api的根目录配置, 这个配置的话我建议不要写死, 因为如果你的项目有多入口或者是子项目,这些可能都会变。你也可以选择其他的方式进行配置。
- // root path
- const reslove = (file = '.') => path.resolve(__dirname, '../src', file)
- const ROOTPATH = Object.freeze({
- srcPath: reslove(),
- routerPath: reslove('router/modules'),
- apiPath: reslove('api'),
- viewsPath: reslove('views')
- })
- module.exports.ROOTPATH = ROOTPATH
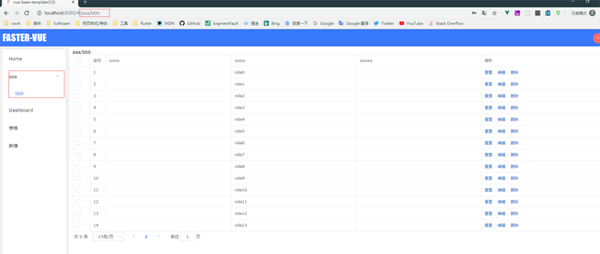
- 预览
这样的话我们就能愉快的通过命令行快速的创建模块了, 效果如下:

运行
总结
虽然这些事儿复制粘贴也能完成,但是通过机器完成可靠度和可信度都会提升不少。我们的前端团队目前已经全面使用脚本来创建新模块,并且脚本在不断升级中。亲测在一个大项目中这样一个脚本为团队节约的时间是非常可观的, 建议大家有时间也可以写一写这种脚本为团队或者自己节约下宝贵的时间😁
完成机械任务
在开发过程中,有很多工作都是机械且无趣的。不拿这些东西开刀简直对不起他们
SSH发布
注: 如果团队部署了CI/CD,这个部分可以直接忽略。
经过我的观察,很多前端程序员并不懂Linux操作, 有的时候发布测试还需要去找同事帮忙,如果另一个同事Linux功底也不是很好的话,那就可能浪费两个人的很大一块儿时间。今天通过写一个脚本让我们的所有同事都能独立的发布测试。这个文件同样放在项目的scripts文件夹下
前期准备
- 先配置好Web服务器, 不会的话可以看我之前的一篇文章服务器发布Vue项目指南
- 需要的技术,都是工具类的包 没什么难度
- inquirer: 命令行交互
- chalk: 美化命令行输出
- ora: 命令行loading
- shelljs: 执行shell命令
- node-ssh: node SSH
- node-ssh: node SSH
- zip-local: zip压缩
开始撸
因为是发布到不同的服务器, 因为development/stage/production应该都是不同的服务器,所以我们需要一个配置文件来管理服务器。
deploy.config.js
- module.exports = Object.freeze({
- // development
- development: {
- SERVER_PATH: "xxx.xxx.xxx.xx", // ssh地址
- SSH_USER: "root", // ssh 用户名
- SSH_KEY: "xxx", // ssh 密码 / private key文件地址
- PATH: '/usr/local' // 操作开始文件夹 可以直接指向配置好的地址
- },
- // stage
- stage: {
- SERVER_PATH: "",
- SSH_USER: "",
- SSH_KEY: "",
- PATH: ''
- },
- // production
- production: {
- SERVER_PATH: "",
- SSH_USER: "",
- SSH_KEY: "",
- PATH: ''
- }
- })
配置文件配置好了下面开始写脚本, 我们先确定下来流程
- 通过inquirer问问题,这是个示例代码, 问题就比较简单了, 在真正使用中包括了发布平台等等不同的发布目标。
- 检查配置文件, 因为配置文件准确是必须的
- 压缩dist文件,通过zip-local去操作。很简单
- 通过node-ssh连接上服务器
- 执行删除和备份(备份还没写)服务器上老的文件。
- 调用SSH的putFile方法开始把本地文件上传到服务器。 对服务器执行unzip命令。
8: 发布完成🎈
下面是干货代码
第一部分 实际操作部分, 链接SSH, 压缩文件等等
- const fs = require('fs')
- const path = require('path')
- const ora = require('ora')
- const zipper = require('zip-local')
- const shell = require('shelljs')
- const chalk = require('chalk')
- const CONFIG = require('../config/release.confg')
- let config
- const inquirer = require('inquirer')
- const node_ssh = require('node-ssh')
- let SSH = new node_ssh()
- // loggs
- const errorerrorLog = error => console.log(chalk.red(`*********${error}*********`))
- const defaultLog = log => console.log(chalk.blue(`*********${log}*********`))
- const successLog = log => console.log(chalk.green(`*********${log}*********`))
- // 文件夹位置
- const distDir = path.resolve(__dirname, '../dist')
- const distZipPath = path.resolve(__dirname, '../dist.zip')
- // ********* TODO 打包代码 暂时不用 需要和打包接通之后进行测试 *********
- const compileDist = async () => {
- // 进入本地文件夹
- shell.cd(path.resolve(__dirname, '../'))
- shell.exec(`npm run build`)
- successLog('编译完成')
- }
- // ********* 压缩dist 文件夹 *********
- const zipDist = async () => {
- try {
- if(fs.existsSync(distZipPath)) {
- defaultLog('dist.zip已经存在, 即将删除压缩包')
- fs.unlinkSync(distZipPath)
- } else {
- defaultLog('即将开始压缩zip文件')
- }
- await zipper.sync.zip(distDir).compress().save(distZipPath);
- successLog('文件夹压缩成功')
- } catch (error) {
- errorLog(error)
- errorLog('压缩dist文件夹失败')
- }
- }
- // ********* 连接ssh *********
- const connectSSh = async () =>{
- defaultLog(`尝试连接服务: ${config.SERVER_PATH}`)
- let spinner = ora('正在连接')
- spinner.start()
- try {
- await SSH.connect({
- host: config.SERVER_PATH,
- username: config.SSH_USER,
- password: config.SSH_KEY
- })
- spinner.stop()
- successLog('SSH 连接成功')
- } catch (error) {
- errorLog(err)
- errorLog('SSH 连接失败');
- }
- }
- // ********* 执行清空线上文件夹指令 *********
- const runCommond = async (commond) => {
- const result = await SSH.exec(commond,[], {cwd: config.PATH})
- defaultLog(result)
- }
- const commonds = [`ls`, `rm -rf *`]
- // ********* 执行清空线上文件夹指令 *********
- const runBeforeCommand = async () =>{
- for (let i = 0; i < commonds.length; i++) {
- await runCommond(commonds[i])
- }
- }
- // ********* 通过ssh 上传文件到服务器 *********
- const uploadZipBySSH = async () => {
- // 连接ssh
- await connectSSh()
- // 执行前置命令行
- await runBeforeCommand()
- // 上传文件
- let spinner = ora('准备上传文件').start()
- try {
- await SSH.putFile(distZipPath, config.PATH + '/dist.zip')
- successLog('完成上传')
- spinner.text = "完成上传, 开始解压"
- await runCommond('unzip ./dist.zip')
- } catch (error) {
- errorLog(error)
- errorLog('上传失败')
- }
- spinner.stop()
- }
第二部分 命令行交互和配置校验
- // ********* 发布程序 *********
- /**
- * 通过配置文件检查必要部分
- * @param {*dev/prod} env
- * @param {*} config
- */
- const checkByConfig = (env, config = {}) => {
- const errors = new Map([
- ['SERVER_PATH', () => {
- // 预留其他校验
- return config.SERVER_PATH == '' ? false : true
- }],
- ['SSH_USER', () => {
- // 预留其他校验
- return config.SSH_USER == '' ? false : true
- }],
- ['SSH_KEY', () => {
- // 预留其他校验
- return config.SSH_KEY == '' ? false : true
- }]
- ])
- if (Object.keys(config).length === 0) {
- errorLog('配置文件为空, 请检查配置文件')
- process.exit(0)
- } else {
- Object.keys(config).forEach((key) => {
- let result = errors.get(key) ? errors.get(key)() : true
- if (!result) {
- errorLog(`配置文件中配置项${key}设置异常,请检查配置文件`)
- process.exit(0)
- }
- })
- }
- }
- // ********* 发布程序 *********
- const runTask = async () => {
- // await compileDist()
- await zipDist()
- await uploadZipBySSH()
- successLog('发布完成!')
- SSH.dispose()
- // exit process
- process.exit(1)
- }
- // ********* 执行交互 *********
- inquirer.prompt([
- {
- type: 'list',
- message: '请选择发布环境',
- name: 'env',
- choices: [
- {
- name: '测试环境',
- value: 'development'
- },
- {
- name: 'stage正式环境',
- value: 'production'
- },
- {
- name: '正式环境',
- value: 'production'
- }
- ]
- }
- ]).then(answers => {
- config = CONFIG[answers.env]
- // 检查配置文件
- checkByConfig(answers.env, config)
- runTask()
- })
效果预览
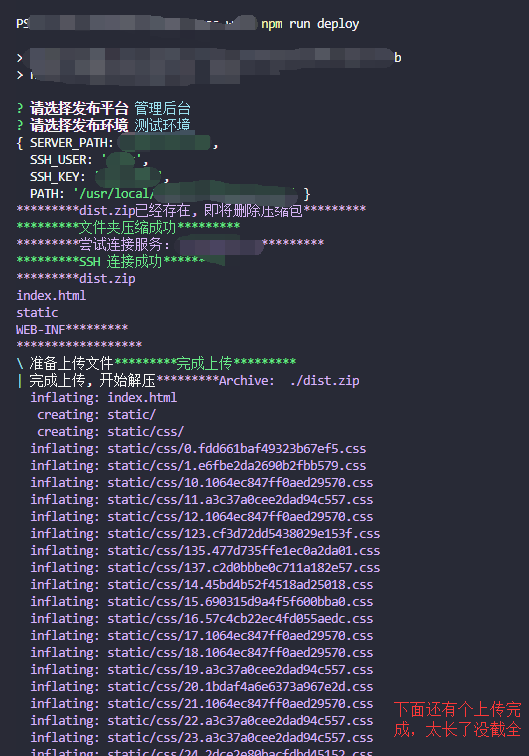
至此大家就可以愉快的发布代码了, 无痛发布。亲测一次耗时不会超过30s
打包后钩子
写累了, 改天抽空接着写😀
总结
这些脚本写的时候可能需要一点时间, 但是一旦完成之后就会为团队在效率和质量上有大幅度的提升,让开发人员更见专注与业务和技术。同时时间成本的节约也是不可忽视的,这是我在团队试验之后得出的结论。 以前开发一个模块前期的复制粘贴准备等等可能需要半个小时还要多点, 现在一个模块前期准备加上一个列表页静态开发10分钟搞定。写了发布脚本之后直接就让每一个同事能够独立发布测试环境(正式权限不是每个人都有),并且耗时极短。这些都是实在的体现在日常开发中了。另外Node环境都安装了,不用白不用(白嫖😁😁😁), 各位大佬也可以自己发散思维,能让代码搬的砖就不要自己搬。