“人类的神经网络是如何运行的?”这个问题让很多数据科学家感到困惑。解释某个简单神经网络的工作机制非常容易,但是当某个计算机视觉项目中的层数增加1000倍时,该怎么办呢?
终端用户想要了解模型是如何得到最终结果时,仅用纸和笔来解释深度神经网络的工作机制是行不通的。那么,如何让神经网络不再像“黑匣子”一样神秘?
可视化可以做到这一点——将神经网络的不同特征可视化能使一切变得清晰明了,也能更直观地呈现卷积神经网络(CNN) 成千上万的图像训练结果。
本文将介绍卷积神经网络可视化的不同技术。此外,我们还将致力于从这些可视化中提取不同看法,以完善卷积神经网络模型。
注意:本文对神经网络和卷积神经网络的基础知识点将不再进行讨论。以下三篇文章可帮助你重温或了解相关知识点。
- A Comprehensive Tutorial to learn Convolutional Neural Networks from Scratch (从零开始学习卷积神经网络的全面教程):https://www.analyticsvidhya.com/blog/2018/12/guide-convolutional-neural-network-cnn/?utm_source=blog&utm_medium=understanding-visualizing-neural-networks
- An Introductory Guide to Deep Learning and Neural Networks (深度学习与神经网络入门指南):https://www.analyticsvidhya.com/blog/2018/10/introduction-neural-networks-deep-learning/?utm_source=blog&utm_medium=understanding-visualizing-neural-networks
- Fundamentals of Deep Learning – Starting with Artificial Neural Network (深度学习的基础——从人工神经网络开始):https://www.analyticsvidhya.com/blog/2016/03/introduction-deep-learning-fundamentals-neural-networks/?utm_source=blog&utm_medium=understanding-visualizing-neural-networks
为什么要用可视化解码神经网络?
这是一个值得研究的问题。有很多方法可以帮助理解神经网络的工作原理,为何要转向可视化这条非同寻常的路呢?
通过一个例子来回答这个问题。例如,某个项目需要对雪豹和阿拉伯豹等动物图像进行分类。从直觉上讲,可以通过图像的背景进行区分。
这两种动物的栖息地截然不同。大多数雪豹的图片都以雪为背景,而大多数阿拉伯豹的图片背景多为广阔的沙漠。
那么问题来了:一旦模型开始对雪和沙漠的图像进行分类,如何确保模型已经正确学习了如何区分这两种豹的特征呢?答案就是可视化。
可视化帮助我们理解是什么特征可以引导模型以对图像进行分类。
有很多种方法可以将模型可视化,本文将介绍其中的几种方法。
建立模型体系结构
学习的最好方式是对概念进行编码。因此,本文将直接深入研究Python代码,提供实用的编码指南。
本文使用VGG16体系结构,并在ImageNet数据集上使用预先训练的权重。第一步,将模型导入程序并了解其体系结构。
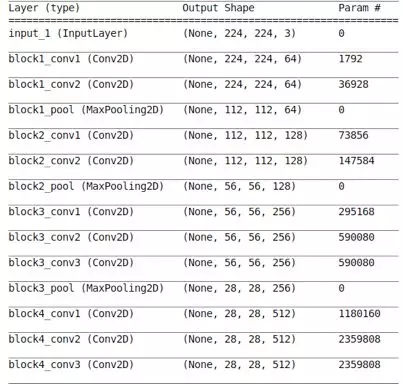
之后使用Keras中的‘model.summary()’函数将模型体系结构可视化。这是在进入模型构建环节之前十分关键的一步。因为需要确保输入和输出的形状与问题陈述相匹配,因此需要将模型概述可视化。
- #importing required modules
- from keras.applications import VGG16
- #loading the saved model
- #we are using the complete architecture thus include_top=True
- model = VGG16(weights='imagenet',include_top=True)
- #show the summary of model
- model.summary()
下表即为由上述代码生成的模型概述。
该表记录了模型的详细架构以及每一层可训练参数的数量。希望ni可以花一些时间阅读以上内容,并了解我们目前达到的水平。
只训练模型层的一个子集(特征提取)时,这一点尤为重要。通过生成模型概述,可以确保不可训练参数的数量与不想训练的层数相匹配。
此外,开发人员可以使用可训练参数总量来检查GPU是否能够分配足够内存来训练模型。对于使用电脑工作的大多数人来说,这项任务很常见,但也是一种挑战。
认识卷积神经网络各层
了解模型的整体架构以后,就可以尝试深入探究神经网络的每一层了。
事实上,访问Keras模型的各层并提取每一层的相关参数是非常容易的,这包括权重和过滤器数量等其他信息。
首先,创建字典,并将层名称映射到其相应的特征和权重。
- #creating a mapping of layer name ot layer details
- #we will create a dictionary layers_info which maps a layer name to its charcteristics
- layers_info = {}
- for i in model.layers:
- layers_info[i.name] = i.get_config()
- #here the layer_weights dictionary will map every layer_name to its corresponding weights
- layer_weights = {}
- for i in model.layers:
- layer_weights[i.name] = i.get_weights()
- print(layers_info['block5_conv1'])
上述代码的输出结果如下所示,包含了block5_conv1层的不同参数:
- {'name': 'block5_conv1',
- 'trainable': True,
- 'filters': 512,
- 'kernel_size': (3, 3),
- 'strides': (1, 1),
- 'padding': 'same',
- 'data_format': 'channels_last',
- 'dilation_rate': (1, 1),
- 'activation': 'relu',
- 'use_bias': True,
- 'kernel_initializer': {'class_name': 'VarianceScaling',
- 'config': {'scale': 1.0,
- 'mode': 'fan_avg',
- 'distribution': 'uniform',
- 'seed': None}},
- 'bias_initializer': {'class_name': 'Zeros', 'config': {}},
- 'kernel_regularizer': None,
- 'bias_regularizer': None,
- 'activity_regularizer': None,
- 'kernel_constraint': None,
- 'bias_constraint': None}
’block5_conv1’层的可训练参数值是真实的,这意味着之后可以通过进一步模型训练来更新权重。
过滤器——卷积神经网络构件的可视化
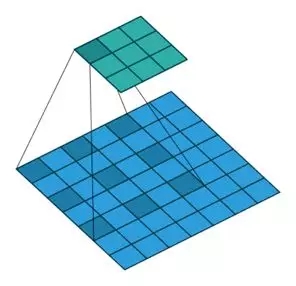
过滤器是卷积神经网络的基本组成部分。如下图所示,不同的过滤器会从图像中提取不同类型的特征:
如图所示,每个卷积层都由多个过滤器组成。回顾上一节中提到的‘block5_conv1’层的参数概要显示了该层含有512个过滤器,确实是这个道理。
通过下列编码,可以绘制每VGG16模块的第一个卷积层的首个过滤器:
- layers = model.layers
- layer_ids = [1,4,7,11,15]
- #plot the filters
- fig,ax = plt.subplots(nrows=1,ncols=5)
- for i in range(5):
- ax[i].imshow(layers[layer_ids[i]].get_weights()[0][:,:,:,0][:,:,0],cmap='gray')
- ax[i].set_title('block'+str(i+1))
- ax[i].set_xticks([])
- ax[i].set_yticks([])
以上输出结果即为不同层的过滤器。由于VGG16只使用3×3过滤器,因此所有过滤器形状大小都相同。
激活最大化——将模型所期望的进行可视化
通过下面的图片来理解最大激活的概念:
在识别大象的过程中,哪些特征比较重要?
下面是一些较容易想到的特征。
- 獠牙
- 象鼻
- 耳朵
这就是人类凭直觉判别大象的方式。但是,使用卷积神经网络优化随机图像,并尝试将其归类为大象时,会得到什么结果呢?
卷积神经网络中,每个卷积层都在前一层的输出中寻找相似的模式。当输入包含其正在寻找的模式时,就能实现最大激活。
在激活最大化技术中,更新每一层的输入,使该过程中的损失达到最小值。
应该怎么做呢?首先需要计算激活损失相对于输入的梯度,并据此更新输入。
以下为所述方法的代码:
- #importing the required modules
- from vis.visualization import visualize_activation
- from vis.utils import utils
- from keras import activations
- from keras import applications
- import matplotlib.pyplot as plt
- %matplotlib inline
- plt.rcParams['figure.figsize'] = (18,6)
- #creating a VGG16 model using fully connected layers also because then we can
- #visualize the patterns for individual category
- from keras.applications import VGG16
- model = VGG16(weights='imagenet',include_top=True)
- #finding out the layer index using layer name
- #the find_layer_idx function accepts the model and name of layer as parameters and return the index of respective layer
- layer_idx = utils.find_layer_idx(model,'predictions')
- #changing the activation of the layer to linear
- model.layers[layer_idx].activation = activations.linear
- #applying modifications to the model
- model = utils.apply_modifications(model)
- #Indian elephant
- img3 = visualize_activation(model,layer_idx,filter_indices=385,max_iter=5000,verbose=True)
- plt.imshow(img3)
示例模型使用对应于印度大象类别的随机输入,输出了以下内容:
从图像中可以看到,模型期望的结构为象牙、大眼睛和象鼻。这些信息可以有效帮助检查数据集的完整性。例如,假设该模型将关注的特征理解为背景中的树木或草丛等其它物体,由于印度象的栖息地中往往含有大量的树木或草丛,模型就可能产生错误。然后,通过最大激活,就会发现已有的数据集可能不足以完成任务,因此需要将生活在不同栖息地的大象图像添加到训练集中,实现大象特征的准确辨别。
遮挡图——将输入过程的重要部分可视化
激活最大化主要用于将图像中模型的期待可视化。而图像遮挡可以找出图像中对模型来说至关重要的部分。
现在,为了理解图像遮挡的工作原理,我们设立了一个模型,它能够根据丰田、奥迪等制造商对汽车进行分类。
能够判断图中汽车属于哪家公司吗?一定很难吧。因为公司标识所在的部分被遮挡了。显然,图像中被遮挡部分是辨别汽车所属厂商时非常重要的线索。
同样地,为了生成遮挡图,我们遮挡了图像中的某些部分,然后计算它属于某一类的概率。如果概率降低,就意味着遮挡部分对于完成分类非常重要。否则,该部分就无足轻重了。
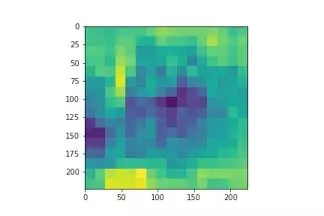
示例程序将概率同图像每个部分的像素值联系起来,对其进行标准化后生成热图:
- import numpy as np
- from keras.utils import np_utils
- from keras.models import Sequential
- from keras.layers import Dense, Dropout, Flatten, Activation, Conv2D, MaxPooling2D
- from keras.optimizers import Adam
- from keras.callbacks import EarlyStopping, ModelCheckpoint
- from keras.preprocessing.image import ImageDataGenerator
- from keras.activations import relu
- %matplotlib inline
- import matplotlib.pyplot as plt
- def iter_occlusion(image, size=8):
- occlusion = np.full((size * 5, size * 5, 1), [0.5], np.float32)
- occlusion_center = np.full((size, size, 1), [0.5], np.float32)
- occlusion_padding = size * 2
- # print('padding…')
- image_padded = np.pad(image, ( \
- (occlusion_padding, occlusion_padding), (occlusion_padding, occlusion_padding), (0, 0) \
- ), 'constant', constant_values = 0.0)
- for y in range(occlusion_padding, image.shape[0] + occlusion_padding, size):
- for x in range(occlusion_padding, image.shape[1] + occlusion_padding, size):
- tmp = image_padded.copy()
- tmp[y - occlusion_padding:y + occlusion_center.shape[0] + occlusion_padding, \
- x - occlusion_padding:x + occlusion_center.shape[1] + occlusion_padding] \
- = occlusion
- tmp[y:y + occlusion_center.shape[0], x:x + occlusion_center.shape[1]] = occlusion_center
- yield x - occlusion_padding, y - occlusion_padding, \
- tmp[occlusion_padding:tmp.shape[0] - occlusion_padding, occlusion_padding:tmp.shape[1] - occlusion_padding]
上述代码定义的函数iter_occlusion能够生成具有不同遮挡部分的图像。
现在可以导入图像并对其进行加工:
- from keras.preprocessing.image import load_img
- # load an image from file
- image = load_img('car.jpeg', target_size=(224, 224))
- plt.imshow(image)
- plt.title('ORIGINAL IMAGE')
一共分为三个步骤:
- 对图像进行预处理
- 计算不同遮挡部分的概率
- 绘制热图
- from keras.preprocessing.image import img_to_array
- from keras.applications.vgg16 import preprocess_input
- # convert the image pixels to a numpy array
- image = img_to_array(image)
- # reshape data for the model
- imageimage = image.reshape((1, image.shape[0], image.shape[1], image.shape[2]))
- # prepare the image for the VGG model
- image = preprocess_input(image)
- # predict the probability across all output classes
- yhat = model.predict(image)
- temp = image[0]
- print(temp.shape)
- heatmap = np.zeros((224,224))
- correct_class = np.argmax(yhat)
- for n,(x,y,image) in enumerate(iter_occlusion(temp,14)):
- heatmap[x:x+14,y:y+14] = model.predict(image.reshape((1, image.shape[0], image.shape[1], image.shape[2])))[0][correct_class]
- print(x,y,n,' - ',image.shape)
- heatmapheatmap1 = heatmap/heatmap.max()
- plt.imshow(heatmap)
是不是很有趣呢?接着将使用标准化的热图概率来创建一个遮挡部分并进行绘制:
- import skimage.io as io
- #creating mask from the standardised heatmap probabilities
- mask = heatmap1 < 0.85
- maskmask1 = mask *256
- maskmask = mask.astype(int)
- io.imshow(mask,cmap='gray')
最后,通过使用下述程序,对输入图像进行遮挡:
- import cv2
- #read the image
- image = cv2.imread('car.jpeg')
- image = cv2.cvtColor(image,cv2.COLOR_BGR2RGB)
- #resize image to appropriate dimensions
- image = cv2.resize(image,(224,224))
- maskmask = mask.astype('uint8')
- #apply the mask to the image
- final = cv2.bitwise_and(image,image,maskmask = mask)
- final = cv2.cvtColor(final,cv2.COLOR_BGR2RGB)
- #plot the final image
- plt.imshow(final)
猜猜为什么只能看到某些部分?没错——只有那些对输出图片类型的概率有显著贡献的部分是可见的。简而言之,这就是遮挡图的全部含义。
特征图——将输入特征的贡献可视化
特征图是另一种基于梯度的可视化技术。这类图像在 Deep Inside Convolutional Networks:Visualising Image Classification Models and Saliency Maps.论文中有介绍。
特征图计算出每个像素对模型输出的影响,包括计算相对于输入图像每一像素而言输出的梯度。
这也说明了在输入图像像素细微改变时输出类别将如何产生变化。梯度的所有正值都表明,像素值的细微变化会增加输出值:
这些梯度与图像的形状相同(梯度是针对每个像素计算的),对直观感觉产生影响。
那么如何生成显著图呢?首先使用下述代码读取输入图像。
然后,通过VGG16模型生成显著图:
- # Utility to search for layer index by name.
- # Alternatively we can specify this as -1 since it corresponds to the last layer.
- layer_idx = utils.find_layer_idx(model, 'predictions')
- # Swap softmax with linear
- model.layers[layer_idx].activation = activations.linear
- model = utils.apply_modifications(model)
- #generating saliency map with unguided backprop
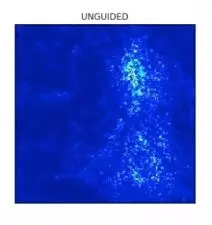
- grads1 = visualize_saliency(model, layer_idx,filter_indices=None,seed_input=image)
- #plotting the unguided saliency map
- plt.imshow(grads1,cmap='jet')
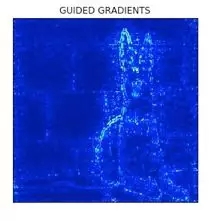
可以看到,模型更加关注狗的面部。下图呈现了使用导向反向传播后的结果:
- #generating saliency map with guided backprop
- grads2 = visualize_saliency(model, layer_idx,filter_indices=None,seed_input=image,backprop_modifier='guided')
- #plotting the saliency map as heatmap
- plt.imshow(grads2,cmap='jet')
导向反向传播将所有的负梯度变为0,即只更新对类别概率有积极影响的像素。
CAM(Class Activation Maps)(梯度加权)
CAM也是一种神经网络可视化技术,基本原理是根据其梯度或对输出的贡献来权衡激活图。
以下节选自Grad-CAM论文给出了该技术的要点:
| Grad-CAM可以使用任何目标概念的梯度(例如“狗”的未归一化概率或者简单的说明文字),进入最终的卷积层生成一个粗略的定位图,最后突出显示图像中用于预测概念的重要区域。 |
本质上,只需取用最后一个卷积层的特征映射,并使用相对于特征图的输出梯度对每个滤波器进行加权(相乘),就能达到目的。生成加权梯度类激活图的过程包括以下步骤:
- 利用最后一层卷积层输出的特征图。对于VGG16来说,该特征映射的大小为14x14x512。
- 计算输出与特征图相对应的梯度。
- 进行梯度全局平均池化。
- 将特征映射与相应的池化梯度相乘。
可以看到输入图像及其对应的类激活图如下:
下图为类激活图。
将过程分层输出可视化
卷积神经网络的起始层通常寻求边缘(edge)等小的细节信息。随着对模型的深入了解,其特征也会发生变化。
对于模型不同层输出的可视化可以直观地呈现图像在相应层上突出显示的特性。为了针对后续问题进行架构微调,可视化是非常重要的一步。因为我们可以看到不同层的不同特性,并决定模型中使用的具体层。
例如,在比较神经风格迁移问题中不同层的性能时,可视化输出可以给予极大的助力。
下述程序展示了如何实现VGG16模型的不同层的输出:
- #importing required libraries and functions
- from keras.models import Model
- #defining names of layers from which we will take the output
- layer_names = ['block1_conv1','block2_conv1','block3_conv1','block4_conv2']
- outputs = []
- imageimage = image.reshape((1, image.shape[0], image.shape[1], image.shape[2]))
- #extracting the output and appending to outputs
- for layer_name in layer_names:
- intermediate_layer_model = Model(inputs=model.input,outputs=model.get_layer(layer_name).output)
- intermediate_output = intermediate_layer_model.predict(image)
- outputs.append(intermediate_output)
- #plotting the outputs
- fig,ax = plt.subplots(nrows=4,ncols=5,figsize=(20,20))
- for i in range(4):
- for z in range(5):
- ax[i][z].imshow(outputs[i][0,:,:,z])
- ax[i][z].set_title(layer_names[i])
- ax[i][z].set_xticks([])
- ax[i][z].set_yticks([])
- plt.savefig('layerwise_output.jpg')
如图所示,VGG16(除block5外)的每一层都从图像中提取了不同特征。起始层对应的是类似边缘的低级特征,而后一层对应的是车顶、排气等特征。
结语
可视化总是让人惊奇不已。固然理解一项技术工作原理的方法有很多,但是将其原理可视化会让理解过程变得更加有趣。以下相关热门话题值得关注:
- 神经网络的特征提取过程是一个极为热门的研究领域,同时也已经促进了很多工具的开发,如TensorSpace和“激活地图集”(ActivationAtlases)。
- TensorSpace也是一个支持多种模型格式的神经网络可视化工具,可以加载模型并以交互的方式将其可视化。TensorSpace还有一个“游乐场”,用户可以使用多个架构进行可视化,在浏览器中尝试神经网络。


