数据科学家在创建机器学习模型后,必须将其部署到生产中。要在不同的基础架构上运行它,使用容器并通过 REST API 公开模型是部署机器学习模型的常用方法。本文演示了如何在 Podman 容器中使用 Connexion 推出使用 REST API 的 TensorFlow 机器学习模型。
准备
首先,使用以下命令安装 Podman:
sudo dnf -y install podman
接下来,为容器创建一个新文件夹并切换到该目录。
mkdir deployment_container && cd deployment_container
TensorFlow 模型的 REST API
下一步是为机器学习模型创建 REST API。这个 github 仓库包含一个预训练模型,以及能让 REST API 工作的设置。
使用以下命令在 deployment_container 目录中克隆它:
git clone https://github.com/svenboesiger/titanic_tf_ml_model.git
prediction.py 和 ml_model/
prediction.py 能进行 Tensorflow 预测,而 20x20x20 神经网络的权重位于文件夹 ml_model/ 中。
swagger.yaml
swagger.yaml 使用 Swagger规范 定义 Connexion 库的 API。此文件包含让你的服务器提供输入参数验证、输出响应数据验证、URL 端点定义所需的所有信息。
额外地,Connexion 还将给你提供一个简单但有用的单页 Web 应用,它演示了如何使用 Javascript 调用 API 和更新 DOM。
swagger: "2.0"info:description: This is the swagger file that goes with our server codeversion: "1.0.0"title: Tensorflow Podman Articleconsumes:- "application/json"produces:- "application/json"basePath: "/"paths:/survival_probability:post:operationId: "prediction.post"tags:- "Prediction"summary: "The prediction data structure provided by the server application"description: "Retrieve the chance of surviving the titanic disaster"parameters:- in: bodyname: passengerrequired: trueschema:$ref: '#/definitions/PredictionPost'responses:'201':description: 'Survival probability of an individual Titanic passenger'definitions:PredictionPost:type: object
server.py 和 requirements.txt
server.py 定义了启动 Connexion 服务器的入口点。
import connexionapp = connexion.App(__name__, specification_dir='./')app.add_api('swagger.yaml')if __name__ == '__main__':app.run(debug=True)
requirements.txt 定义了运行程序所需的 python 包。
connexiontensorflowpandas
容器化!
为了让 Podman 构建映像,请在上面的准备步骤中创建的 deployment_container 目录中创建一个名为 Dockerfile 的新文件:
FROM fedora:28# File Author / MaintainerMAINTAINER Sven Boesiger <donotspam@ujelang.com># Update the sourcesRUN dnf -y update --refresh# Install additional dependenciesRUN dnf -y install libstdc++RUN dnf -y autoremove# Copy the application folder inside the containerADD /titanic_tf_ml_model /titanic_tf_ml_model# Get pip to download and install requirements:RUN pip3 install -r /titanic_tf_ml_model/requirements.txt# Expose portsEXPOSE 5000# Set the default directory where CMD will executeWORKDIR /titanic_tf_ml_model# Set the default command to execute# when creating a new containerCMD python3 server.py
接下来,使用以下命令构建容器镜像:
podman build -t ml_deployment .
运行容器
随着容器镜像的构建和准备就绪,你可以使用以下命令在本地运行它:
podman run -p 5000:5000 ml_deployment
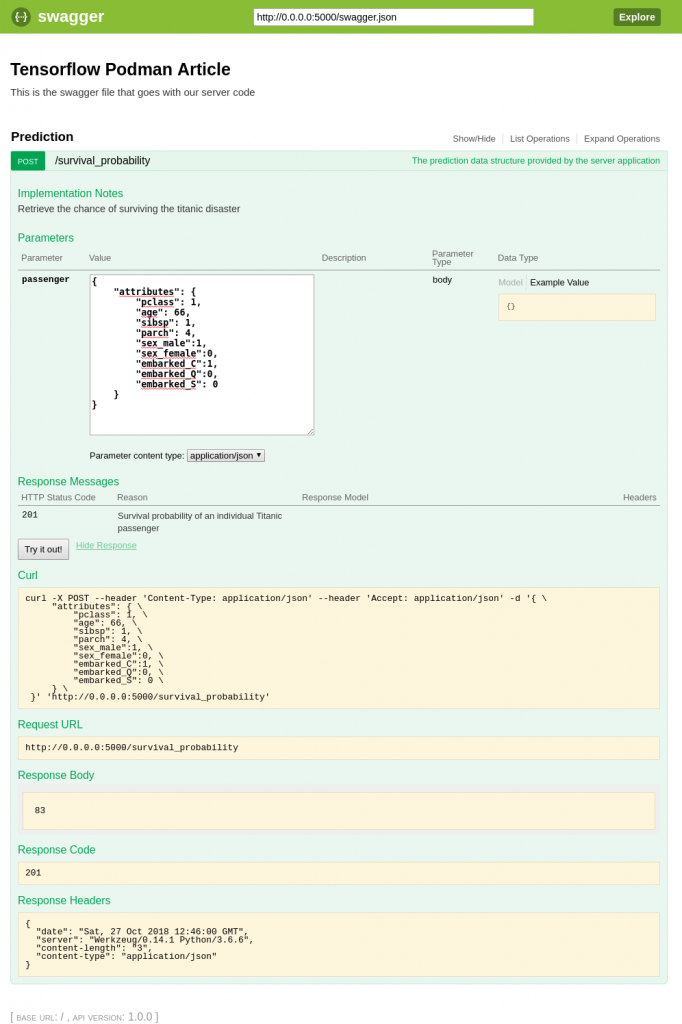
在 Web 浏览器中输入 http://0.0.0.0:5000/ui 访问 Swagger/Connexion UI 并测试模型:

当然,你现在也可以在应用中通过 REST API 访问模型。


