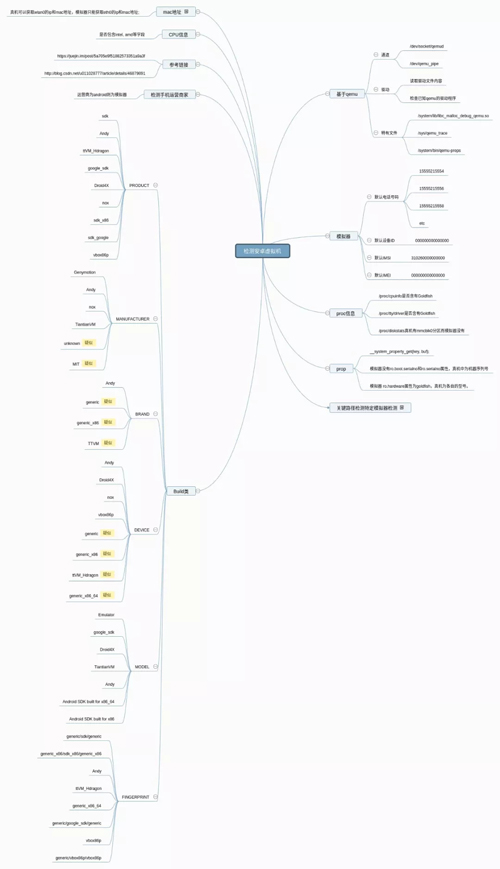
刚刚看了一些关于Detect Android Emulator的开源项目/文章/论文,我看的这些其实都是13年14年提出的方法,方法里大多是检测一些环境属性,检查一些文件这样,但实际上检测的思路并不局限于此。有的是很直接了当去检测qemu,而其它的方法则是旁敲侧击比如检测adb,检测ptrace之类的。思路也很灵活。
***看到有提出通过利用QEMU这样的模拟CPU与物理CPU之间的实际差异(任务调度差异), 模拟传感器和物理传感器的差异,缓存的差异等方法来检测。相比检测环境属性,检测效果会提升很多。
下面我就列出各个资料中所提出的一些方法/思路/代码供大家交流学习。
QEMU Properties
- public class Property {
- public String name;
- public String seek_value;
- public Property(String name, String seek_value) {
- this.name = name;
- this.seek_value = seek_value;
- }
- }
- /**
- * 已知属性, 格式为 [属性名, 属性值], 用于判定当前是否为QEMU环境
- */
- private static Property[] known_props = {new Property("init.svc.qemud", null),
- new Property("init.svc.qemu-props", null), new Property("qemu.hw.mainkeys", null),
- new Property("qemu.sf.fake_camera", null), new Property("qemu.sf.lcd_density", null),
- new Property("ro.bootloader", "unknown"), new Property("ro.bootmode", "unknown"),
- new Property("ro.hardware", "goldfish"), new Property("ro.kernel.android.qemud", null),
- new Property("ro.kernel.qemu.gles", null), new Property("ro.kernel.qemu", "1"),
- new Property("ro.product.device", "generic"), new Property("ro.product.model", "sdk"),
- new Property("ro.product.name", "sdk"),
- new Property("ro.serialno", null)};
- /**
- * 一个阈值, 因为所谓"已知"的模拟器属性并不完全准确, 有可能出现假阳性结果, 因此保持一定的阈值能让检测效果更好
- */
- private static int MIN_PROPERTIES_THRESHOLD = 0x5;
- /**
- * 尝试通过查询指定的系统属性来检测QEMU环境, ***跟阈值比较得出检测结果.
- *
- * @param context A {link Context} object for the Android application.
- * @return {@code true} if enough properties where found to exist or {@code false} if not.
- */
- public boolean hasQEmuProps(Context context) {
- int found_props = 0;
- for (Property property : known_props) {
- String property_value = Utilities.getProp(context, property.name);
- // See if we expected just a non-null
- if ((property.seek_value == null) && (property_value != null)) {
- found_props++;
- }
- // See if we expected a value to seek
- if ((property.seek_value != null) && (property_value.indexOf(property.seek_value) != -1)) {
- found_props++;
- }
- }
- if (found_props >= MIN_PROPERTIES_THRESHOLD) {
- return true;
- }
- return false;
- }
这些都是基于一些经验和特征来比对的属性, 这里的属性以及之后的一些文件呀属性啊之类的我就不再多作解释。
Device ID
- private static String[] known_device_ids = {"000000000000000", // Default emulator id
- "e21833235b6eef10", // VirusTotal id
- "012345678912345"};
- public static boolean hasKnownDeviceId(Context context) {
- TelephonyManager telephonyManager = (TelephonyManager) context.getSystemService(Context.TELEPHONY_SERVICE);
- String deviceId = telephonyManager.getDeviceId();
- for (String known_deviceId : known_device_ids) {
- if (known_deviceId.equalsIgnoreCase(deviceId)) {
- return true;
- }
- }
- return false;
- }
Default Number
- private static String[] known_numbers = {
- "15555215554", // 模拟器默认电话号码 + VirusTotal
- "15555215556", "15555215558", "15555215560", "15555215562", "15555215564", "15555215566",
- "15555215568", "15555215570", "15555215572", "15555215574", "15555215576", "15555215578",
- "15555215580", "15555215582", "15555215584",};
- public static boolean hasKnownPhoneNumber(Context context) {
- TelephonyManager telephonyManager = (TelephonyManager) context.getSystemService(Context.TELEPHONY_SERVICE);
- String phoneNumber = telephonyManager.getLine1Number();
- for (String number : known_numbers) {
- if (number.equalsIgnoreCase(phoneNumber)) {
- return true;
- }
- }
- return false;
- }
IMSI
- private static String[] known_imsi_ids = {"310260000000000" // 默认IMSI编号
- };
- public static boolean hasKnownImsi(Context context) {
- TelephonyManager telephonyManager = (TelephonyManager) context.getSystemService(Context.TELEPHONY_SERVICE);
- String imsi = telephonyManager.getSubscriberId();
- for (String known_imsi : known_imsi_ids) {
- if (known_imsi.equalsIgnoreCase(imsi)) {
- return true;
- }
- }
- return false;
- }
Build类
- public static boolean hasEmulatorBuild(Context context) {
- String BOARD = android.os.Build.BOARD; // The name of the underlying board, like "unknown".
- // This appears to occur often on real hardware... that's sad
- // String BOOTLOADER = android.os.Build.BOOTLOADER; // The system bootloader version number.
- String BRAND = android.os.Build.BRAND; // The brand (e.g., carrier) the software is customized for, if any.
- // "generic"
- String DEVICE = android.os.Build.DEVICE; // The name of the industrial design. "generic"
- String HARDWARE = android.os.Build.HARDWARE; // The name of the hardware (from the kernel command line or
- // /proc). "goldfish"
- String MODEL = android.os.Build.MODEL; // The end-user-visible name for the end product. "sdk"
- String PRODUCT = android.os.Build.PRODUCT; // The name of the overall product.
- if ((BOARD.compareTo("unknown") == 0) /* || (BOOTLOADER.compareTo("unknown") == 0) */
- || (BRAND.compareTo("generic") == 0) || (DEVICE.compareTo("generic") == 0)
- || (MODEL.compareTo("sdk") == 0) || (PRODUCT.compareTo("sdk") == 0)
- || (HARDWARE.compareTo("goldfish") == 0)) {
- return true;
- }
- return false;
- }
运营商名
- public static boolean isOperatorNameAndroid(Context paramContext) {
- String szOperatorName = ((TelephonyManager) paramContext.getSystemService(Context.TELEPHONY_SERVICE)).getNetworkOperatorName();
- boolean isAndroid = szOperatorName.equalsIgnoreCase("android");
- return isAndroid;
- }
QEMU驱动
- private static String[] known_qemu_drivers = {"goldfish"};
- /**
- * 读取驱动文件, 检查是否包含已知的qemu驱动
- *
- * @return {@code true} if any known drivers where found to exist or {@code false} if not.
- */
- public static boolean hasQEmuDrivers() {
- for (File drivers_file : new File[]{new File("/proc/tty/drivers"), new File("/proc/cpuinfo")}) {
- if (drivers_file.exists() && drivers_file.canRead()) {
- // We don't care to read much past things since info we care about should be inside here
- byte[] data = new byte[1024];
- try {
- InputStream is = new FileInputStream(drivers_file);
- is.read(data);
- is.close();
- } catch (Exception exception) {
- exception.printStackTrace();
- }
- String driver_data = new String(data);
- for (String known_qemu_driver : FindEmulator.known_qemu_drivers) {
- if (driver_data.indexOf(known_qemu_driver) != -1) {
- return true;
- }
- }
- }
- }
- return false;
- }
QEMU文件
- private static String[] known_files = {"/system/lib/libc_malloc_debug_qemu.so", "/sys/qemu_trace",
- "/system/bin/qemu-props"};
- /**
- * 检查是否存在已知的QEMU环境文件
- *
- * @return {@code true} if any files where found to exist or {@code false} if not.
- */
- public static boolean hasQEmuFiles() {
- for (String pipe : known_files) {
- File qemu_file = new File(pipe);
- if (qemu_file.exists()) {
- return true;
- }
- }
- return false;
- }
Genymotion文件
- private static String[] known_geny_files = {"/dev/socket/genyd", "/dev/socket/baseband_genyd"};
- /**
- * 检查是否存在已知的Genemytion环境文件
- *
- * @return {@code true} if any files where found to exist or {@code false} if not.
- */
- public static boolean hasGenyFiles() {
- for (String file : known_geny_files) {
- File geny_file = new File(file);
- if (geny_file.exists()) {
- return true;
- }
- }
- return false;
- }
QEMU管道
- private static String[] known_pipes = {"/dev/socket/qemud", "/dev/qemu_pipe"};
- /**
- * 检查是否存在已知的QEMU使用的管道
- *
- * @return {@code true} if any pipes where found to exist or {@code false} if not.
- */
- public static boolean hasPipes() {
- for (String pipe : known_pipes) {
- File qemu_socket = new File(pipe);
- if (qemu_socket.exists()) {
- return true;
- }
- }
- return false;
- }
设置断点
- static {
- // This is only valid for arm
- System.loadLibrary("anti");
- }
- public native static int qemuBkpt();
- public static boolean checkQemuBreakpoint() {
- boolean hit_breakpoint = false;
- // Potentially you may want to see if this is a specific value
- int result = qemuBkpt();
- if (result > 0) {
- hit_breakpoint = true;
- }
- return hit_breakpoint;
- }
以下是对应的c++代码
- void handler_sigtrap(int signo) {
- exit(-1);
- }
- void handler_sigbus(int signo) {
- exit(-1);
- }
- int setupSigTrap() {
- // BKPT throws SIGTRAP on nexus 5 / oneplus one (and most devices)
- signal(SIGTRAP, handler_sigtrap);
- // BKPT throws SIGBUS on nexus 4
- signal(SIGBUS, handler_sigbus);
- }
- // This will cause a SIGSEGV on some QEMU or be properly respected
- int tryBKPT() {
- __asm__ __volatile__ ("bkpt 255");
- }
- jint Java_diff_strazzere_anti_emulator_FindEmulator_qemuBkpt(JNIEnv* env, jobject jObject) {
- pid_t child = fork();
- int child_status, status = 0;
- if(child == 0) {
- setupSigTrap();
- tryBKPT();
- } else if(child == -1) {
- status = -1;
- } else {
- int timeout = 0;
- int i = 0;
- while ( waitpid(child, &child_status, WNOHANG) == 0 ) {
- sleep(1);
- // Time could be adjusted here, though in my experience if the child has not returned instantly
- // then something has gone wrong and it is an emulated device
- if(i++ == 1) {
- timeout = 1;
- break;
- }
- }
- if(timeout == 1) {
- // Process timed out - likely an emulated device and child is frozen
- status = 1;
- }
- if ( WIFEXITED(child_status) ) {
- // 子进程正常退出
- status = 0;
- } else {
- // Didn't exit properly - very likely an emulator
- status = 2;
- }
- // Ensure child is dead
- kill(child, SIGKILL);
- }
- return status;
- }
这里我的描述可能并不准确, 因为并没有找到相关的资料. 我只能以自己的理解来解释一下:
SIGTRAP是调试器设置断点时发生的信号, 在nexus5或一加手机等大多数手机都可以触发. SIGBUS则是在一个总线错误, 指针也许访问了一个有效地址, 但总线会因为数据未对齐等原因无法使用, 在nexus4手机上可以触发. 而bkpt则是arm的断点指令, 这是曾经qemu被提出来的一个issue, qemu会因为SIGSEGV信号而崩溃, 作者想利用这个崩溃来检测qemu. 如果程序没有正常退出或被冻结, 那么就可以认定很可能是在模拟器里.
ADB
- public static boolean hasEmulatorAdb() {
- try {
- return FindDebugger.hasAdbInEmulator();
- } catch (Exception exception) {
- exception.printStackTrace();
- return false;
- }
- }
isUserAMonkey()
- public static boolean hasEmulatorAdb() {
- try {
- return FindDebugger.hasAdbInEmulator();
- } catch (Exception exception) {
- exception.printStackTrace();
- return false;
- }
- }
这个其实是用于检测当前操作到底是用户还是脚本在要求应用执行。
isDebuggerConnected()
- /**
- * 你信或不信, 还真有许多加固程序使用这个方法...
- */
- public static boolean isBeingDebugged() {
- return Debug.isDebuggerConnected();
- }
这个方法是用来检测调试,判断是否有调试器连接。
ptrace
- private static String tracerpid = "TracerPid";
- /**
- * 阿里巴巴用于检测是否在跟踪应用进程
- *
- * 容易规避, 用法是创建一个线程每3秒检测一次, 如果检测到则程序崩溃
- *
- * @return
- * @throws IOException
- */
- public static boolean hasTracerPid() throws IOException {
- BufferedReader reader = null;
- try {
- reader = new BufferedReader(new InputStreamReader(new FileInputStream("/proc/self/status")), 1000);
- String line;
- while ((line = reader.readLine()) != null) {
- if (line.length() > tracerpid.length()) {
- if (line.substring(0, tracerpid.length()).equalsIgnoreCase(tracerpid)) {
- if (Integer.decode(line.substring(tracerpid.length() + 1).trim()) > 0) {
- return true;
- }
- break;
- }
- }
- }
- } catch (Exception exception) {
- exception.printStackTrace();
- } finally {
- reader.close();
- }
- return false;
- }
这个方法是通过检查 /proc/self/status 的TracerPid项,这个项在没有跟踪的时候默认为0,当有程序在跟踪时会修改为对应的pid。因此如果TracerPid不等于0,那么就可以认为是在模拟器环境。
TCP连接
- public static boolean hasAdbInEmulator() throws IOException {
- boolean adbInEmulator = false;
- BufferedReader reader = null;
- try {
- reader = new BufferedReader(new InputStreamReader(new FileInputStream("/proc/net/tcp")), 1000);
- String line;
- // Skip column names
- reader.readLine();
- ArrayList<tcp> tcpList = new ArrayList<tcp>();
- while ((line = reader.readLine()) != null) {
- tcpList.add(tcp.create(line.split("\\W+")));
- }
- reader.close();
- // Adb is always bounce to 0.0.0.0 - though the port can change
- // real devices should be != 127.0.0.1
- int adbPort = -1;
- for (tcp tcpItem : tcpList) {
- if (tcpItem.localIp == 0) {
- adbPort = tcpItem.localPort;
- break;
- }
- }
- if (adbPort != -1) {
- for (tcp tcpItem : tcpList) {
- if ((tcpItem.localIp != 0) && (tcpItem.localPort == adbPort)) {
- adbInEmulator = true;
- }
- }
- }
- } catch (Exception exception) {
- exception.printStackTrace();
- } finally {
- reader.close();
- }
- return adbInEmulator;
- }
- public static class tcp {
- public int id;
- public long localIp;
- public int localPort;
- public int remoteIp;
- public int remotePort;
- static tcp create(String[] params) {
- return new tcp(params[1], params[2], params[3], params[4], params[5], params[6], params[7], params[8],
- params[9], params[10], params[11], params[12], params[13], params[14]);
- }
- public tcp(String id, String localIp, String localPort, String remoteIp, String remotePort, String state,
- String tx_queue, String rx_queue, String tr, String tm_when, String retrnsmt, String uid,
- String timeout, String inode) {
- this.id = Integer.parseInt(id, 16);
- this.localIp = Long.parseLong(localIp, 16);
- this.localPort = Integer.parseInt(localPort, 16);
- }
- }
这个方法是通过读取/proc/net/tcp的信息来判断是否存在adb,比如真机的的信息为0: 4604D20A:B512 A3D13AD8...,而模拟器上的对应信息就是 0: 00000000:0016 00000000:0000,因为adb通常是反射到0.0.0.0这个ip上,虽然端口有可能改变,但确实是可行的。
TaintDroid
- public static boolean hasPackageNameInstalled(Context context, String packageName) {
- PackageManager packageManager = context.getPackageManager();
- // In theory, if the package installer does not throw an exception, package exists
- try {
- packageManager.getInstallerPackageName(packageName);
- return true;
- } catch (IllegalArgumentException exception) {
- return false;
- }
- }
- public static boolean hasAppAnalysisPackage(Context context) {
- return Utilities.hasPackageNameInstalled(context, "org.appanalysis");
- }
- public static boolean hasTaintClass() {
- try {
- Class.forName("dalvik.system.Taint");
- return true;
- }
- catch (ClassNotFoundException exception) {
- return false;
- }
- }
这个比较单纯了。就是通过检测包名,检测Taint类来判断是否安装有TaintDroid这个污点分析工具。另外也还可以检测TaintDroid的一些成员变量。
eth0
- private static boolean hasEth0Interface() {
- try {
- for (Enumeration<NetworkInterface> en = NetworkInterface.getNetworkInterfaces(); en.hasMoreElements(); ) {
- NetworkInterface intf = en.nextElement();
- if (intf.getName().equals("eth0"))
- return true;
- }
- } catch (SocketException ex) {
- }
- return false;
- }
检测是否存在eth0网卡。
传感器
手机上配备了各式各样的传感器, 但它们实质上都是基于从环境收集的信息输出值, 因此想要模拟传感器是非常具有挑战性的. 这些传感器为识别手机和模拟器提供了新的机会。
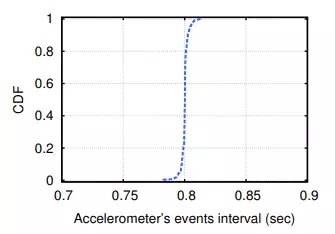
比如在论文 Rage Against the Virtual Machine: Hindering Dynamic Analysis of Android Malware 中,作者对Android模拟器的加速器进行测试,作者发现Android模拟器上的传感器会在相同的时间间隔内(观测结果是0.8s, 标准偏差为0.003043)产生相同的值。显然对于现实世界的传感器,这是不可能的。
于是我们可以先注册一个传感器监听器,如果注册失败,就可能是在模拟器中(排除实际设备不支持传感器的可能性)。如果注册成功,那么检查onSensorChanged回调方法,如果在连续调用这个方法的过程所观察到的传感器值或时间间隔相同,那么就可以认定是在模拟器环境中。
QEMU任务调度
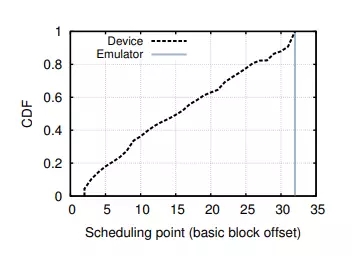
出于性能优化的原因, QEMU在每次执行指令时都不会主动更新程序计数器(PC), 由于翻译指令在本地执行, 而增加PC需要额外的指令带来开销. 所以QEMU只在执行那些从线性执行过程里中断的指令(例如分支指令)时才会更新程序计数器。
这也就导致在执行一些基本块的期间如果发生了调度事件, 那么也没有办法恢复调度前的PC,也是出于这个原因,QEMU仅在执行基本块后才发生调度事件,绝不会执行的过程中发生。
如上图,因为调度可能在任意时间发生,所以在非模拟器环境下,会观察到大量的调度点. 而在模拟器环境中,只能看到特定的调度点。
SMC识别
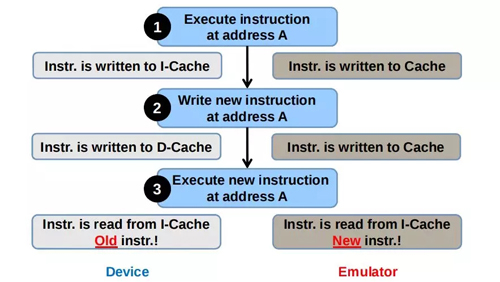
因为QEMU会跟踪代码页的改动,于是存在一种新颖的方法来检测QEMU--使用自修改代码(Self-Modifying Code, SMC)引起模拟器和实际设备之间的执行流变化。
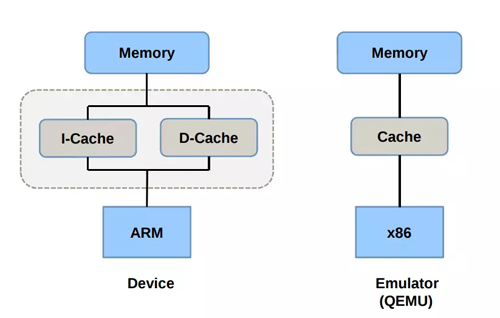
ARM处理器包含有两个不同的缓冲Cache, 一个用于指令访问(I-Cache),而另一个用于数据访问(D-Cache)。但如ARM这样的哈佛架构并不能保证I-Cache和D-Cache之间的一致性。因此CPU有可能在新代码片已经写入主存后执行旧的代码片(也许是无效的)。
这个问题可以通过强迫两个缓存一致得到解决, 这有两步:
- 清理主存, 以便将D-Cache中新写入的代码移入主存
- 使I-Cache无效, 以便它可以用主存的新内容重新填充
在原生Android代码中,可以使用cacheflush函数,该函数通过系统调用完成上述操作。
识别代码,使用一个具有读写权限的内存, 其中包含两个不同函数f1和f2的代码,这两个函数其实很简单,只是单纯在一个全局字符串变量的末尾附加各自的函数名称, 这两个函数会在循环里交错执行,这样就可以通过结果的字符串推断出函数调用序列。
如前所述,我们调用cacheflush来同步缓存. 在实际设备和模拟器上运行代码得到的结果是相同的--每次执行都会产生一致的函数调用序列。
接下来我们移除调用cacheflush,执行相同的操作。那么在实际设备中, 我们每次运行都会观察到一个随机的函数调用序列,这也如前所述的那样,因为I-Cache可能包含一些旧指令,每次调用的时候缓存都不同步所导致的。
而模拟器环境却不会发生这样的情况, 而且函数调用序列会跟之前没有移除cacheflush时完全相同, 也就是每次函数调用前缓存都是一致的. 这是因为QEMU会跟踪代码页上的修改,并确保生成的代码始终与内存中的目标指令匹配, 因此QEMU会放弃之前版本的代码翻译并重新生成新代码。
结语
看到这里会不会已经觉得检测方法够多了,可是我还只是看了13年14年的资料。有关近几年的资料还未涉及。
***我就把这些检测方法整合在一张思维导图(见附件)里供大家一览,欢迎大家和我交流带带我
参考链接
strazzere/anti-emulator:***发表于2013年HitCon, 提出了检测虚拟机的一些方法和思路, 应该是Android模拟器检测的开山之作了, 本文也主要基于该仓库进行讲解.
Rage Against the Virtual Machine: Hindering Dynamic Analysis of Android Malware:通过任务调度检测和使用SMC识别都是参考于这篇论文. 这篇论文和下面这篇论文十分有参考价值, 值得一读.
Evading Android Runtime Analysis via Sandbox Detection:论文中提出了大量的检测Android运行环境的方法和思路, 内容丰富且十分全面, 也值得一读.
CalebFenton/AndroidEmulatorDetect:这个仓库其实是整合了一些文章和仓库中的检测方法和代码, 而且并不全面, 不过倒是给出了很多参考链接, 我顺藤摸瓜.
How can I detect when an Android application is running in the emulator? 网友给出了很多解决方法. 但实际上并不全面, 也只是模拟器检测中的冰山一角罢了. 毕竟可以检测的地方多了去了。
利用任务调度特性检测Android模拟器


