使用 Headless Chrome 进行页面渲染 从属于笔者的 Web 开发基础与工程实践系列文章,主要介绍了使用 Node.js 利用 Chrome Remote Protocol 远程控制 Headless Chrome 渲染界面的基础用法。本文涉及的参考与引用资料统一列举在这里。
近日笔者在为 declarative-crawler 编写动态页面的蜘蛛,即在使用 declarative-crawler 爬取知乎美图 一文中介绍的 HeadlessChromeSpider 时,需要选择某个无界面浏览器以执行 JavaScript 代码来动态生成页面。之前笔者往往是使用 PhantomJS 或者 Selenium 执行动态页面渲染,而在 Chrome 59 之后 Chrome 提供了 Headless 模式,其允许在命令行中使用 Chromium 以及 Blink 渲染引擎提供的完整的现代 Web 平台特性。需要注意的是,Headless Chrome 仍然存在一定的局限,相较于 Nightmare 或 Phantom 这样的工具, Chrome 的远程接口仍然无法提供较好的开发者体验。我们在下文介绍的代码示例中也会发现,目前我们仍需要大量的模板代码进行控制。
安装与启动
在 Chrome 安装完毕后我们可以利用其包体内自带的命令行工具启动:
$ chrome --headless --remote-debugging-port=9222 https://chromium.org
- 1.
笔者为了部署方便,使用 Docker 镜像来进行快速部署,如果你本地存在 Docker 环境,可以使用如下命令快速启动:
docker run -d -p 9222:9222 justinribeiro/chrome-headless
- 1.
如果是在 Mac 下本地使用的话我们还可以创建命令别名:
alias chrome="/Applications/Google\ Chrome.app/Contents/MacOS/Google\ Chrome"
alias chrome-canary="/Applications/Google\ Chrome\ Canary.app/Contents/MacOS/Google\ Chrome\ Canary"
alias chromium="/Applications/Chromium.app/Contents/MacOS/Chromium"
- 1.
- 2.
- 3.
如果是在 Ubuntu 环境下我们可以使用 deb 进行安装:
# Install Google Chrome
# https://askubuntu.com/questions/79280/how-to-install-chrome-browser-properly-via-command-line
sudo apt-get install libxss1 libappindicator1 libindicator7
wget https://dl.google.com/linux/direct/google-chrome-stable_current_amd64.deb
sudo dpkg -i google-chrome*.deb  # Might show "errors", fixed by next line
sudo apt-get install -f
- 1.
- 2.
- 3.
- 4.
- 5.
- 6.
chrome 命令行也支持丰富的命令行参数,--dump-dom 参数可以将 document.body.innerHTML 打印到标准输出中:
chrome --headless --disable-gpu --dump-dom https://www.chromestatus.com/
- 1.
而 --print-to-pdf 标识则会将网页输出位 PDF:
chrome --headless --disable-gpu --print-to-pdf https://www.chromestatus.com/
- 1.
初次之外,我们也可以使用 --screenshot 参数来获取页面截图:
chrome --headless --disable-gpu --screenshot https://www.chromestatus.com/

# Size of a standard letterhead.
chrome --headless --disable-gpu --screenshot --window-size=1280,1696 https://www.chromestatus.com/

# Nexus 5x
chrome --headless --disable-gpu --screenshot --window-size=412,732 https://www.chromestatus.com/
- 1.
- 2.
- 3.
- 4.
- 5.
- 6.
- 7.
如果我们需要更复杂的截图策略,譬如进行完整页面截图则需要利用代码进行远程控制。
代码控制
启动
在上文中我们介绍了如何利用命令行来手动启动 Chrome,这里我们尝试使用 Node.js 来启动 Chrome,最简单的方式就是使用 child_process 来启动:
const exec = require('child_process').exec;

function launchHeadlessChrome(url, callback) {
  // Assuming MacOSx.
  const CHROME = '/Applications/Google\ Chrome.app/Contents/MacOS/Google\ Chrome';
  exec(`${CHROME} --headless --disable-gpu --remote-debugging-port=9222 ${url}`, callback);
}

launchHeadlessChrome('https://www.chromestatus.com', (err, stdout, stderr) => {
  ...
});
- 1.
- 2.
- 3.
- 4.
- 5.
- 6.
- 7.
- 8.
- 9.
- 10.
- 11.
远程控制
这里我们使用 chrome-remote-interface 来远程控制 Chrome ,实际上 chrome-remote-interface 是对于 Chrome DevTools Protocol 的远程封装,我们可以参考协议文档了解详细的功能与参数。使用 npm 安装完毕之后,我们可以用如下代码片进行简单控制:
const CDP = require('chrome-remote-interface');

CDP((client) => {
    // extract domains
    const {Network, Page} = client;
    // setup handlers
    Network.requestWillBeSent((params) => {
        console.log(params.request.url);
    });
    Page.loadEventFired(() => {
        client.close();
    });
    // enable events then start!
    Promise.all([
        Network.enable(),
        Page.enable()
    ]).then(() => {
        return Page.navigate({url: 'https://github.com'});
    }).catch((err) => {
        console.error(err);
        client.close();
    });
}).on('error', (err) => {
    // cannot connect to the remote endpoint
    console.error(err);
});
- 1.
- 2.
- 3.
- 4.
- 5.
- 6.
- 7.
- 8.
- 9.
- 10.
- 11.
- 12.
- 13.
- 14.
- 15.
- 16.
- 17.
- 18.
- 19.
- 20.
- 21.
- 22.
- 23.
- 24.
- 25.
- 26.
我们也可以使用 chrome-remote-interface 提供的命令行功能,譬如我们可以在命令行中访问某个界面并且记录所有的网络请求:
$ chrome-remote-interface inspect
>>> Network.enable()
{ result: {} }
>>> Network.requestWillBeSent(params => params.request.url)
{ 'Network.requestWillBeSent': 'params => params.request.url' }
>>> Page.navigate({url: 'https://www.wikipedia.org'})
{ 'Network.requestWillBeSent': 'https://www.wikipedia.org/' }
{ result: { frameId: '5530.1' } }
{ 'Network.requestWillBeSent': 'https://www.wikipedia.org/portal/wikipedia.org/assets/img/Wikipedia_wordmark.png' }
{ 'Network.requestWillBeSent': 'https://www.wikipedia.org/portal/wikipedia.org/assets/img/Wikipedia-logo-v2.png' }
{ 'Network.requestWillBeSent': 'https://www.wikipedia.org/portal/wikipedia.org/assets/js/index-3b68787aa6.js' }
{ 'Network.requestWillBeSent': 'https://www.wikipedia.org/portal/wikipedia.org/assets/js/gt-ie9-c84bf66d33.js' }
{ 'Network.requestWillBeSent': 'https://www.wikipedia.org/portal/wikipedia.org/assets/img/sprite-bookshelf_icons.png?16ed124e8ca7c5ce9d463e8f99b2064427366360' }
{ 'Network.requestWillBeSent': 'https://www.wikipedia.org/portal/wikipedia.org/assets/img/sprite-project-logos.png?9afc01c5efe0a8fb6512c776955e2ad3eb48fbca' }
- 1.
- 2.
- 3.
- 4.
- 5.
- 6.
- 7.
- 8.
- 9.
- 10.
- 11.
- 12.
- 13.
- 14.
我们也可以直接查看内置的接口文档:
>>> Page.navigate
{ [Function]
  category: 'command',
  parameters: { url: { type: 'string', description: 'URL to navigate the page to.' } },
  returns:
   [ { name: 'frameId',
       '$ref': 'FrameId',
       hidden: true,
       description: 'Frame id that will be navigated.' } ],
  description: 'Navigates current page to the given URL.',
  handlers: [ 'browser', 'renderer' ] }>>> Page.navigate
{ [Function]
  category: 'command',
  parameters: { url: { type: 'string', description: 'URL to navigate the page to.' } },
  returns:
   [ { name: 'frameId',
       '$ref': 'FrameId',
       hidden: true,
       description: 'Frame id that will be navigated.' } ],
  description: 'Navigates current page to the given URL.',
  handlers: [ 'browser', 'renderer' ] }
- 1.
- 2.
- 3.
- 4.
- 5.
- 6.
- 7.
- 8.
- 9.
- 10.
- 11.
- 12.
- 13.
- 14.
- 15.
- 16.
- 17.
- 18.
- 19.
- 20.
- 21.
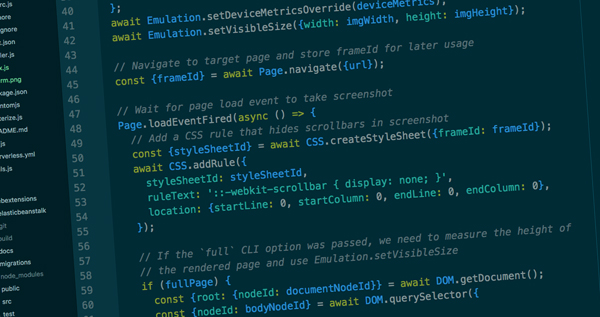
我们在上文中还提到需要以代码控制浏览器进行完整页面截图,这里需要利用 Emulation 模块控制页面视口缩放:
const CDP = require('chrome-remote-interface');
const argv = require('minimist')(process.argv.slice(2));
const file = require('fs');

// CLI Args
const url = argv.url || 'https://www.google.com';
const format = argv.format === 'jpeg' ? 'jpeg' : 'png';
const viewportWidth = argv.viewportWidth || 1440;
const viewportHeight = argv.viewportHeight || 900;
const delay = argv.delay || 0;
const userAgent = argv.userAgent;
const fullPage = argv.full;

// Start the Chrome Debugging Protocol
CDP(async function(client) {
  // Extract used DevTools domains.
  const {DOM, Emulation, Network, Page, Runtime} = client;

  // Enable events on domains we are interested in.
  await Page.enable();
  await DOM.enable();
  await Network.enable();

  // If user agent override was specified, pass to Network domain
  if (userAgent) {
    await Network.setUserAgentOverride({userAgent});
  }

  // Set up viewport resolution, etc.
  const deviceMetrics = {
    width: viewportWidth,
    height: viewportHeight,
    deviceScaleFactor: 0,
    mobile: false,
    fitWindow: false,
  };
  await Emulation.setDeviceMetricsOverride(deviceMetrics);
  await Emulation.setVisibleSize({width: viewportWidth, height: viewportHeight});

  // Navigate to target page
  await Page.navigate({url});

  // Wait for page load event to take screenshot
  Page.loadEventFired(async () => {
    // If the `full` CLI option was passed, we need to measure the height of
    // the rendered page and use Emulation.setVisibleSize
    if (fullPage) {
      const {root: {nodeId: documentNodeId}} = await DOM.getDocument();
      const {nodeId: bodyNodeId} = await DOM.querySelector({
        selector: 'body',
        nodeId: documentNodeId,
      });
      const {model: {height}} = await DOM.getBoxModel({nodeId: bodyNodeId});

      await Emulation.setVisibleSize({width: viewportWidth, height: height});
      // This forceViewport call ensures that content outside the viewport is
      // rendered, otherwise it shows up as grey. Possibly a bug?
      await Emulation.forceViewport({x: 0, y: 0, scale: 1});
    }

    setTimeout(async function() {
      const screenshot = await Page.captureScreenshot({format});
      const buffer = new Buffer(screenshot.data, 'base64');
      file.writeFile('output.png', buffer, 'base64', function(err) {
        if (err) {
          console.error(err);
        } else {
          console.log('Screenshot saved');
        }
        client.close();
      });
    }, delay);
  });
}).on('error', err => {
  console.error('Cannot connect to browser:', err);
});
- 1.
- 2.
- 3.
- 4.
- 5.
- 6.
- 7.
- 8.
- 9.
- 10.
- 11.
- 12.
- 13.
- 14.
- 15.
- 16.
- 17.
- 18.
- 19.
- 20.
- 21.
- 22.
- 23.
- 24.
- 25.
- 26.
- 27.
- 28.
- 29.
- 30.
- 31.
- 32.
- 33.
- 34.
- 35.
- 36.
- 37.
- 38.
- 39.
- 40.
- 41.
- 42.
- 43.
- 44.
- 45.
- 46.
- 47.
- 48.
- 49.
- 50.
- 51.
- 52.
- 53.
- 54.
- 55.
- 56.
- 57.
- 58.
- 59.
- 60.
- 61.
- 62.
- 63.
- 64.
- 65.
- 66.
- 67.
- 68.
- 69.
- 70.
- 71.
- 72.
- 73.
- 74.
- 75.
- 76.
【本文是51CTO专栏作者“张梓雄 ”的原创文章,如需转载请通过51CTO与作者联系】