数据分析都是直接使用hive脚本进行调用,随着APP用户行为和日志数据量的逐渐累积,跑每天的脚本运行需要花的时间越来越长,虽然进行了sql优化,但是上spark已经提上日程。
直接进行spark开发需要去学习scala,为了降低数据分析师的学习成本,决定前期先试用sparkSQL,能够让计算引擎无缝从MR切换到spark,现在主要使用pyspark访问hive数据。
以下是安装配置过程中的详细步骤:
1.安装spark
需要先安装JDK和scala,这不必多说,由于现有hadoop集群版本是采用的2.6.3,所以spark版本是下载的稳定版本spark-1.4.0-bin-hadoop2.6.tgz
我是先在一台机器上完成了Spark的部署,Master和Slave都在一台机器上。注意要配置免秘钥ssh登陆。
1.1 环境变量配置
- export JAVA_HOME=/usr/jdk1.8.0_73
- export HADOOP_HOME=/usr/hadoop
- export HADOOP_CONF_DIR=/usr/hadoop/etc/hadoop
- export SCALA_HOME=/usr/local/scala-2.11.7
- export SPARK_HOME=/home/hadoop/spark_folder/spark-1.4.0-bin-hadoop2.6
- export SPARK_MASTER_IP=127.0.0.1
- export SPARK_MASTER_PORT=7077
- export SPARK_MASTER_WEBUI_PORT=8099
- export SPARK_WORKER_CORES=3 //每个Worker使用的CPU核数
- export SPARK_WORKER_INSTANCES=1 //每个Slave中启动几个Worker实例
- export SPARK_WORKER_MEMORY=10G //每个Worker使用多大的内存
- export SPARK_WORKER_WEBUI_PORT=8081 //Worker的WebUI端口号
- export SPARK_EXECUTOR_CORES=1 //每个Executor使用使用的核数
- export SPARK_EXECUTOR_MEMORY=1G //每个Executor使用的内存
- export HIVE_HOME=/home/hadoop/hive
- export SPARK_CLASSPATH=$HIVE_HOME/lib/mysql-connector-java-5.1.31-bin.jar:$SPARK_CLASSPATH
- export LD_LIBRARY_PATH=${LD_LIBRARY_PATH}:$HADOOP_HOME/lib/native
1.2 配置slaves
- cp slaves.template slaves
- vi slaves 添加以下内容:localhost
1.3 启动master和slave
- cd $SPARK_HOME/sbin/
- ./start-master.sh
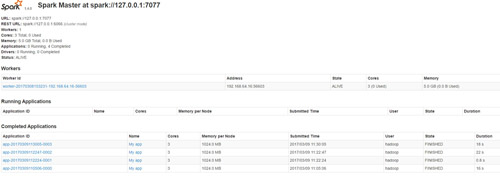
- 启动日志位于 $SPARK_HOME/logs/目录,访问 http://localhost:8099,即可看到Spark的WebUI界面
- 执行 ./bin/spark-shell,打开Scala到Spark的连接窗口
2.SparkSQL与Hive的整合
- 拷贝$HIVE_HOME/conf/hive-site.xml和hive-log4j.properties到 $SPARK_HOME/conf/
- 在$SPARK_HOME/conf/目录中,修改spark-env.sh,添加
- export HIVE_HOME=/home/hadoop/hive
- export SPARK_CLASSPATH=$HIVE_HOME/lib/mysql-connector-java-5.1.31-bin.jar:$SPARK_CLASSPATH
- 另外也可以设置一下Spark的log4j配置文件,使得屏幕中不打印额外的INFO信息(如果不想受干扰可设置为更高):
- log4j.rootCategory=WARN, console
- 进入$SPARK_HOME/bin,执行 ./spark-sql –master spark://127.0.0.1:7077 进入spark-sql CLI:
- [hadoop@hadoop spark]$ bin/spark-sql --help
- Usage: ./bin/spark-sql [options] [cli option]
- CLI options:
- -d,--define <keykey=value> Variable subsitution to apply to hive
- commands. e.g. -d A=B or --define A=B
- --database <databasename> Specify the database to use
- -e <quoted-query-string> SQL from command line
- -f <filename> SQL from files
- -h <hostname> connecting to Hive Server on remote host
- --hiveconf <propertyproperty=value> Use value for given property
- --hivevar <keykey=value> Variable subsitution to apply to hive
- commands. e.g. --hivevar A=B
- -i <filename> Initialization SQL file
- -p <port> connecting to Hive Server on port number
- -S,--silent Silent mode in interactive shell
- -v,--verbose Verbose mode (echo executed SQL to the
- console)
需要注意的是CLI不是使用JDBC连接,所以不能连接到ThriftServer;但可以配置conf/hive-site.xml连接到hive的metastore,然后对hive数据进行查询。下面我们接着说如何在python中连接hive数据表查询。
3.配置pyspark和示例代码
3.1 配置pyspark
- 打开/etc/profile:
- #PythonPath 将Spark中的pySpark模块增加的Python环境中
- export PYTHONPATH=/opt/spark-hadoop/python
- source /etc/profile
执行./bin/pyspark ,打开Python到Spark的连接窗口,确认没有报错。
打开命令行窗口,输入python,Python版本为2.7.6,如图所示,注意Spark暂时不支持Python3。输入import pyspark不报错,证明开发前工作已经完成。
3.2 启动ThriftServer
启动ThriftServer,使之运行在spark集群中:
sbin/start-thriftserver.sh --master spark://localhost:7077 --executor-memory 5g
ThriftServer可以连接多个JDBC/ODBC客户端,并相互之间可以共享数据。
3.3 请求示例
查看spark官方文档说明,spark1.4和2.0对于sparksql调用hive数据的API变化并不大。都是用sparkContext 。
- from pyspark import SparkConf, SparkContext
- from pyspark.sql import HiveContext
- conf = (SparkConf()
- .setMaster("spark://127.0.0.1:7077")
- .setAppName("My app")
- .set("spark.executor.memory", "1g"))
- sc = SparkContext(conf = conf)
- sqlContext = HiveContext(sc)
- my_dataframe = sqlContext.sql("Select count(1) from logs.fmnews_dim_where")
- my_dataframe.show()
返回结果:
运行以后在webUI界面看到job运行详情。
4.性能比较
截取了接近一个月的用户行为数据,数据大小为2G,总共接近1600w条记录。
为了测试不同sql需求情况下的结果,我们选取了日常运行的2类sql:
1.统计数据条数:
- select count(1) from fmnews_user_log2;
2.统计用户行为:
- SELECT device_id, min_time FROM
- (SELECT device_id,min(import_time) min_time FROM fmnews_user_log2
- GROUP BY device_id)a
- WHERE from_unixtime(int(substr(min_time,0,10)),'yyyy-MM-dd') = '2017-03-02';
3. 用户行为分析:
- select case when from_unixtime(int(substr(fmnews_time,0,10)),'HH:mm') between '06:00' and '07:59' then 1
- when from_unixtime(int(substr(fmnews_time,0,10)),'HH:mm') between '08:00' and '09:59' then 2
- when from_unixtime(int(substr(fmnews_time,0,10)),'HH:mm') between '10:00' and '11:59' then 3
- when from_unixtime(int(substr(fmnews_time,0,10)),'HH:mm') between '12:00' and '13:59' then 4
- when from_unixtime(int(substr(fmnews_time,0,10)),'HH:mm') between '14:00' and '15:59' then 5
- when from_unixtime(int(substr(fmnews_time,0,10)),'HH:mm') between '16:00' and '17:59' then 6
- when from_unixtime(int(substr(fmnews_time,0,10)),'HH:mm') between '18:00' and '19:59' then 7
- when from_unixtime(int(substr(fmnews_time,0,10)),'HH:mm') between '20:00' and '21:59' then 8
- when from_unixtime(int(substr(fmnews_time,0,10)),'HH:mm') between '22:00' and '23:59' then 9
- else 0 end fmnews_time_type, count(distinct device_id) device_count,count(1) click_count
- from fmcm.fmnews_user_log2
- where from_unixtime(int(substr(import_time,0,10)),'yyyy-MM-dd') = '2017-03-02'
- group by case when from_unixtime(int(substr(fmnews_time,0,10)),'HH:mm') between '06:00' and '07:59' then 1
- when from_unixtime(int(substr(fmnews_time,0,10)),'HH:mm') between '08:00' and '09:59' then 2
- when from_unixtime(int(substr(fmnews_time,0,10)),'HH:mm') between '10:00' and '11:59' then 3
- when from_unixtime(int(substr(fmnews_time,0,10)),'HH:mm') between '12:00' and '13:59' then 4
- when from_unixtime(int(substr(fmnews_time,0,10)),'HH:mm') between '14:00' and '15:59' then 5
- when from_unixtime(int(substr(fmnews_time,0,10)),'HH:mm') between '16:00' and '17:59' then 6
- when from_unixtime(int(substr(fmnews_time,0,10)),'HH:mm') between '18:00' and '19:59' then 7
- when from_unixtime(int(substr(fmnews_time,0,10)),'HH:mm') between '20:00' and '21:59' then 8
- when from_unixtime(int(substr(fmnews_time,0,10)),'HH:mm') between '22:00' and '23:59' then 9
- else 0 end;
第一条sql的执行结果对比:hive 35.013 seconds
第一条sql的执行结果对比:sparksql 1.218 seconds
第二条sql的执行结果对比:hive 78.101 seconds
第二条sql的执行结果对比:sparksql 8.669 seconds
第三条sql的执行结果对比:hive 101.228 seconds
第三条sql的执行结果对比:sparksql 14.221 seconds
可以看到,虽然没有官网吹破天的100倍性能提升,但是根据sql的复杂度来看10~30倍的效率还是可以达到的。
不过这里要注意到2个影响因子:
1. 我们数据集并没有采取全量,在数据量达到TB级别两者的差距应该会有所减小。同时sql也没有针对hive做优化。
2. spark暂时是单机(内存足够)并没有搭建集群,hive使用的hadoop集群有4台datanode。


