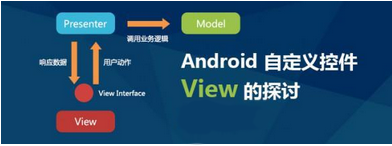
如果你打算完全定制一个View,那么你需要实现View类(所有的Android View都实现于这个类),并且实现确定尺寸的onMeasure(…))方法和确认绘图的onDraw(…))方法。
自定义View一共分为6步
***步
public class SmileyView extends View {
    private Paint mCirclePaint;
    private Paint mEyeAndMouthPaint;

    private float mCenterX;
    private float mCenterY;
    private float mRadius;
    private RectF mArcBounds = new RectF();

    public SmileyView(Context context) {
        this(context, null);
    }

    public SmileyView(Context context, AttributeSet attrs) {
        this(context, attrs, 0);
    }

    public SmileyView(Context context, AttributeSet attrs, int defStyleAttr) {
        super(context, attrs, defStyleAttr);
        initPaints();
    }

    private void initPaints() {/* ... */}

    @Override
    protected void onMeasure(int widthMeasureSpec, int heightMeasureSpec) {/* ... */}

    @Override
    protected void onDraw(Canvas canvas) {/* ... */}
}
- 1.
- 2.
- 3.
- 4.
- 5.
- 6.
- 7.
- 8.
- 9.
- 10.
- 11.
- 12.
- 13.
- 14.
- 15.
- 16.
- 17.
- 18.
- 19.
- 20.
- 21.
- 22.
- 23.
- 24.
- 25.
- 26.
- 27.
- 28.
- 29.
- 30.
2.实现画笔paint类
本文一共两只画笔
private void initPaints() {
    mCirclePaint = new Paint(Paint.ANTI_ALIAS_FLAG);
    mCirclePaint.setStyle(Paint.Style.FILL);
    mCirclePaint.setColor(Color.YELLOW);
    mEyeAndMouthPaint = new Paint(Paint.ANTI_ALIAS_FLAG);
    mEyeAndMouthPaint.setStyle(Paint.Style.STROKE);
    mEyeAndMouthPaint.setStrokeWidth(16 * getResources().getDisplayMetrics().density);
    mEyeAndMouthPaint.setStrokeCap(Paint.Cap.ROUND);
    mEyeAndMouthPaint.setColor(Color.BLACK);
}
- 1.
- 2.
- 3.
- 4.
- 5.
- 6.
- 7.
- 8.
- 9.
- 10.
3.覆写onMeasure(…)方法
实现这个方法告诉了母容器如何放弃自定义View,可以通过提供的measureSpecs来决定你的View的高和宽,以下是一个正方形,确认它的宽和高是一样的。
@Override
protected void onMeasure(int widthMeasureSpec, int heightMeasureSpec) {
    int w = MeasureSpec.getSize(widthMeasureSpec);
    int h = MeasureSpec.getSize(heightMeasureSpec);

    int size = Math.min(w, h);
    setMeasuredDimension(size, size);
}
- 1.
- 2.
- 3.
- 4.
- 5.
- 6.
- 7.
- 8.
注意:
这个方法需要至少保证一个setMeasuredDimension(..)调用,否则会报IllegalStateException错误。
4.实现onSizeChanged(…)方法
这个方法是你获取View现在的宽和高. 这里我们计算的是中心和半径。
@Override
protected void onSizeChanged(int w, int h, int oldw, int oldh) {
    mCenterX = w / 2f;
    mCenterY = h / 2f;
    mRadius = Math.min(w, h) / 2f;
}
- 1.
- 2.
- 3.
- 4.
- 5.
- 6.
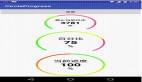
5.实现onDraw(…)方法
这个方法提供了如何绘制view,它提供的Canvas类可以进行绘制。
@Override
protected void onDraw(Canvas canvas) {
    // draw face
    canvas.drawCircle(mCenterX, mCenterY, mRadius, mCirclePaint);
    // draw eyes
    float eyeRadius = mRadius / 5f;
    float eyeOffsetX = mRadius / 3f;
    float eyeOffsetY = mRadius / 3f;
    canvas.drawCircle(mCenterX - eyeOffsetX, mCenterY - eyeOffsetY, eyeRadius, mEyeAndMouthPaint);
    canvas.drawCircle(mCenterX + eyeOffsetX, mCenterY - eyeOffsetY, eyeRadius, mEyeAndMouthPaint);
    // draw mouth
    float mouthInset = mRadius /3f;
    mArcBounds.set(mouthInset, mouthInset, mRadius * 2 - mouthInset, mRadius * 2 - mouthInset);
    canvas.drawArc(mArcBounds, 45f, 90f, false, mEyeAndMouthPaint);
}
- 1.
- 2.
- 3.
- 4.
- 5.
- 6.
- 7.
- 8.
- 9.
- 10.
- 11.
- 12.
- 13.
- 14.
- 15.
6.添加你的View
<FrameLayout
    xmlns:android="http://schemas.android.com/apk/res/android"
    android:layout_width="match_parent"
    android:layout_height="match_parent">

    <com.example.app.SmileyView
        android:layout_width="match_parent"
        android:layout_height="match_parent" />
</FrameLayout>
- 1.
- 2.
- 3.
- 4.
- 5.
- 6.
- 7.
- 8.
- 9.
到此就结束了,自定义View没你想的那么难