最近公司的项目中用到了相机,由于不用系统的相机,UI给的相机切图,必须自定义才可以。就花时间简单研究了一下相机的自定义。
相机属于系统硬件,这就需要我们来手动调用iPhone的相机硬件,分为以下步骤:
1、首先声明以下对象
#import <AVFoundation/AVFoundation.h>
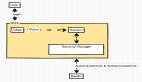
//捕获设备,通常是前置摄像头,后置摄像头,麦克风(音频输入)
@property (nonatomic, strong) AVCaptureDevice *device;
//AVCaptureDeviceInput 代表输入设备,他使用AVCaptureDevice 来初始化
@property (nonatomic, strong) AVCaptureDeviceInput *input;
//输出图片
@property (nonatomic ,strong) AVCaptureStillImageOutput *imageOutput;
//session:由他把输入输出结合在一起,并开始启动捕获设备(摄像头)
@property (nonatomic, strong) AVCaptureSession *session;
//图像预览层,实时显示捕获的图像
@property (nonatomic ,strong) AVCaptureVideoPreviewLayer *previewLayer;
- 1.
- 2.
- 3.
- 4.
- 5.
- 6.
- 7.
- 8.
- 9.
- 10.
- 11.
- 12.
- 13.
- 14.
- 15.
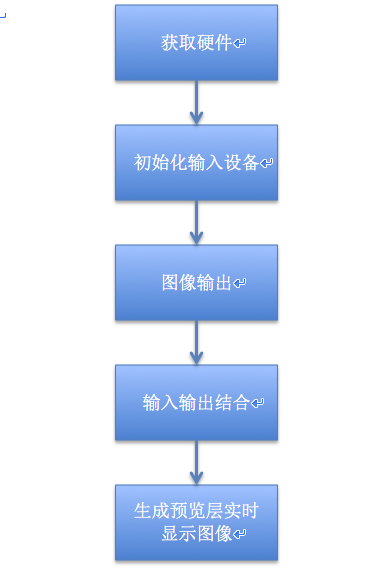
2、初始化各个对象
- (void)cameraDistrict
{
//    AVCaptureDevicePositionBack  后置摄像头
//    AVCaptureDevicePositionFront 前置摄像头
   self.device = [self cameraWithPosition:AVCaptureDevicePositionFront];
    self.input = [[AVCaptureDeviceInput alloc] initWithDevice:self.device error:nil];

    self.imageOutput = [[AVCaptureStillImageOutput alloc] init];

    self.session = [[AVCaptureSession alloc] init];
    //     拿到的图像的大小可以自行设定
    //    AVCaptureSessionPreset320x240
    //    AVCaptureSessionPreset352x288
    //    AVCaptureSessionPreset640x480
    //    AVCaptureSessionPreset960x540
    //    AVCaptureSessionPreset1280x720
    //    AVCaptureSessionPreset1920x1080
    //    AVCaptureSessionPreset3840x2160
    self.session.sessionPreset = AVCaptureSessionPreset640x480;
    //输入输出设备结合
    if ([self.session canAddInput:self.input]) {
        [self.session addInput:self.input];
    }
    if ([self.session canAddOutput:self.imageOutput]) {
        [self.session addOutput:self.imageOutput];
    }
    //预览层的生成
    self.previewLayer = [[AVCaptureVideoPreviewLayer alloc] initWithSession:self.session];
    self.previewLayer.frame = CGRectMake(0, 64, SCREEN_WIDTH, SCREEN_HEIGHT-64);
    self.previewLayer.videoGravity = AVLayerVideoGravityResizeAspectFill;
    [self.view.layer addSublayer:self.previewLayer];
    //设备取景开始
    [self.session startRunning];
    if ([_device lockForConfiguration:nil]) {
    //自动闪光灯,
        if ([_device isFlashModeSupported:AVCaptureFlashModeAuto]) {
            [_device setFlashMode:AVCaptureFlashModeAuto];
        }
        //自动白平衡,但是好像一直都进不去
        if ([_device isWhiteBalanceModeSupported:AVCaptureWhiteBalanceModeAutoWhiteBalance]) {
            [_device setWhiteBalanceMode:AVCaptureWhiteBalanceModeAutoWhiteBalance];
        }
        [_device unlockForConfiguration];
    }

}
- 1.
- 2.
- 3.
- 4.
- 5.
- 6.
- 7.
- 8.
- 9.
- 10.
- 11.
- 12.
- 13.
- 14.
- 15.
- 16.
- 17.
- 18.
- 19.
- 20.
- 21.
- 22.
- 23.
- 24.
- 25.
- 26.
- 27.
- 28.
- 29.
- 30.
- 31.
- 32.
- 33.
- 34.
- 35.
- 36.
- 37.
- 38.
- 39.
- 40.
- 41.
- 42.
- 43.
- 44.
- 45.
- 46.
根据前后置位置拿到相应的摄像头:
- (AVCaptureDevice *)cameraWithPosition:(AVCaptureDevicePosition)position{
    NSArray *devices = [AVCaptureDevice devicesWithMediaType:AVMediaTypeVideo];
    for ( AVCaptureDevice *device in devices )
        if ( device.position == position ){
            return device;
        }
    return nil;
}
- 1.
- 2.
- 3.
- 4.
- 5.
- 6.
- 7.
- 8.
3、拍照拿到相应图片:
- (void)photoBtnDidClick
{
    AVCaptureConnection *conntion = [self.imageOutput connectionWithMediaType:AVMediaTypeVideo];
      if (!conntion) {
          NSLog(@"拍照失败!");
          return;
          }
    [self.imageOutput captureStillImageAsynchronouslyFromConnection:conntion completionHandler:^(CMSampleBufferRef imageDataSampleBuffer, NSError *error) {
        if (imageDataSampleBuffer == nil) {
            return ;
          }
        NSData *imageData = [AVCaptureStillImageOutput jpegStillImageNSDataRepresentation:imageDataSampleBuffer];
        self.image = [UIImage imageWithData:imageData];
        [self.session stopRunning];
        [self.view addSubview:self.cameraImageView];
}
- 1.
- 2.
- 3.
- 4.
- 5.
- 6.
- 7.
- 8.
- 9.
- 10.
- 11.
- 12.
- 13.
- 14.
- 15.
- 16.
4、前后置摄像头的切换
- (void)changeCamera{
    NSUInteger cameraCount = [[AVCaptureDevice devicesWithMediaType:AVMediaTypeVideo] count];
    if (cameraCount > 1) {
        NSError *error;
        //给摄像头的切换添加翻转动画
        CATransition *animation = [CATransition animation];
        animation.duration = .5f;
        animation.timingFunction = [CAMediaTimingFunction functionWithName:kCAMediaTimingFunctionEaseInEaseOut];
        animation.type = @"oglFlip";

        AVCaptureDevice *newCamera = nil;
        AVCaptureDeviceInput *newInput = nil;
  //拿到另外一个摄像头位置
        AVCaptureDevicePosition position = [[_input device] position];
        if (position == AVCaptureDevicePositionFront){
            newCamera = [self cameraWithPosition:AVCaptureDevicePositionBack];
            animation.subtype = kCATransitionFromLeft;//动画翻转方向
        }
        else {
            newCamera = [self cameraWithPosition:AVCaptureDevicePositionFront];
            animation.subtype = kCATransitionFromRight;//动画翻转方向
        }
        //生成新的输入
        newInput = [AVCaptureDeviceInput deviceInputWithDevice:newCamera error:nil];
        [self.previewLayer addAnimation:animation forKey:nil];
        if (newInput != nil) {
            [self.session beginConfiguration];
            [self.session removeInput:self.input];
            if ([self.session canAddInput:newInput]) {
                [self.session addInput:newInput];
                self.input = newInput;

            } else {
                [self.session addInput:self.input];
            }
            [self.session commitConfiguration];

        } else if (error) {
            NSLog(@"toggle carema failed, error = %@", error);
        }
    }
}
- 1.
- 2.
- 3.
- 4.
- 5.
- 6.
- 7.
- 8.
- 9.
- 10.
- 11.
- 12.
- 13.
- 14.
- 15.
- 16.
- 17.
- 18.
- 19.
- 20.
- 21.
- 22.
- 23.
- 24.
- 25.
- 26.
- 27.
- 28.
- 29.
- 30.
- 31.
- 32.
- 33.
- 34.
- 35.
- 36.
- 37.
- 38.
- 39.
- 40.
- 41.
- 42.
5、相机的其它参数设置
//AVCaptureFlashMode  闪光灯
//AVCaptureFocusMode  对焦
//AVCaptureExposureMode  曝光
//AVCaptureWhiteBalanceMode  白平衡
//闪光灯和白平衡可以在生成相机时候设置
//曝光要根据对焦点的光线状况而决定,所以和对焦一块写
//point为点击的位置
- (void)focusAtPoint:(CGPoint)point{
    CGSize size = self.view.bounds.size;
    CGPoint focusPoint = CGPointMake( point.y /size.height ,1-point.x/size.width );
    NSError *error;
    if ([self.device lockForConfiguration:&error]) {
        //对焦模式和对焦点
        if ([self.device isFocusModeSupported:AVCaptureFocusModeAutoFocus]) {
            [self.device setFocusPointOfInterest:focusPoint];
            [self.device setFocusMode:AVCaptureFocusModeAutoFocus];
        }
        //曝光模式和曝光点
        if ([self.device isExposureModeSupported:AVCaptureExposureModeAutoExpose ]) {
            [self.device setExposurePointOfInterest:focusPoint];
            [self.device setExposureMode:AVCaptureExposureModeAutoExpose];
        }

        [self.device unlockForConfiguration];
        //设置对焦动画
        _focusView.center = point;
        _focusView.hidden = NO;
        [UIView animateWithDuration:0.3 animations:^{
            _focusView.transform = CGAffineTransformMakeScale(1.25, 1.25);
        }completion:^(BOOL finished) {
            [UIView animateWithDuration:0.5 animations:^{
                _focusView.transform = CGAffineTransformIdentity;
            } completion:^(BOOL finished) {
                _focusView.hidden = YES;
            }];
        }];
    }

}
- 1.
- 2.
- 3.
- 4.
- 5.
- 6.
- 7.
- 8.
- 9.
- 10.
- 11.
- 12.
- 13.
- 14.
- 15.
- 16.
- 17.
- 18.
- 19.
- 20.
- 21.
- 22.
- 23.
- 24.
- 25.
- 26.
- 27.
- 28.
- 29.
- 30.
- 31.
- 32.
- 33.
- 34.
- 35.
- 36.
- 37.
- 38.
- 39.
6、遇到的一些坑和解决办法
1) 前后置摄像头的切换
前后值不能切换,各种尝试找了半天没找到有原因。后来发现我在设置图片尺寸的时候设置为1080P [self.session canSetSessionPreset: AVCaptureSessionPreset1920x1080] ,前置摄像头并不支持这么大的尺寸,所以就不能切换前置摄像头。我验证了下 前置摄像头最高支持720P,720P以内可自由切换。
当然也可以在前后置摄像头切换的时候,根据前后摄像头来设置不同的尺寸,这里不在赘述。
2)焦点位置
CGPoint focusPoint = CGPointMake( point.y /size.height ,1-point.x/size.width );
setExposurePointOfInterest:focusPoint 函数后面Point取值范围是取景框左上角(0,0)到取景框右下角(1,1)之间。官方是这么写的:
The value of this property is a CGPoint that determines the receiver's focus point of interest, if it has one. A value of (0,0) indicates that the camera should focus on the top left corner of the image, while a value of (1,1) indicates that it should focus on the bottom right. The default value is (0.5,0.5).
我也试了按这个来但位置就是不对,只能按上面的写法才可以。前面是点击位置的y/PreviewLayer的高度,后面是1-点击位置的x/PreviewLayer的宽度
3)对焦和曝光
我在设置对焦是 先设置了模式setFocusMode,后设置对焦位置,就会导致很奇怪的现象,对焦位置是你上次点击的位置。所以一定要先设置位置,再设置对焦模式。
曝光同上
7、写在最后
附上demo:https://github.com/nanshanyi/photographDemo
常用到的基本就这么多,写的并不完善,有什么不对的,欢迎大家批评指正,共同学习。