之前跟两个同事一起用业余时间给我们的 Glow App 做了 Apple Watch 的应用。写这篇文章来对 Apple Watch 的开发做个介绍,也列出开发过程中遇到的一些坑。虽然 Watch OS 2 已经出来,而我们是用 WatchKit 进行的开发,但很多内容也适用于 Watch OS 2。希望这篇文章对大家有帮助。
Introduction
- Design
- WatchKit App Architecture
- Data Communication
- Provisioning Profiles and Entitlements
- Tips
Design
本质上,你可以把 Apple Watch 当作 iPhone 的一个扩展屏幕。你不需要掏出手机。只需要稍稍抬一下手腕,就可以获取信息,或做一些简单的操作。实际上,在你开发 Watch App 的时候,你就会发现 Watch 的模拟器就是当作 iPhone 模拟器的一个 external display 实现的。
不过 Apple Watch 展现了全新的人机交互方式,iOS App 的设计交互准则在 Watch 上并不适用。因此在设计开发 Watch App 之前,有必要先理解它的交互和基本的 UI 元素。
首先说交互。除了熟悉的手势交互,Apple Watch 提供了 3 种新的交互方式:
-
Force Touch
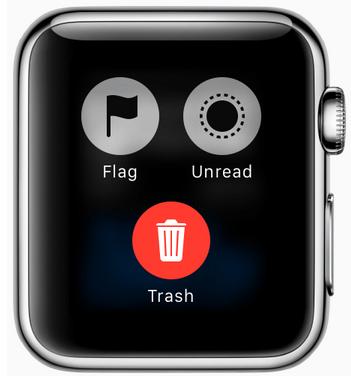
Apple Watch 的显示屏在感知用户点击的同时,也能感知压力。通过「重按」可以显示最多有 4 个操作的上下文菜单。

-
The Digital Crown(数码表冠)
跟传统手表一样,表冠是最常用的交互。但在 Apple Watch 上,表冠不是用来调校时间日期,或上弦。通过转动 Digital Crown,可以在不会遮挡视线的情况下,精确地放大缩放、滚动、或选择数据。它作为按钮还有返回的功能,按下返回主屏幕,按两下回到时钟界面。
听起来很美,但目前表冠的 API 还没有开放,滚动都是系统自动帮你做的 :[
-
Side Button
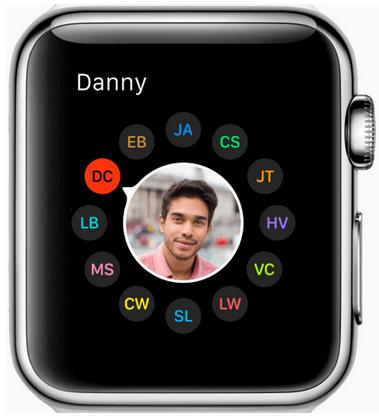
表冠下面的一个长长的按钮。按它会把你带到 Friends 界面。在这里,你可以给你选择好的 12 个联系人打电话,发短信,或者 Watch 提供的新的交流方式,例如轻点他们一下,画个涂鸦,或是发送心跳。

恩,这也没有开放相关的 API,考虑到它联系人的功能,估计之后也不会开放。
Watchkit App Architecture
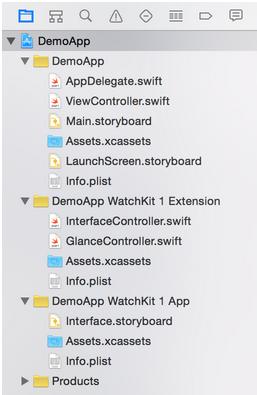
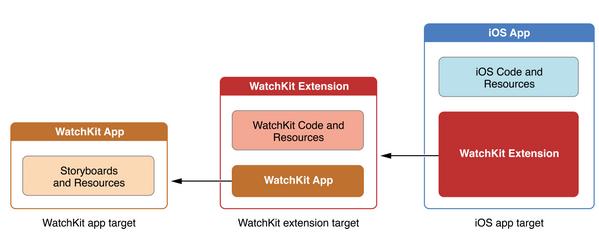
当你新增一个 Watchkit App target 的时候,你会发现 Xcode 实际上给添加了 2 个新的 executables,并同你的 iOS App 打包在一起编译。

他们之间的依赖关系如下图所示,Watch App 依赖于 Watchkit Extension,而 Watchkit Extension 依赖于 iOS App. 从上面下面两张图都可以看到,Watch App 里只有 Storyboard 和 ImageAssets。没错,Watch OS 1 里,Watch App 只包含一些静态的东西,Extension 是真正执行代码的地方。Extension 负责从 iOS App 那里获得数据,并控制 Watch App 界面上要显示什么。而 Watch App 的操作也是由 Extension 向 iOS App 发起请求。Watch App 不直接与 iOS App 交流。

Watch App 的每一个页面,都需要有一个对应的 WKInterfaceController 的子类。如上图 Extension 的文件夹的 InterfaceController 和 GlanceInterfaceController。WKInterfaceController 除了 init 之外,还有 3 个与生命周期有关的方法:
// 在 init 之后被调用,可以在这个方法里配置界面上的元素
- (void)awakeWithContext:(id)context;
// 当这个页面将要显示给用户的时候被调用
- (void)willActivate;
// 当这个页面不再显示的时候被调用
- (void)didDeactivate;
- 1.
- 2.
- 3.
- 4.
- 5.
- 6.
Data Communication
前面说到 Watch App 本身只包含一些静态内容,它自己不保存数据,也无法发送网络请求。它只能借由 Extension 与 iOS App 交互。所以 Watch App 与 iOS App 的数据传递是关键,也是大部分 Watch App 的主要开发工作。数据传递的方法主要有下面 5 种。***种是使用 WKInterfaceController 提供的 openParentApplication:reply,然后在 iOS 端 实现 application:handleWatchKitExtensionRequest:reply 来处理 Watch Extension 发来的请求。***一种 Wormhole 是第三方的一个库,通过 Dawrin notification center 发送消息并捎带上数据。而中间三种都是通过 App Group,在独立的共享沙盒里传递数据。
- WKInterfaceController openParentApplication:reply
- NSUserDefaults
- Core Data
- NSFileManager
- Dawrin notification center - MMWormhole
WKInterfaceController openParentApplication:reply
这种方法很直观,也是几种数据传递方式中最实时可靠的。你可以用 Enum 定义几种请求的类型,然后在发送请求的时候把请求类型一并传过去,这样 iOS App 收到请求时,就能知道要做什么。iOS App 用 reply 回调把请求结果传回去。
用这种方法,iOS App 即使在后台也能被唤起。但 iOS App 不能主动去唤起 Watch Extension。
NSDictionary *request = @{kRequestType: @(requestType)};
[InterfaceController openParentApplication:request
                    reply:^(NSDictionary *replyInfo, NSError *error) {
}];
- 1.
- 2.
- 3.
- 4.
- (void)application:(UIApplication *)application
handleWatchKitExtensionRequest:(NSDictionary *)userInfo
                         reply:(void (^)(NSDictionary *))reply
{
    RequestType requestType = userInfo[kRequestType];
    if (requestType == RequestTypeRefreshWatchData) {
        //
    }
}
- 1.
- 2.
- 3.
- 4.
- 5.
- 6.
- 7.
- 8.
- 9.
中间三种方式很类似,都是把数据存在一个独立的共享沙盒中,不同是他们的存放方式。iOS App 或者 Watch App 需要数据了,就去找沙盒里面找。就像一个秘密的信箱,只有他们俩知道这在哪儿。所以这也是异步的传递方式,双方不直接打交道。具体怎么用看下面代码吧。
NSUserDefaults
用 NSUserDefaults 最简单,但有数据大小的限制。
NSString *appGroupName = @"group.com.yourcompnay.shared";
NSUserDefaults *defaults = [[NSUserDefaults alloc] initWithSuiteName:appGroupName];
[defaults setObject:user.name forKey:@"userName"];
- 1.
- 2.
- 3.
Core Data
如果你的 iOS App 已经把 Core Data 放到共享沙盒里了,那可以考虑这种方法。
NSString *appGroupName = @"group.com.yourcompnay.shared";
NSURL *storeURL = [[NSFileManager defaultManager]
    containerURLForSecurityApplicationGroupIdentifier:appGroupName];
storeURL = [storeURL URLByAppendingPathComponent:@"glow.sqlite"];
[self.persistentStoreCoordinator addPersistentStoreWithType:NSSQLiteStoreType
                                              configuration:nil
                                                        URL:storeURL
                                                        options:nil
                                                        error:&error]
- 1.
- 2.
- 3.
- 4.
- 5.
- 6.
- 7.
- 8.
- 9.
NSFileManager && NSFileCoordinator
文件读写必然要涉及到多线程问题,不过不用担心,用 NSFileCoordinator 就可以了。
- coordinateReadingItemAtURL:options:error:byAccessor:
- coordinateWritingItemAtURL:options:error:byAccessor:
[coordinator coordinateWritingItemAtURL:fileURL
                                options:nil
                                  error:nil
                             byAccessor:^(NSURL* writingURL) {
   [dataToSave writeToURL:newURL atomically:true];
}];
- 1.
- 2.
- 3.
- 4.
- 5.
- 6.
- 7.
- 8.
NSFilePresenter
你还可以通过实现 NSFilePresenter 协议来监听文件的更改,不需要自己实现刷新机制就能免费获得实时更新。
- presentedItemDidChange
- 1.
Dawrin notification - MMWormhole
***一种用起来也很方便,Watch Extension 和 iOS App 一方发送消息,一方监听消息。而且还有一大优势是,Wormhole 会保存上次传递的数据,这样在 Watch App 唤醒的时候,可以先使用 Wormhole 里的数据,等 iOS App 传来***的数据时,再更新界面。
// init
self.wormhole = [[MMWormhole alloc] initWithApplicationGroupIdentifier:kApplicationGroupIdentifier
                                               optionalDirectory:kWormholeDirectory];
// iOS app
NSDictionary *message = [self makeWatchData];
[self.wormhole passMessageObject:message identifier:kWormholeWatchData];
// WatchKit Extension
NSDictionary *message = [self.wormhole messageWithIdentifier:kWormholeWatchData];
// do something with message
[self.wormhole listenForMessageWithIdentifier:kWormholeWatchData
                               listener:^(id messageObject) {
    NSLog(@"Received data from wormhole.");
}];
- 1.
- 2.
- 3.
- 4.
- 5.
- 6.
- 7.
- 8.
- 9.
- 10.
- 11.
- 12.
- 13.
也是我开发最初使用的方式。但在我使用的过程中,发现如果 iOS App 是在后台模式,就并不能实时接收到 WatchKit Extension 发来的消息。所以***,我们选择openParentApplication:reply 和 Wormhole 的混用。在 Watch App 唤醒时,使用 Wormhole 里的数据,保证 Watch App 响应的速度,同时用 openParentApplication:reply 向 iOS 请求***的更新。
Provisioning Profiles and Entitlements
开发之初,最让人头疼的可能就是 Code Signing, Provisioning 和 entitlements 这些东西了。
每一个 target 都要有自己的 App ID。所以我们一共需要有三个:
- yourAppID
- yourAppID.watchkitextension
- yourAppID.watchkitapp
你还需要给每个 App ID 创建一个相关联的 Provisioning Profile。如果你用 Xcode 自动创建 Provisioning Profile,它只会给你创建前面两个,你需要自己去 developer center 里手动创建。
另外,你还需要确保你的三个 Entitlements 都是对的。Version Number、Build Number、以及 App Groups (如果使用的话) 都必须是一样的,不然编译就不能通过。
Tips
Debug
有时候,你会需要同时 debug iOS App 和 Watch App。但 Xcode 只允许你指定一个 target 运行,你要么 debug iOS App 的代码,要么 Watch App 的代码。但通过 Xcode 的 Attach to Process 就能同时 debug。具体步骤如下:
- 运行 WatchKit App
- 在 Simulator 中打开你的 iOS App
- 在 Xcode 的菜单栏上 Debug -> Attach to Process,选择你的 iOS App 就能同时 debug iOS 跟 WatchKit app 了。
App Icons and iTunes Connect
如果在上传你的应用到 iTunes Connect 的时候,遇到 Invalid Binary 的错误。很大可能是因为你的 Watch App 的 icon 里有透明层或者 alpha 通道。一个比较方便的解决办法是,用 Preview 打开图片,选择导出(export),然后不要勾选底部的 Alpha 选项,确定。
End


