【51CTO译文】我们要开发的就是这样一套方案。
介绍
从最基本的概念角度来讲,启动器其实应该是一款能够实现以下功能的应用程序:
- 它代表着一台设备的主屏幕。
- 它能够列出并启动已经安装在该设备当中的应用程序。
换句话来说,它就是那款用户按下home按钮后所显示的应用程序。除非大家已经安装了定制化启动器,否则我们目前正在使用的应该都是Android系统自带的默认启动方案。不少设备制造商都会在产品中默认使用由其定制的启动器,从而确保我们获得与厂商预期相符的外观效果与使用感受,例如三星TouchWiz以及HTC Sense。
在今天的教程中,我们将利用基本用户界面创建出一款简单的启动器,它将由两部分屏幕构成:
- 在主屏幕中显示的是该设备的墙纸图案。
- 另一屏幕中显示的是已经安装在设备当中的应用程序图标及其它细节信息。
1.要求
大家需要在自己的开发设备上预先安装并配置好以下项目:
- Android SDK以及平台工具
- Eclipse IDE 3.7.2或者更高版本,同时具备ADT插件
- 运行有Android 2.2或者更高版本的模拟器或者Android设备
大家可以点击此处通过Android开发者门户下载对应SDK及平台工具。
2.项目设置
首先我们需要启动Eclipse并创建一个新的Android应用程序项目。我为这个应用取了个非常直白的名称——SimpleLauncher,当然大家也可以自由选择自己想要的名称。请确保软件包名称没有与其它项目出现重复。我们的启动器所能支持的***SDK版本为“冻酸奶”,而主要的面向版本则为“果冻豆”。
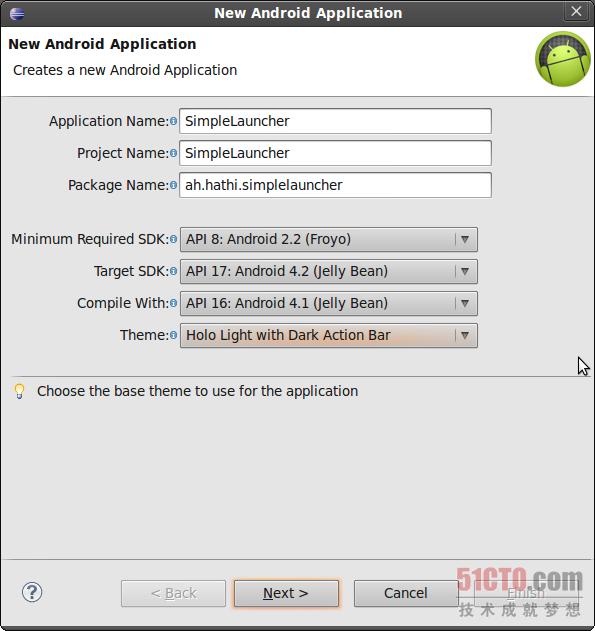
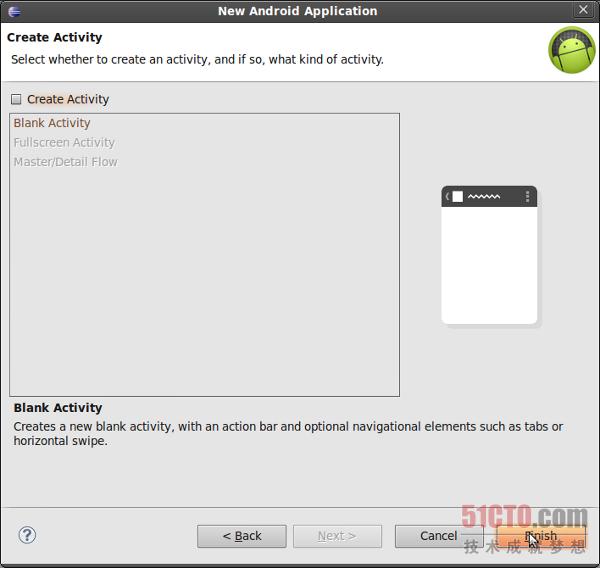
由于我们不打算创建Activity,因此取消“Create Activity”勾选项,然后点击“Finish”以继续。
3.项目清单
接下来我们需要通过添加两个activity对AndroidManifest.xml文件进行修改。***个Activity用于显示主屏幕,我们如下所示将其命名为HomeActivity。
- <activity
- android:name="ah.hathi.simplelauncher.HomeActivity"
- android:label="Simple Launcher Home"
- android:theme="@android:style/Theme.Wallpaper.NoTitleBar.Fullscreen"
- android:launchMode="singleTask"
- android:stateNotNeeded="true"
- >
- <intent-filter>
- <action android:name="android.intent.action.MAIN" />
- <category android:name="android.intent.category.HOME" />
- <category android:name="android.intent.category.DEFAULT" />
- </intent-filter>
- </activity>
通过将android.intent.category.HOME与android.intent.category.DEFAULT两个类添加至intent-filter组当中,相关Activity得以拥有与启动器概念相符的运行方式。当大家按下设备上的home按钮时,其还将作为选项方案显示出来。
我们还需要将launchMode设置到singleTask当中,从而确保无论何时都只有单一Activity实例由系统负责运行。要显示用户的墙纸图案,大家必须将主题设置为Theme.Wallpaper.NoTitleBar.FullScreen。
我们需要添加的第二个Activity负责显示已经安装在用户设备中的应用程序条目。它还有另一项任务,即启动这些应用程序。我们不需要对该Activity进行任何特殊配置,将其命名为AppsListActivity即可。
- <activity
- android:name="ah.hathi.simplelauncher.AppsListActivity"
- android:theme="@android:style/Theme.NoTitleBar.Fullscreen"
- >
- </activity>
4.Activity布局
下面在项目的res/layout文件夹中为HomeActivity类创建一个XML文件,并将其命名为activity_home.xml。该布局拥有一个单独的Button用以响应点触事件。点触该按钮能够让用户由主屏幕切换至应用程序列表。
- <RelativeLayout xmlns:android="http://schemas.android.com/apk/res/android"
- xmlns:tools="http://schemas.android.com/tools"
- android:layout_width="match_parent"
- android:layout_height="match_parent"
- tools:context=".HomeActivity" >
- <Button
- android:id="@+id/apps_button"
- android:layout_width="wrap_content"
- android:layout_height="wrap_content"
- android:layout_alignParentRight="true"
- android:layout_alignParentTop="true"
- android:layout_marginRight="10dp"
- android:layout_marginTop="10dp"
- android:text="Show Apps"
- android:onClick="showApps"
- />
- </RelativeLayout>
接下来,在项目的res/layout文件夹中为AppsListActivity类创建一个XML文件并将其命名为activity_apps_list.xml。该布局当中包含一个占据整个屏幕的ListView。
- <?xml version="1.0" encoding="utf-8"?>
- <LinearLayout xmlns:android="http://schemas.android.com/apk/res/android"
- android:layout_width="match_parent"
- android:layout_height="match_parent"
- android:orientation="vertical" >
- <ListView
- android:id="@+id/apps_list"
- android:layout_width="match_parent"
- android:layout_height="match_parent"
- >
- </ListView>
- </LinearLayout>
***,在同样的位置创建第三个XML文件并将其命名为list_item.xml。该文件用于定义ListView当中各个条目的布局方案。列表视图中的每个条目都代表着已经安装在用户设备上的一款应用程序。它能够显示该应用程序的图标、标签以及软件包名称。我们可以利用ImageView实例来显示该应用的图标,并通过TextView实例显示标签与软件包名称。
- <?xml version="1.0" encoding="utf-8"?>
- <RelativeLayout xmlns:android="http://schemas.android.com/apk/res/android"
- android:layout_width="match_parent"
- android:layout_height="match_parent"
- android:padding="10dp"
- >
- <ImageView
- android:id="@+id/item_app_icon"
- android:layout_width="wrap_content"
- android:layout_height="wrap_content"
- android:layout_alignParentLeft="true"
- android:layout_centerVertical="true"
- />
- <TextView
- android:id="@+id/item_app_label"
- android:layout_width="wrap_content"
- android:layout_height="wrap_content"
- android:layout_toRightOf="@+id/item_app_icon"
- android:paddingLeft="10dp"
- />
- <TextView
- android:id="@+id/item_app_name"
- android:layout_width="wrap_content"
- android:layout_height="wrap_content"
- android:layout_below="@+id/item_app_label"
- android:layout_toRightOf="@+id/item_app_icon"
- android:paddingLeft="10dp"
- />
- </RelativeLayout>
5.创建Acitivity类
HomeActivity
应用程序的布局方案创建完成之后,现在要做的是创建两个Activity类。当创建这两个类时,请确保每个类的名称都与我们之前在项目清单文件中所指定的内容相匹配。
创建一个名为HomeActivity的新类,然后将android.app.Activity设置为其超类。
- package ah.hathi.simplelauncher;
- import android.app.Activity;
- import android.content.Intent;
- import android.os.Bundle;
- import android.view.View;
- public class HomeActivity extends Activity {
- @Override
- protected void onCreate(Bundle savedInstanceState) {
- super.onCreate(savedInstanceState);
- setContentView(R.layout.activity_home);
- }
- public void showApps(View v){
- Intent i = new Intent(this, AppsListActivity.class);
- startActivity(i);
- }
- }
在该类的onCreate方法中,我们调用setContentView并将其传递至之前已经创建完成的布局当中。大家可能还记得,我们曾为activity_home布局添加过一个按钮,用于触发名为showApps的方法。现在我们要做的是将该方法引入HomeActivity类当中。整个添加过程非常简单,各位需要做的只是为AppsListActivity类创建一个Intent并付诸运行。
#p#
AppsListActivity
创建另一个名为AppsListActivity的Activity类,而后将android.app.Activity设置为其超类。在该类的onCreate方法当中,我们调用setContentView并将其传递至此前已经创建完成的activity_apps_list布局当中。
- package ah.hathi.simplelauncher;
- import android.app.Activity;
- import android.content.Intent;
- import android.os.Bundle;
- import android.view.View;
- public class AppsListActivity extends Activity {
- @Override
- protected void onCreate(Bundle savedInstanceState) {
- super.onCreate(savedInstanceState);
- setContentView(R.layout.activity_apps_list);
- }
- }
虽然我们的启动器方案还没有最终完成,但到这里大家已经可以保存现有内容并借此启动自己设备上的应用程序了。当各位按下设备上的home按钮时,系统会能够弹窗询问我们希望使用哪种启动器方案。
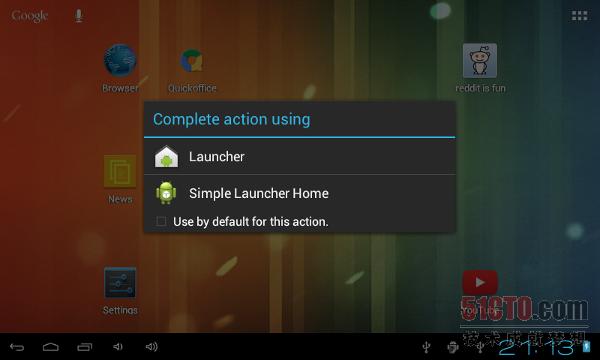
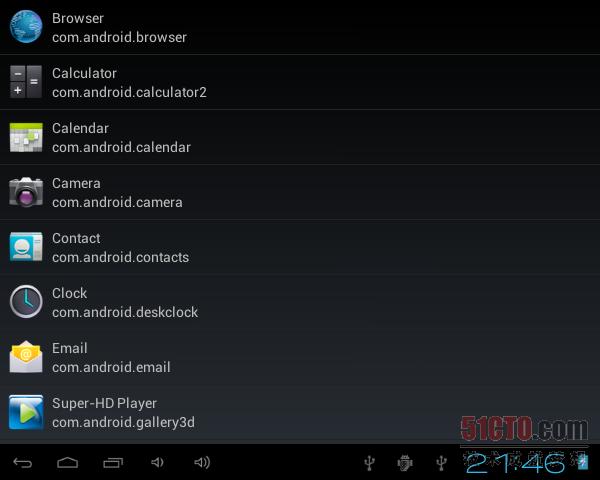
如果大家选择了Simple Launcher Home,则可以看到自己创建的全新主屏幕,其右上屏幕位置还配备一个按钮。大家还能看到自己设备上原本设定的墙纸图案。
现在回到Eclipse并创建一个名为AppDetail的类,其中将包含与应用程序相关的细节信息、软件包名称、标签以及应用程序图标。该界面非常基础,大家可以利用如下代码实现:
- package ah.hathi.simplelauncher;
- import android.graphics.drawable.Drawable;
- public class AppDetail {
- CharSequence label;
- CharSequence name;
- Drawable icon;
- }
6.获取应用程序
在AppsListActivity类的loadApps方法当中,我们可以使用PackageManager类的queryIntentActivities方法以获取Intent.CATEGORY_LAUNCHER类别当中的所有Intents。该查询能够返回一份列表,其中包含全部能够经由启动器实现启动的应用程序。我们可以将查询返回结果中的每个条目添加到名为apps的列表当中。大家可以通过以下代码片段进一步了解其效果。
- private PackageManager manager;
- private List<AppDetail> apps;
- private void loadApps(){
- manager = getPackageManager();
- apps = new ArrayList<AppDetail>();
- Intent i = new Intent(Intent.ACTION_MAIN, null);
- i.addCategory(Intent.CATEGORY_LAUNCHER);
- List<ResolveInfo> availableActivities = manager.queryIntentActivities(i, 0);
- for(ResolveInfo ri:availableActivities){
- AppDetail app = new AppDetail();
- app.label = ri.loadLabel(manager);
- app.name = ri.activityInfo.packageName;
- app.icon = ri.activityInfo.loadIcon(manager);
- apps.add(app);
- }
- }
7.显示应用程序列表
由于apps变量当中包含有我们所需要的全部细节信息,因此大家可以利用ListView类显示出完整的应用程序列表。我们首先创建一个简单的ArrayAdapter并覆盖其getView方法以获取列表中的条目信息。接下来,将该ListView与适配器相关联。
- private ListView list;
- private void loadListView(){
- list = (ListView)findViewById(R.id.apps_list);
- ArrayAdapter<AppDetail> adapter = new ArrayAdapter<AppDetail>(this,
- R.layout.list_item,
- apps) {
- @Override
- public View getView(int position, View convertView, ViewGroup parent) {
- if(convertView == null){
- convertView = getLayoutInflater().inflate(R.layout.list_item, null);
- }
- ImageView appIcon = (ImageView)convertView.findViewById(R.id.item_app_icon);
- appIcon.setImageDrawable(apps.get(position).icon);
- TextView appLabel = (TextView)convertView.findViewById(R.id.item_app_label);
- appLabel.setText(apps.get(position).label);
- TextView appName = (TextView)convertView.findViewById(R.id.item_app_name);
- appName.setText(apps.get(position).name);
- return convertView;
- }
- };
- list.setAdapter(adapter);
- }
8.侦听点触操作
当用户点触ListView当中的某个条目时,我们的启动器应该能够运行相应的应用程序。我们可以通过PackageManager类中的getLaunchIntentForPackage方法来创建一个Intent,用于指定我们要启动哪款应用程序。请大家查看以下代码片段。
- private void addClickListener(){
- list.setOnItemClickListener(new AdapterView.OnItemClickListener() {
- @Override
- public void onItemClick(AdapterView<?> av, View v, int pos,
- long id) {
- Intent i = manager.getLaunchIntentForPackage(apps.get(pos).name.toString());
- AppsListActivity.this.startActivity(i);
- }
- });
- }
9.通过整合实现完整功能
为了让前面提到的全部内容整合起来并实现完整功能,我们需要在AppsListActivity类的onCreate方法中调用loadApps、loadListView与addClickListener,具体代码如下所示。
- protected void onCreate(Bundle savedInstanceState) {
- super.onCreate(savedInstanceState);
- setContentView(R.layout.activity_apps_list);
- loadApps();
- loadListView();
- addClickListener();
- }
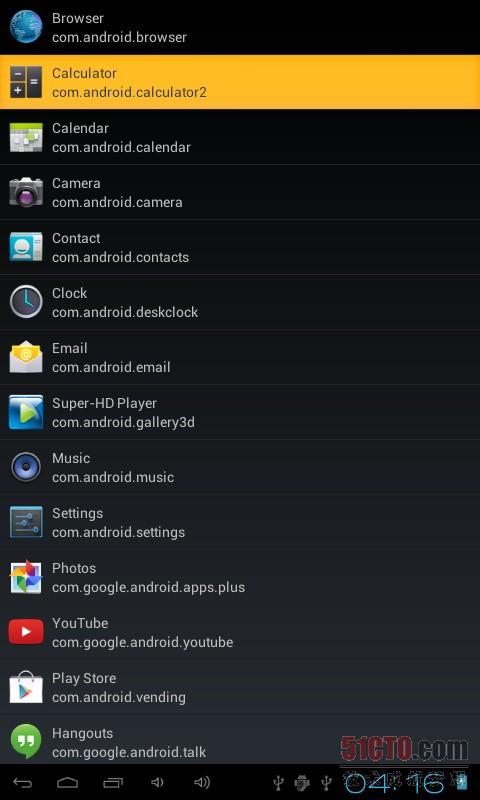
下面编译并运行我们的启动器应用,并再一次运行以查看结果。大家现在应该已经能够在启动器主屏幕中点击该按钮后查看所有可以启用的应用程序了。别犹豫,快点触其中一个尝试一下吧。
总结
大家现在已经拥有自己的定制化启动器了。它很简单也很粗糙,但我们完全可以陆续为其添加更多功能特性、从而让它逐步得到完善。如果大家想进一步了解能够在启动器中引入哪些自定义项目,我建议各位点击此处查看Android开发者门户当中给出的示例应用程序。
原文链接:Build A Custom Launcher on Android
核子可乐译