查看 Linux 内核路由表
使用下面的 route 命令可以查看 Linux 内核路由表。
# route
Destination     Gateway         Genmask         Flags Metric Ref    Use Iface
192.168.0.0     *               255.255.255.0   U     0      0        0 eth0
169.254.0.0     *               255.255.0.0     U     0      0        0 eth0
default         192.168.0.1     0.0.0.0         UG    0      0        0 eth0
- 1.
- 2.
- 3.
- 4.
- 5.
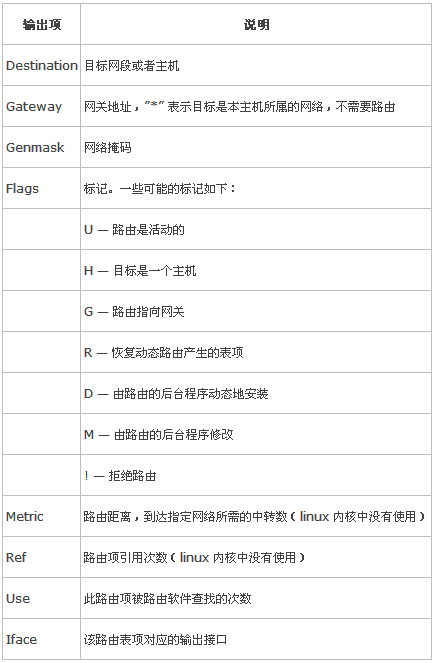
route 命令的输出项说明
3 种路由类型
主机路由
主机路由是路由选择表中指向单个IP地址或主机名的路由记录。主机路由的Flags字段为H。例如,在下面的示例中,本地主机通过IP地址192.168.1.1的路由器到达IP地址为10.0.0.10的主机。
 Destination    Gateway       Genmask        Flags     Metric    Ref    Use    Iface
-----------    -------     -------            -----     ------    ---    ---    -----
10.0.0.10 192.168.1.1 255.255.255.255 UH 0 0 0 eth0- 1.
- 2.
- 3.
网络路由
网络路由是代表主机可以到达的网络。网络路由的Flags字段为N。例如,在下面的示例中,本地主机将发送到网络192.19.12的数据包转发到IP地址为192.168.1.1的路由器。
 Destination    Gateway       Genmask      Flags    Metric    Ref     Use    Iface
-----------    -------     -------         -----    -----   ---    ---    -----
192.19.12 192.168.1.1 255.255.255.0 UN 0 0 0 eth0- 1.
- 2.
- 3.
默认路由
当主机不能在路由表中查找到目标主机的IP地址或网络路由时,数据包就被发送到默认路由(默认网关)上。默认路由的Flags字段为G。例如,在下面的示例中,默认路由是IP地址为192.168.1.1的路由器。
 Destination    Gateway       Genmask    Flags     Metric    Ref    Use    Iface
-----------    -------     ------- -----      ------    ---    ---    -----
default 192.168.1.1 0.0.0.0 UG 0 0 0 eth0- 1.
- 2.
- 3.
配置静态路由
route 命令
设置和查看路由表都可以用 route 命令,设置内核路由表的命令格式是:
# route [add|del] [-net|-host] target [netmask Nm] [gw Gw] [[dev] If]
其中:
* add : 添加一条路由规则
* del : 删除一条路由规则
* net : 目的地址是一个网络
* host : 目的地址是一个主机
* target : 目的网络或主机
* netmask : 目的地址的网络掩码
* gw : 路由数据包通过的网关
* dev : 为路由指定的网络接口
route 命令使用举例
添加到主机的路由
# route add -host 192.168.1.2 dev eth0:0
# route add -host 10.20.30.148 gw 10.20.30.40
添加到网络的路由
# route add -net 10.20.30.40 netmask 255.255.255.248 eth0
# route add -net 10.20.30.48 netmask 255.255.255.248 gw 10.20.30.41
# route add -net 192.168.1.0/24 eth1
添加默认路由
# route add default gw 192.168.1.1
删除路由
# route del -host 192.168.1.2 dev eth0:0
# route del -host 10.20.30.148 gw 10.20.30.40
# route del -net 10.20.30.40 netmask 255.255.255.248 eth0
# route del -net 10.20.30.48 netmask 255.255.255.248 gw 10.20.30.41
# route del -net 192.168.1.0/24 eth1
# route del default gw 192.168.1.1
设置包转发
在 CentOS 中默认的内核配置已经包含了路由功能,但默认并没有在系统启动时启用此功能。开启 Linux 的路由功能可以通过调整内核的网络参数来实现。要配置和调整内核参数可以使用 sysctl 命令。例如:要开启 Linux 内核的数据包转发功能可以使用如下的命令。
# sysctl -w net.ipv4.ip_forward=1
- 1.
这样设置之后,当前系统就能实现包转发,但下次启动计算机时将失效。为了使在下次启动计算机时仍然有效,需要将下面的行写入配置文件/etc/sysctl.conf。
# vi /etc/sysctl.conf
net.ipv4.ip_forward = 1
- 1.
- 2.
用户还可以使用如下的命令查看当前系统是否支持包转发。
# sysctl net.ipv4.ip_forward
- 1.


