这段时间接触了一下B/S的东西,觉得那东西真不是人用的,一旦工程量上去,后续开发很大一部分时间都是在Debug中渡过,很是纠结。现在业内普遍的对移动开发的看法是——web应用是种趋势,可是个人觉得除非现阶段的移动网络环境有质的改变,否则用户体验会很有问题。然后简单的玩了一下node.js,觉得后台其实也可以不用那么复杂,想想,还是老老实实的写回自己的客户端应用好了。
废话就不多说了,先简单的介绍一下本篇的目的吧。MVC这个东西,现下看起来很流行,Model-View-Control,其实我个人并不清楚其概念所谓,其实说白了就是当年的“所见即所得”,一个意思。之前接触了一下WPF,就是给这个概念给搞死,但不管怎么样,xaml可能是MS的开发趋势,MCV又是其中一个极重要的概念,不入门不行。
MVC的更多的概念性解析请诸位百度或google吧,它的核心是数据,MVC是一种展现数据呈现方式的一种开发手段,虽然比纯代码性的呈现方式多了一些额外的工作,可是,必须要记住,现在做多一些是为了将来少做一些,其优势还是相当可观的。
一、构造数据类DataItem
WinForm的项目里,我们想在程序设计的阶段预览ListBox是怎么显示数据,那几乎是不可能的,除非我将程序跑起来,在人类审美观崛起的现在,代码与界面分离设计可以有效的通过分工实现人力资源的最大化的利用,而这也是MVC的主要任务。
写WinForm时,我会这么设计一个简单的数据结构体:
|
1
2
3
4
5
6
|
struct TestDataItem{ int Index; string Name; boo Flag;} |
|
1
2
3
4
5
6
7
8
9
10
11
12
13
14
15
16
17
18
19
20
21
22
23
24
25
26
27
28
29
30
31
32
33
34
35
36
37
38
39
40
41
42
43
44
45
46
47
48
49
50
51
52
53
54
55
56
57
58
59
60
61
62
63
64
65
66
67
68
69
70
71
72
73
74
75
76
77
78
79
80
81
82
83
84
85
86
87
88
89
90
91
92
93
94
95
96
97
98
99
100
101
102
103
104
105
106
107
108
109
110
111
112
113
114
115
116
117
118
119
120
121
|
using System;using System.Collections.Generic;using System.ComponentModel;using System.Linq;using System.Text;using System.Threading.Tasks;namespace MvcTest{ /// <summary> /// 数据集的Item类,继承INotifyPropertyChanged,INotifyPropertyChanging接口 /// </summary> public partial class TestDataItem : INotifyPropertyChanged, INotifyPropertyChanging { /// <summary> /// 属性更改的事件参数 /// </summary> private static PropertyChangingEventArgs emptyChangingEventArgs = new PropertyChangingEventArgs(String.Empty); /// <summary> /// 数据属性变化的事件回调 /// </summary> public event PropertyChangingEventHandler PropertyChanging; public event PropertyChangedEventHandler PropertyChanged; /// <summary> /// Item的成员属性 /// </summary> private int _index; private string _name; private bool _flag; /// 属性更改的响应函数 #region partial void OnIndexChanging(int value); partial void OnIndexChanged(); partial void OnNameChanging(string value); partial void OnNameChanged(); partial void OnFlagChanging(bool value); partial void OnFlagChanged(); #endregion /// 类接口的实现 #region /// <summary> /// INotifyPropertyChanging接口的实现函数 /// </summary> protected virtual void SendPropertyChanging() { if ((this.PropertyChanging != null)) { this.PropertyChanging(this, emptyChangingEventArgs); } } /// <summary> /// INotifyPropertyChanged接口的实现 /// </summary> /// <param name="propertyName"></param> protected virtual void SendPropertyChanged(String propertyName) { if ((this.PropertyChanged != null)) { this.PropertyChanged(this, new PropertyChangedEventArgs(propertyName)); } } #endregion /// 数据的公共属性 #region public int Index { get { return this._index; } set { if(this._index != value) { this.OnIndexChanging(value); this.SendPropertyChanging(); this._index = value; this.SendPropertyChanged("Index"); this.OnIndexChanged(); } } } public string Name { get { return this._name; } set { if(this._name != value) { this.OnNameChanging(value); this.SendPropertyChanging(); this._name = value; this.SendPropertyChanged("Name"); this.OnNameChanged(); } } } public bool Flag { get { return this._flag; } set { if (this._flag != value) { this.OnFlagChanging(value); this.SendPropertyChanging(); this._flag = value; this.SendPropertyChanged("Flag"); this.OnFlagChanged(); } } } #endregion }} |
此类的核心是INotifyPropertyChanged,INotifyPropertyChanging这两个接口(不懂请百度呗,我也懂不了多少)。因为数据的窗口(像Grid或LongListSelector)要感知每一条TestDataItem的属性变化,然后这个类里面就存在各种的回调或事件啦。
这步理解就简单一点了,数据容器呈现的是整体的数据集合,这个集合也需要一个特殊的类,否则编译器不知道怎么去解析(我只能这么理解),有玩过数据绑定的童鞋应该能弄懂这点。
当然,TestDataItem的集合类也需要实现一个特殊的接口INotifyPropertyChanged——没错,跟上面TestDataItem实现的接口一样,可以这么理解,这个接口是MVC的核心所在。
//TestDataItemCollection.cs
|
1
2
3
4
5
6
7
8
9
10
11
12
13
14
15
16
17
18
19
20
21
22
23
24
25
26
27
28
29
30
31
32
33
34
35
36
37
38
39
40
41
42
|
using System;using System.Collections.Generic;using System.Collections.ObjectModel;using System.ComponentModel;using System.Linq;using System.Text;using System.Threading.Tasks;namespace MvcTest{ /// <summary> /// 数据集的类 /// </summary> public class TestDataCollection : INotifyPropertyChanged { /// <summary> /// 数据集合 /// </summary> public ObservableCollection<TestDataItem> TestDataItems { get; private set; } /// <summary> /// 属性更改事件回调 /// </summary> public event PropertyChangedEventHandler PropertyChanged; /// <summary> /// 构造函数 /// </summary> public TestDataCollection() { this.TestDataItems = new ObservableCollection<TestDataItem>(); } /// <summary> /// INotifyPropertyChanged接口的实现 /// </summary> private void NotifyPropertyChanged(String propertyName) { PropertyChangedEventHandler handler = PropertyChanged; if (null != handler) { handler(this, new PropertyChangedEventArgs(propertyName)); } } }} |
三、构造数据集示例ViewModel
这一步设计要呈现的数据例子,其用到的xmal的文件,可是在Visual Studio新建项的时候,并没有这一选项,可是我们会发现WP的页面文件格式就xaml的,所以不妨新建一个页面,将其重命名为TestDataViewModel.xaml,然后,删掉页面正面的cs等文件,将下面这段xaml代码粘上去——当然,你直接手敲上去也是没有问题的。
//TestDataViewModel.xaml
|
1
2
3
4
5
6
7
8
9
10
11
12
13
14
15
16
|
<!-- 这对应的是数据集的类名,表示一组数据--><vm:TestDataCollection xmlns="http://schemas.microsoft.com/winfx/2006/xaml/presentation" xmlns:x="http://schemas.microsoft.com/winfx/2006/xaml" xmlns:vm="clr-namespace:MvcTest"> <!--clr-namespace:MvcTest这是数据集的命名空间,带文件夹的要注意啦--> <!--简单的数据集例子--> <vm:TestDataCollection.TestDataItems> <vm:TestDataItem Index="0" Name="name1" Flag="False"></vm:TestDataItem> <vm:TestDataItem Index="1" Name="name2" Flag="True"></vm:TestDataItem> <vm:TestDataItem Index="2" Name="name3" Flag="True"></vm:TestDataItem> <vm:TestDataItem Index="3" Name="name4" Flag="False"></vm:TestDataItem> <vm:TestDataItem Index="4" Name="name5" Flag="True"></vm:TestDataItem> <vm:TestDataItem Index="5" Name="name6" Flag="True"></vm:TestDataItem> </vm:TestDataCollection.TestDataItems></vm:TestDataCollection> |
四、呈现ViewModel数据集
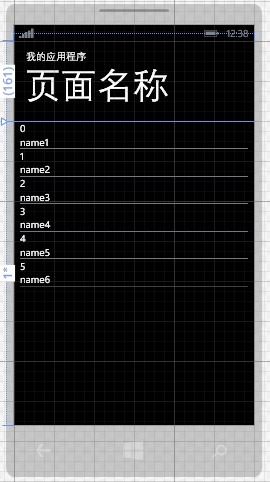
首先,我们要选一个数据容器,个人比较喜欢LongListSelector,但似乎没有其分的选择,将上面的数据集例子绑定上去;然后,设计一下单条数据呈现的样式,要用到DataItemTemplate,这也许我将来会详讲。就这两条,直接上代码:
//MainPage.xaml
|
1
2
3
4
5
6
7
8
9
10
11
12
13
14
15
16
17
18
19
20
21
22
23
24
25
26
27
28
29
30
31
32
33
34
35
36
37
38
39
40
41
42
43
44
|
<phone:PhoneApplicationPage x:Class="MvcTest.MainPage" xmlns="http://schemas.microsoft.com/winfx/2006/xaml/presentation" xmlns:x="http://schemas.microsoft.com/winfx/2006/xaml" xmlns:phone="clr-namespace:Microsoft.Phone.Controls;assembly=Microsoft.Phone" xmlns:shell="clr-namespace:Microsoft.Phone.Shell;assembly=Microsoft.Phone" xmlns:d="http://schemas.microsoft.com/expression/blend/2008" xmlns:mc="http://schemas.openxmlformats.org/markup-compatibility/2006" mc:Ignorable="d" d:DataContext="{d:DesignData TestDataViewModel.xaml}" FontFamily="{StaticResource PhoneFontFamilyNormal}" FontSize="{StaticResource PhoneFontSizeNormal}" Foreground="{StaticResource PhoneForegroundBrush}" SupportedOrientations="Portrait" Orientation="Portrait" shell:SystemTray.IsVisible="True"> <!--单条数据显示的样式--> <phone:PhoneApplicationPage.Resources> <DataTemplate x:Key="TestDataItemTemplate"> <StackPanel Margin="0,0,0,0"> <TextBlock Text="{Binding Index}"/> <TextBlock Text="{Binding Name}" /> <!--TextBlock Text="{Binding Flag}" /--> <StackPanel Height="1" Background="AliceBlue"></StackPanel> </StackPanel> </DataTemplate> </phone:PhoneApplicationPage.Resources> <Grid x:Name="LayoutRoot" Background="Transparent"> <Grid.RowDefinitions> <RowDefinition Height="Auto"/> <RowDefinition Height="*"/> </Grid.RowDefinitions> <StackPanel x:Name="TitlePanel" Grid.Row="0" Margin="12,17,0,28"> <TextBlock Text="我的应用程序" Style="{StaticResource PhoneTextNormalStyle}" Margin="12,0"/> <TextBlock Text="页面名称" Margin="9,-7,0,0" Style="{StaticResource PhoneTextTitle1Style}"/> </StackPanel> <Grid x:Name="ContentPanel" Grid.Row="1" Margin="12,0,12,0"> <!--用一个LongListSelector来显示数据集--> <StackPanel> <phone:LongListSelector Margin="0,0,0,0" ItemTemplate="{StaticResource ResourceKey=TestDataItemTemplate}" ItemsSource="{Binding TestDataItems}"/> </StackPanel> </Grid> </Grid></phone:PhoneApplicationPage> |
小结:
以上的是一个简单的MVC模式设计的例子,其实这工作一个人做看不出什么优势,可是,我们从中看出,这样的设计手法,可以让界面逻辑跟功能逻辑分开设计提高效率,还有,如果程序以后要改进,从预览窗口我们也更容易知道自己需要更改哪些东西,总之,优势不少就是啦。
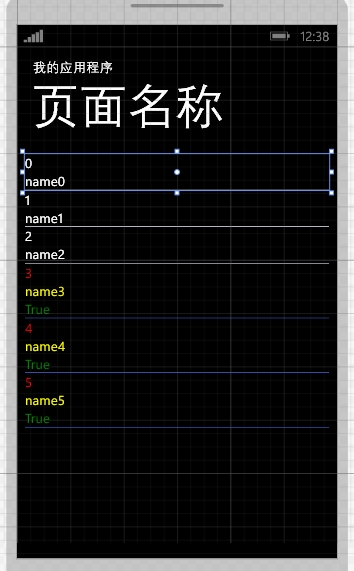
自己还有一个问题,如何在同一个页面呈现两个数据集呢?嗯,这是个问题。
讲到在一个PhonePage里绑定一个数据集,用的是如下的方法:
|
1
|
d:DataContext="{d:DesignData TestDataViewModel.xaml}" |
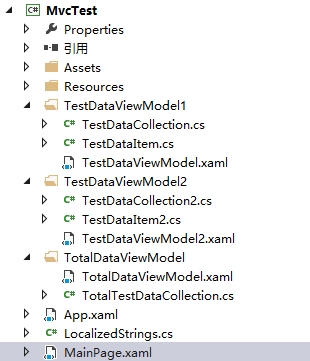
自己设计了两个除了类名外其他都一样的数据类(TestDataItem.cs及TestDataItem2.cs),如下图的文件目录所示,为了显示方便将其放到两个不同的文件夹里,这时就要注意namespace的问题啦。
//TotalTestDataCollection.cs
|
1
2
3
4
5
6
7
8
9
10
11
12
13
14
15
16
17
18
19
20
21
22
23
24
25
26
27
28
29
30
31
32
33
34
35
36
37
38
39
40
41
42
43
44
45
46
|
using MvTest.TestDataViewModel1;using MvTest.TestDataViewModel2;using System;using System.Collections.Generic;using System.Collections.ObjectModel;using System.ComponentModel;using System.Linq;using System.Text;using System.Threading.Tasks;namespace MvcTest.TotalDataViewModel{ public class TotalTestDataCollection : INotifyPropertyChanged { /// <summary> /// 数据集合1 /// </summary> public ObservableCollection<TestDataItem> TestDataItems1 { get; private set; } /// <summary> /// 数据集合2 /// </summary> public ObservableCollection<TestDataItem2> TestDataItems2 { get; private set; } /// <summary> /// 属性更改事件回调 /// </summary> public event PropertyChangedEventHandler PropertyChanged; /// <summary> /// 构造函数 /// </summary> public TotalTestDataCollection() { this.TestDataItems1 = new ObservableCollection<TestDataItem>(); this.TestDataItems2 = new ObservableCollection<TestDataItem2>(); } /// <summary> /// INotifyPropertyChanged接口的实现 /// </summary> private void NotifyPropertyChanged(String propertyName) { PropertyChangedEventHandler handler = PropertyChanged; if (null != handler) { handler(this, new PropertyChangedEventArgs(propertyName)); } } }} |
//TotalDataViewModel.xaml
|
1
2
3
4
5
6
7
8
9
10
11
12
13
14
15
16
17
18
19
20
|
<!-- 这对应的是数据集的类名,表示一组数据--><vm:TotalTestDataCollection xmlns="http://schemas.microsoft.com/winfx/2006/xaml/presentation" xmlns:x="http://schemas.microsoft.com/winfx/2006/xaml" xmlns:vm="clr-namespace:MvcTest.TotalDataViewModel" xmlns:c1="clr-namespace:MvTest.TestDataViewModel1" xmlns:c2="clr-namespace:MvTest.TestDataViewModel2"> <!--clr-namespace:MvcTest这是数据集的命名空间,带文件夹的要注意啦--> <vm:TotalTestDataCollection.TestDataItems1> <c1:TestDataItem Index="0" Name="name0" Flag="True"></c1:TestDataItem> <c1:TestDataItem Index="1" Name="name1" Flag="True"></c1:TestDataItem> <c1:TestDataItem Index="2" Name="name2" Flag="True"></c1:TestDataItem> </vm:TotalTestDataCollection.TestDataItems1> <vm:TotalTestDataCollection.TestDataItems2> <c2:TestDataItem2 Index="3" Name="name3" Flag="True"></c2:TestDataItem2> <c2:TestDataItem2 Index="4" Name="name4" Flag="True"></c2:TestDataItem2> <c2:TestDataItem2 Index="5" Name="name5" Flag="True"></c2:TestDataItem2> </vm:TotalTestDataCollection.TestDataItems2></vm:TotalTestDataCollection> |
//MainPage.xaml
|
1
2
3
4
5
6
7
8
9
10
11
12
13
14
15
16
17
18
19
20
21
22
23
24
25
26
27
28
29
30
31
32
33
34
35
36
37
38
39
40
41
42
43
44
45
46
47
48
49
50
51
52
53
54
|
<phone:PhoneApplicationPage x:Class="MvcTest.MainPage" xmlns="http://schemas.microsoft.com/winfx/2006/xaml/presentation" xmlns:x="http://schemas.microsoft.com/winfx/2006/xaml" xmlns:phone="clr-namespace:Microsoft.Phone.Controls;assembly=Microsoft.Phone" xmlns:shell="clr-namespace:Microsoft.Phone.Shell;assembly=Microsoft.Phone" xmlns:d="http://schemas.microsoft.com/expression/blend/2008" xmlns:mc="http://schemas.openxmlformats.org/markup-compatibility/2006" mc:Ignorable="d" d:DataContext="{d:DesignData TotalDataViewModel/TotalDataViewModel.xaml}" FontFamily="{StaticResource PhoneFontFamilyNormal}" FontSize="{StaticResource PhoneFontSizeNormal}" Foreground="{StaticResource PhoneForegroundBrush}" SupportedOrientations="Portrait" Orientation="Portrait" shell:SystemTray.IsVisible="True"> <!--单条数据显示的样式--> <phone:PhoneApplicationPage.Resources> <DataTemplate x:Key="TestDataItemTemplate"> <StackPanel Margin="0,0,0,0"> <TextBlock Text="{Binding Index}"/> <TextBlock Text="{Binding Name}" /> <!--TextBlock Text="{Binding Flag}" /--> <StackPanel Height="1" Background="AliceBlue"></StackPanel> </StackPanel> </DataTemplate> <DataTemplate x:Key="TestDataItemTemplate2"> <StackPanel Margin="0,0,0,0"> <TextBlock Foreground="Red" Text="{Binding Index}"/> <TextBlock Foreground="Yellow" Text="{Binding Name}" /> <TextBlock Foreground="Green" Text="{Binding Flag}" /> <StackPanel Height="1" Background="RoyalBlue"></StackPanel> </StackPanel> </DataTemplate> </phone:PhoneApplicationPage.Resources> <Grid x:Name="LayoutRoot" Background="Transparent"> <Grid.RowDefinitions> <RowDefinition Height="Auto"/> <RowDefinition Height="*"/> </Grid.RowDefinitions> <StackPanel x:Name="TitlePanel" Grid.Row="0" Margin="12,17,0,28"> <TextBlock Text="我的应用程序" Style="{StaticResource PhoneTextNormalStyle}" Margin="12,0"/> <TextBlock Text="页面名称" Margin="9,-7,0,0" Style="{StaticResource PhoneTextTitle1Style}"/> </StackPanel> <Grid x:Name="ContentPanel" Grid.Row="1" Margin="12,0,12,0"> <!--用一个LongListSelector来显示数据集--> <StackPanel> <phone:LongListSelector Margin="0,0,0,0" ItemTemplate="{StaticResource ResourceKey=TestDataItemTemplate}" ItemsSource="{Binding TestDataItems1}"/> <phone:LongListSelector Margin="0,0,0,0" ItemTemplate="{StaticResource ResourceKey=TestDataItemTemplate2}" ItemsSource="{Binding TestDataItems2}"/> </StackPanel> </Grid> </Grid></phone:PhoneApplicationPage> |


