安全套接层(SSL)及其后续版本:传输层安全(TLS)是两种应用最广泛的协议,用来对服务器与客户机之间传输的数据进行加密。这些协议常常使用X.509证书和非对称加密方法。
STARTTTLS是另一种确保明文通信安全的方法。这种协议也使用SSL或TLS,对数据进行加密,但是使用与明文协议一样的端口,而不是使用另外的端口用来传输由SSL/TLS加密的数据。比如说,基于STARTTLS的IMAP使用与IMAP一样的端口(端口143),而基于SSL的IMAP(IMAPS)使用单独的端口:端口993。
前一个教程(http://xmodulo.com/2014/01/mail-server-ubuntu-debian.html)介绍了如何搭建一台在Postfix和Dovecot上运行的邮件服务器,但并没有探讨安全方面。在该教程中,我们将演示如何通过基于的TLS/SSL加密技术,为邮件服务器添加安全性。
TLS/SSL所需的证书可以是自签名、由免费的认证机构(比如CAcert)签名,或者由商业认证机构(比如VeriSign)签名,可以借助OpenSSL等实用工具来生成。我们准备在该教程中使用自签名证书。
为Postfix登记TLS加密
自签名证书可以用下面这个命令来创建。
# openssl req -new -x509 -days 365 -nodes -out /etc/ssl/certs/postfixcert.pem -keyout /etc/ssl/private/postfixkey.pem- 1.
上面这个命令请求一个新的证书,证书类型是X.509,保持365天有效。可选的-nodes参数明确规定了私有密钥不应该加密。输出证书文件作为postfixcert.pem保存起来,输出密钥文件作为postfixkey.pem保存起来。
可以赋予证书的所有必要值:
Country Name (2 letter code) [AU]:BD
State or Province Name (full name) [Some-State]:Dhaka
Locality Name (eg, city) []:Dhaka
Organization Name (eg, company) [Internet Widgits Pty Ltd]:
Organizational Unit Name (eg, section) []:Example.tst
Common Name (e.g. server FQDN or YOUR name) []:mail.example.tst
Email Address []:sarmed@example.tst- 1.
- 2.
- 3.
- 4.
- 5.
- 6.
- 7.
由于证书已准备就绪,可以调整postfix配置文件中的必要参数:
root@mail:~# vim /etc/postfix/main.cf
### STARTTLS已被启用###
smtpd_tls_security_level = may
smtpd_tls_received_header = yes
smtpd_tls_auth_only = yes
### 排查故障时,应该使用loglevel 3 ###
smtpd_tls_loglevel = 1
### 证书和密钥文件的路径 ###
smtpd_tls_cert_file = /etc/ssl/certs/postfixcert.pem
smtpd_tls_key_file = /etc/ssl/private/postfixkey.pem
smtpd_use_tls=yes- 1.
- 2.
- 3.
- 4.
- 5.
- 6.
- 7.
- 8.
- 9.
- 10.
- 11.
重启postfix,以启用TLS。
root@mail:~# service postfix restart- 1.
至此,postfix已准备对发到和来自服务器的数据进行加密。关于Postfix TLS支持的更多详细信息可以在官方README(http://www.postfix.org/TLS_README.html)中找到。
为Dovecot启用SSL加密
针对加密配置dovecot的方法与postfix大同小异。
首先,自签名证书用openssl来创建:
# openssl req -new -x509 -days 365 -nodes -out /etc/ssl/certs/dovecotcert.pem -keyout /etc/ssl/private/dovecotkey.pem- 1.
上面这个命令请求一个新的X.509证书,保持365天有效。-nodes这个可选参数明确规定了存储的私有密钥不应该加密。输出证书文件将是dovecotcert.pem,输出密钥文件将是dovecotkey.pem。
所有的必要参数需要在证书中加以明确指定:
Country Name (2 letter code) [AU]:BD
State or Province Name (full name) [Some-State]:Dhaka
Locality Name (eg, city) []:Dhaka
Organization Name (eg, company) [Internet Widgits Pty Ltd]:
Organizational Unit Name (eg, section) []:Example.tst
Common Name (e.g. server FQDN or YOUR name) []:mail.example.tst
Email Address []:sarmed@example.tst- 1.
- 2.
- 3.
- 4.
- 5.
- 6.
- 7.
下一步,证书路径添加到dovecot配置中。
root@mail:~# vim /etc/dovecot/conf.d/10-ssl.conf
ssl_cert =
ssl_key =- 1.
- 2.
- 3.
***,重启dovecot,以便使用新证书启用SSL。
root@mail:~# service dovecot restart- 1.
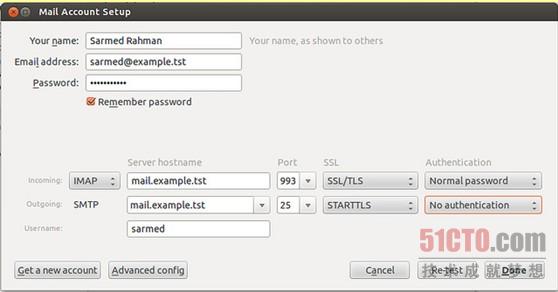
Thunderbird邮件客户端配置
下面这个屏幕快照显示了如何配置Mozilla Thunderbird中的帐户。
故障排查
首先,确保所有的必要端口在防火墙中已被允许。
其次,试一试通过telnet连接到邮件服务器。你应该能够连上去。下面给出了几个例子,仅供参考。
连接到IMAPS
$ telnet mail.example.tst 993
Trying mail.example.tst...
Connected to mail.example.tst.
Escape character is '^]'.
exit
exit
Connection closed by foreign host.- 1.
- 2.
- 3.
- 4.
- 5.
- 6.
- 7.
连接到POP3S
$ telnet mail.example.tst 995
Trying mail.example.tst...
Connected to mail.example.tst.
Escape character is '^]'.
exit
exit
Connection closed by foreign host.- 1.
- 2.
- 3.
- 4.
- 5.
- 6.
- 7.
连接到SMTP
$ telnet mail.example.tst 25
Trying mail.example.tst...
Connected to mail.example.tst.
Escape character is '^]'.
220 mail.example.tst ESMTP Postfix (Ubuntu)
### 命令 ###
ehlo mail.example.tst
250-mail.example.tst
250-PIPELINING
250-SIZE 10240000
250-VRFY
250-ETRN
250-STARTTLS
250-ENHANCEDSTATUSCODES
250-8BITMIME
250 DSN- 1.
- 2.
- 3.
- 4.
- 5.
- 6.
- 7.
- 8.
- 9.
- 10.
- 11.
- 12.
- 13.
- 14.
- 15.
- 16.
原文地址:http://xmodulo.com/2014/01/secure-mail-server-using-encryption.html