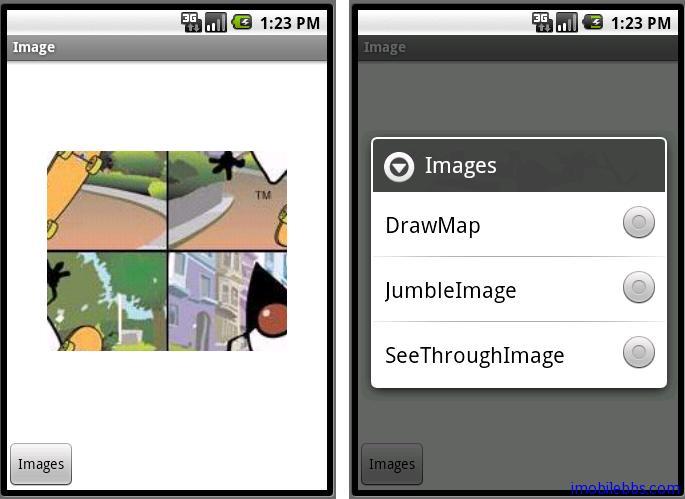
Dialog一般指可以显示在Activity前面的小窗口,当前的Activity失去焦点(Focus),Dialog将接受用户输入,一般可 以用来显示消息或接受用户输入等等。使用Dialog时一般不需要直接创建Dialog类的实例。而是可以使用 AlertDialog,ProgressDialog,DatePickerDialog,TimePickerDialog。最常用的是 AlertDialog。下面就以使用AlertDialog为例,使用AlertDialog来选择显示图像的三个例子:DrawMap, JumbleImage,SeeThroughImage。其中DrawMap暂时不介绍,将在后面介绍Internet应用显示在线地图时再说。
通常Dialog是作为Activity一部分来创建的,也就是说在Activity的onCreateDialog(int)中创建。当在 onCreateDialog(int)创建Dialog时,Android系统将自动管理Dialog的状态,并把当前Activity作为 Dialog的所有者。并且Dialog也继承当前Activity的一些属性,比如说Option Menu。
创建好Dialog后,可以使用showDialog(int) 来显示Dialog ,showDialog的参数为Dialog的ID。在显示Dialog之前,如果想对Dialog做些改动,可以 在 onPrepareDialog(int, Dialog) 添加代码。dismiss()关闭对话框。如果在Activity中则使用dismissDialog(int) 。
本例中使用一个按钮来触发Dialog,在res\layout 在添加images.xml
- <?xml version=”1.0″ encoding=”utf-8″?>
- <LinearLayout xmlns:android=”http://schemas.android.com/apk/res/android”
- android:orientation=”vertical”
- android:background=”@drawable/white”
- android:layout_width=”fill_parent”
- android:layout_height=”fill_parent”>
- <com.pstreets.graphics2d.GuidebeeGraphics2DView
- android:id=”@+id/graphics2dview”
- android:layout_weight=”1″
- android:layout_width=”fill_parent”
- android:layout_height=”wrap_content”/>
- <LinearLayout xmlns:android=”http://schemas.android.com/apk/res/android”
- android:layout_width=”wrap_content” android:layout_height=”wrap_content”
- android:orientation=”horizontal”
- >
- <Button android:text=”Images”
- android:id=”@+id/btnImages”
- android:layout_width=”wrap_content”
- android:textColor=”@color/black”
- android:checked=”true”
- android:layout_height=”wrap_content”>
- </Button>
- </LinearLayout>
- </LinearLayout>
修改Image.java
- public class Images extends Graphics2DActivity
- implements OnClickListener{
- private Button btnImages;
- private int[] imageDuke;
- static final private int IMAGE_DIALOG=1;
- int w, h;
- int offX, offY;
- int alpha = 128;
- FontEx font = FontEx.getSystemFont();
- int fontSize = 24;
- Pen pen = new Pen(Color.RED, 2);
- char[] message = "Guidebee".toCharArray();
- int widthOfMessage = 0;
- private int numlocs = 2;
- private int numcells = numlocs * numlocs;
- private int[] cells;
- int cw, ch;
- public void onCreate(Bundle savedInstanceState) {
- super.onCreate(savedInstanceState);
- setContentView(R.layout.images);
- graphic2dView = (GuidebeeGraphics2DView)
- findViewById(R.id.graphics2dview);
- btnImages = (Button) findViewById(R.id.btnImages);
- btnImages.setOnClickListener(this);
- Bitmap bitmap
- = BitmapFactory.decodeResource(getResources(),
- R.drawable.duke_skateboard);
- imageDuke = new int[bitmap.getHeight()
- * bitmap.getWidth()];
- bitmap.getPixels(imageDuke, 0, bitmap.getWidth(), 0, 0,
- bitmap.getWidth(), bitmap.getHeight());
- widthOfMessage = font.charsWidth(message, 0,
- message.length, fontSize);
- w=bitmap.getWidth();
- h=bitmap.getHeight();
- offX = (SharedGraphics2DInstance.CANVAS_WIDTH - w) / 2;
- offY = (SharedGraphics2DInstance.CANVAS_HEIGHT - h) / 2;
- cw = w / numlocs;
- ch = h / numlocs;
- cells = new int[numcells];
- for (int i = 0; i < numcells; i++) {
- cells[i] = i;
- }
- }
- private void drawJumbleImage(){
- Random rand = new Random();
- int ri;
- for (int i = 0; i < numcells; i++) {
- while ((ri = rand.nextInt(numlocs)) == i) {
- }
- int tmp = cells[i];
- cells[i] = cells[ri];
- cells[ri] = tmp;
- }
- graphics2D.clear(Color.WHITE);
- graphics2D.Reset();
- int dx, dy;
- for (int x = 0; x < numlocs; x++) {
- int sx = x * cw;
- for (int y = 0; y < numlocs; y++) {
- int sy = y * ch;
- int cell = cells[x * numlocs + y];
- dx = (cell / numlocs) * cw;
- dy = (cell % numlocs) * ch;
- graphics2D.drawImage(imageDuke, w, h,
- dx + offX, dy + offY,
- sx, sy, cw, ch);
- }
- }
- graphic2dView.refreshCanvas();
- }
- private void drawSeeThroughImage(){
- alpha += 16;
- if(alpha>255) alpha=0;
- graphics2D.clear(Color.WHITE);
- graphics2D.Reset();
- graphics2D.setDefaultPen(pen);
- graphics2D.drawChars(font, fontSize, message,
- 0, message.length, offX
- + (w - widthOfMessage) / 2, offY + h / 2);
- graphics2D.drawImage(imageDuke, w, h,
- offX, offY,
- 0xFFFF00FF, alpha);
- graphic2dView.refreshCanvas();
- }
- protected Dialog onCreateDialog(int id) {
- Dialog dialog;
- switch(id) {
- case IMAGE_DIALOG:
- final CharSequence[] items = {"DrawMap",
- "JumbleImage","SeeThroughImage"};
- AlertDialog.Builder builder
- = new AlertDialog.Builder(this);
- builder.setTitle("Images");
- builder.setSingleChoiceItems(items,
- -1, new DialogInterface.OnClickListener() {
- public void onClick(DialogInterface dialog,
- int item) {
- switch(item){
- case 0:
- break;
- case 1:
- drawJumbleImage();
- break;
- case 2:
- drawSeeThroughImage();
- break;
- }
- dialog.dismiss();
- }
- });
- AlertDialog alert = builder.create();
- dialog=alert;
- break;
- default:
- dialog = null;
- }
- return dialog;
- }
- @Override
- protected void drawImage() {
- drawJumbleImage();
- }
- @Override
- public void onClick(View view) {
- showDialog(IMAGE_DIALOG);
- }
- }
从代码中看到,Dialog是通过AlertDialog.Builder 来创建的,这里Dialog显示了三个选项,通过builder.setSingleChoiceItems添加处理事件。实际AlertDialog可以有多种选项,具体请参考Android AlertDialog 文档。


