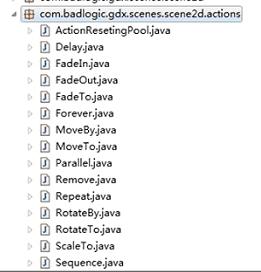
上一节讲了常用UI类和舞台,本节我们已经能够很容易的制作一出戏了。
因为actor类在绘制是以x、y值为基准,所以我们可以通过控制x、y值变化演员的位置,但是演员的其他效果需要配合Action类进行操作。
Action类是一个抽象类,所有的具体实现都在com.badlogic.gdx.scenes.scene2d.actions包中。

而包中的类依功能而言可以分为两类:
1、控制Action
2、表现Action
控制Action没有直接表现效果,它操作的对象是表现Action。比如Delay。
表现Action就是直接的表现效果,继承自AnimationAction,操作对象是Actor。比如MoveTo。
现在挨着说吧:
控制类:
Delay $ (Action action, float duration)
延迟duration秒执行action。
Forever $ (Action action)
一直执行action。
Parallel $ (Action... actions)
并行(同时)执行actions。
Repeat $ (Action action, int times)
重复action times次。
Sequence $ (Action... actions)
按顺序执行actions。
Remove $ ()
删除所有Action。
表现类:
FadeIn $ (float duration) FadeOut $ (float duration)
淡入淡出效果
FadeTo $ (float alpha, float duration)
duration秒改变至alpha。
MoveTo $ (float x, float y, float duration) MoveBy $ (float x, float y, float duration)
用duration移动到x,y处。
RotateBy $ (float rotation, float duration) RotateTo $ (float rotation, float duration)
用duration秒旋转rotation度。
ScaleTo $ (float scaleX, float scaleY, float duration)
缩放x到scaleX,y到scaleY,用时duration秒。
实例演示
一个个写例子太麻烦了,而且实际运用中也多是多个组合运用,下面来看一个综合性的示例:
我们的主角是

通过action的组合实现闪烁,飞动,旋转等效果。
代码如下:
- package com.cnblogs.htynkn.listener;
- import com.badlogic.gdx.ApplicationListener;
- import com.badlogic.gdx.Gdx;
- import com.badlogic.gdx.graphics.GL10;
- import com.badlogic.gdx.graphics.Texture;
- import com.badlogic.gdx.graphics.Texture.TextureFilter;
- import com.badlogic.gdx.math.MathUtils;
- import com.badlogic.gdx.scenes.scene2d.Action;
- import com.badlogic.gdx.scenes.scene2d.Stage;
- import com.badlogic.gdx.scenes.scene2d.actions.FadeIn;
- import com.badlogic.gdx.scenes.scene2d.actions.FadeOut;
- import com.badlogic.gdx.scenes.scene2d.actions.MoveBy;
- import com.badlogic.gdx.scenes.scene2d.actions.MoveTo;
- import com.badlogic.gdx.scenes.scene2d.actions.Parallel;
- import com.badlogic.gdx.scenes.scene2d.actions.Repeat;
- import com.badlogic.gdx.scenes.scene2d.actions.RotateTo;
- import com.badlogic.gdx.scenes.scene2d.actions.Sequence;
- import com.badlogic.gdx.scenes.scene2d.actors.Image;
- public class FirstGame implements ApplicationListener {
- private Stage stage;
- private Texture texture;
- @Override
- public void create() {
- stage = new Stage(Gdx.graphics.getWidth(), Gdx.graphics.getHeight(),
- true);
- texture = new Texture(Gdx.files.internal("star.png"));
- texture.setFilter(TextureFilter.Linear, TextureFilter.Linear);
- float duration = 4f;
- int maxwidth = Gdx.graphics.getWidth() - texture.getWidth();
- int maxheight = Gdx.graphics.getHeight() - texture.getHeight();
- for (int i = 0; i < 20; i++) {
- Image image = new Image("star" + i, texture);
- image.x = MathUtils.random(0, maxwidth);
- image.y = MathUtils.random(0, Gdx.graphics.getHeight()); //随机出现
- Action moveAction = Sequence.$(MoveTo.$(MathUtils.random(0,
- maxwidth), MathUtils.random(0, maxheight), duration / 2),
- MoveBy.$(MathUtils.random(0, maxwidth), MathUtils.random(0,
- maxheight), duration / 2)); //移动方向和地点随机
- Action rotateAction = RotateTo.$(360, duration); //旋转
- Action fadeAction = Repeat.$(Sequence.$(FadeOut.$(duration / 20),
- FadeIn.$(duration / 20)), 10); //闪烁,重复10次
- image.action(Parallel.$(moveAction, rotateAction, fadeAction)); //所有action并行
- stage.addActor(image);
- }
- Gdx.input.setInputProcessor(stage);
- }
- @Override
- public void dispose() {
- texture.dispose();
- stage.dispose();
- }
- @Override
- public void pause() {
- // TODO Auto-generated method stub
- }
- @Override
- public void render() {
- Gdx.gl.glClear(GL10.GL_COLOR_BUFFER_BIT);
- stage.act(Gdx.graphics.getDeltaTime());
- stage.draw();
- }
- @Override
- public void resize(int width, int height) {
- // TODO Auto-generated method stub
- }
- @Override
- public void resume() {
- // TODO Auto-generated method stub
- }
- }
其实每个action的用法都很简单,主要问题是怎么组合排列来显示一种符合需求的效果。
我发现libgdx的更新不是一般快,每天都有几个版本的。那个通过文件配置UI样式让我觉得非常有意思,但是具体操作中有诸多问题。


