ASIHTTPRequest检测系统的proxy设置并自动将proxy用于request。从1.0.6版本开始,它还支持PAC文件和要求授权的proxy。
默认情况下,ASIHTTPRequest将尝试自动检测proxy设置。当然,你可以看自己手动设置:
- // 手动设置代理服务器
- NSURL *url = [NSURL URLWithString:@"http://www.dreamingwish.com"];
- ASIHTTPRequest *request = [ASIHTTPRequest requestWithURL:url];
- [request setProxyHost:@"192.168.0.1"];
- [request setProxyPort:3128];
- // 另一种方法, 使用代理配置脚本文件
- // (***使用本地pac文件)
- [request setPACurl:[NSURL URLWithString:@"path/to/test.pac"]];
要求授权的proxy
在Mac OS上,ASIHTTPRequest可以自动检测到要求授权的proxy的凭据(前提是在系统设定中设置好)。在iOS上,ASIHTTPRequest则无法自动检测出授权凭据,所以你要么手动使用delegate来向你的controller或者用户索取合适的凭据,要么让ASIAuthenticationDialog向用户索取凭据。一旦获得了一个有效的proxy凭据,那么该凭据将被存储到keychian中(前提是启用useKeychainPersistence )并自动重用。
手动为proxy指定凭据
- NSURL *url = [NSURL URLWithString:@"http://www.dreamingwish.com"];
- ASIHTTPRequest *request = [ASIHTTPRequest requestWithURL:url];
- [request setProxyHost:@"192.168.0.1"];
- [request setProxyPort:3128];
- //为要求授权的proxy设置username 和password
- [request setProxyUsername:@"bencopsey"];
- [request setProxyPassword:@"password"];
- // 对于NTLM proxy,还要设置 domain (NTLM proxy功能是未经测试的)
- [request setProxyDomain:@"la.la.land"];
使用delegate来提供proxy凭据
这个特性的工作原理和“使用delegate提供HTTP授权”一样,只有一点不同:你的delegate要响应proxyAuthenticationNeededForRequest:函数。
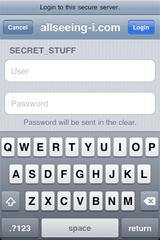
使用内建的授权对话框(仅适用于iOS)
这个特性归功于1.0.8版本的新类ASIAuthenticationDialog 。用来向用户索取凭据来授权webserver或者proxy。
如果你的delegate不响应proxyAuthenticationNeededForRequest:函数,那么默认情况下,ASIHTTPRequest将会显示一个对客户来提示用户输入授权凭据。使用ASIHTTPRequest,开发者不再需要写额外的代码来显示授权对话框,因为默认情况下,ASIHTTPRequest就会显示它。
使用同步request时proxy授权对话框不会显示出来。
如果你不限使用proxy授权对话框,那么你要么实现proxyAuthenticationNeededForRequest:,要么设置shouldPresentProxyAuthenticationDialog 为false(此时你的程序将无法连接到proxy)。如果你要改变对话框的样式,你得继承ASIHTTPRequest类,重写showProxyAuthenticationDialog 来显示你自己的对话框或者ASIAuthenticationDialog 子类.


