【51CTO专稿】由于Foreman的应用资料比较***,苦于像我们这些IT民众花费大量的时间研究,所以将相关内容共享出来,文章内容主要是针对安装配置应用的一些实例,在网上安装的文章很多,但对于配置的细节问题,没有太多的讲解,特别是针对操作系统安装的这个方面,网上的文章少之又少,针对这种情况,特写此文,也算尽我的微薄之力。
本文的重点也源自于像Cobbler那样无人值守安装操作系统,其它的针对Puppet的整合操作并不会在本文中出现太多。
一、安装
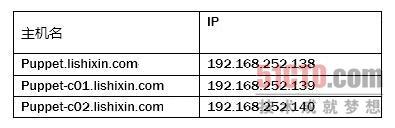
1、环境介绍
- System:CentOS 6.4 Minimal版本
- IP:192.168.252.138
- Hostname:puppet.lishixin.com
架构
本环境是在Puppet的环境之上进行的安装,Puppet环境已经成功运行。所有的版本均采用repo库中***的安装包,yum自动识别安装。
2. 安装
yum clean all
yum -y groupinstall "Development tools"
rpm -ivh http://dl.fedoraproject.org/pub/epel/6/x86_64/epel-release-6-8.noarch.rpm
rpm -vih http://yum.puppetlabs.com/el/6/products/x86_64/\
puppetlabs-release-6-7.noarch.rpm
yum -y install http://yum.theforeman.org/releases/1.2/el6/x86_64/\
foreman-release.rpm
yum -y install dhcp
yum -y install foreman-installer
ruby /usr/share/foreman-installer/generate_answers.rb
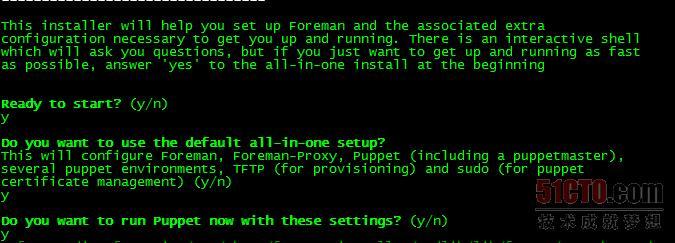
三个都是y,经过大概一段时间的等待就安装OK了。

Note:如果你这一步都没有安装完成,请不断重试这一步骤以完成这一步的成功安装进行下一步的配置工作。#p#
二、配置
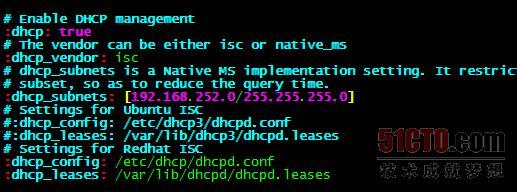
1、配置DHCP服务
vim /etc/dhcp/dhcpd.conf
ddns-update-style interim;
ignore client-updates;
authoritative;
allow booting;
allow bootp;
omapi-port 7911;
subnet 192.168.252.0 netmask 255.255.255.0 {
option routers      192.168.252.2;
option subnet-mask  255.255.255.0;
option domain-name    "lishixin.com";
option domain-name-servers  192.168.252.2;
option log-servers    syslog;
option ntp-servers    ntp;
range dynamic-bootp 192.168.252.2 192.168.252.25;
default-lease-time 21600;
max-lease-time 43200;
}
- chgrp foreman-proxy /etc/dhcp/ -R
- chkconfig dhcpd on
- service dhcpd start
2、配置Foreman-Proxy
- vim /etc/foreman-proxy/settings.yml
- vim /etc/foreman-proxy/settings.yml
3、配置Puppet及HTTP
- https://puppet.lishixin.com
- username: admin
- password: changeme
- vim /etc/puppet/puppet.conf
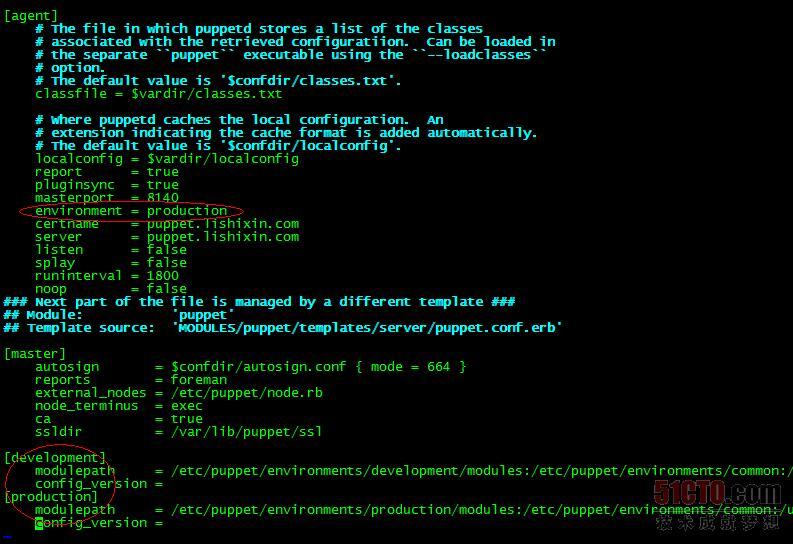
红色区域全部删除,不需要这样细化配置环境,不然配置起来就复杂了,***次以简单为主。
- service httpd restart
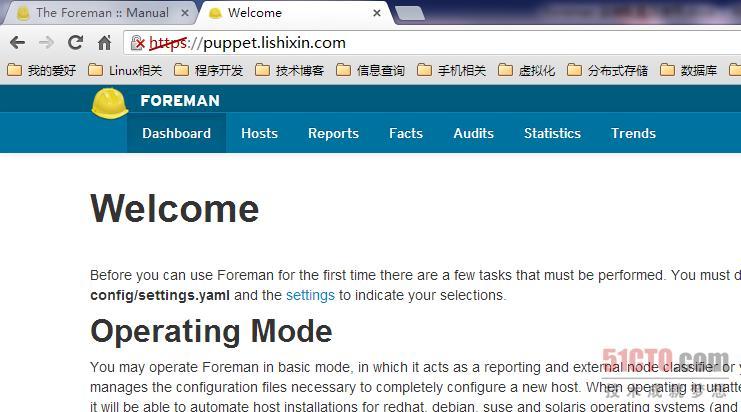
出现上图说明安装成功。
4、简单Web配置
点击Settings进入下图的设置项:
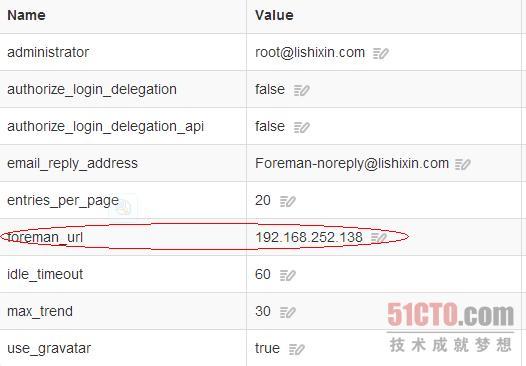
foreman_url 改成一个网络中可以解析的域名,我这里直接改成IP:192.168.252.138,这样可以省了DNS服务器的配置。
5、Create a Smart Proxy


添加完成。
6、Import your data
- vim /etc/foreman/database.yml
#添加
- production:
- adapter: postgresql
- database: foreman
- username: foreman
- password: xNPq6xBYgBSEJbNhiBbooL2bYquMYopi
- host: localhost
默认没有host这个可能是puppet安装的foreman一个bug
- cd /usr/share/foreman
- ruby193-rake puppet:import:hosts_and_facts RAILS_ENV=production
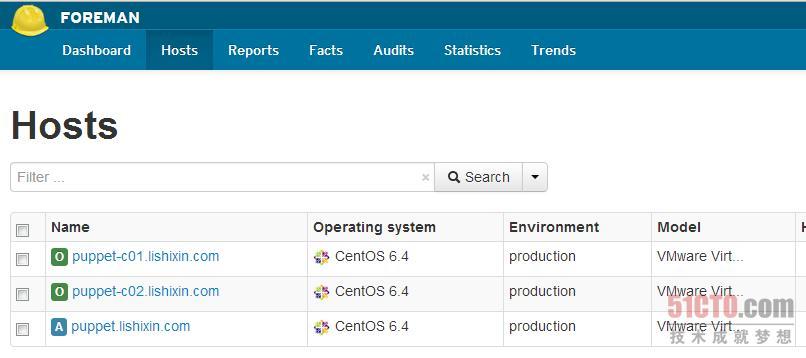
在puppet-c01 puppet-c02配置文件添加:
- report = true
导入类
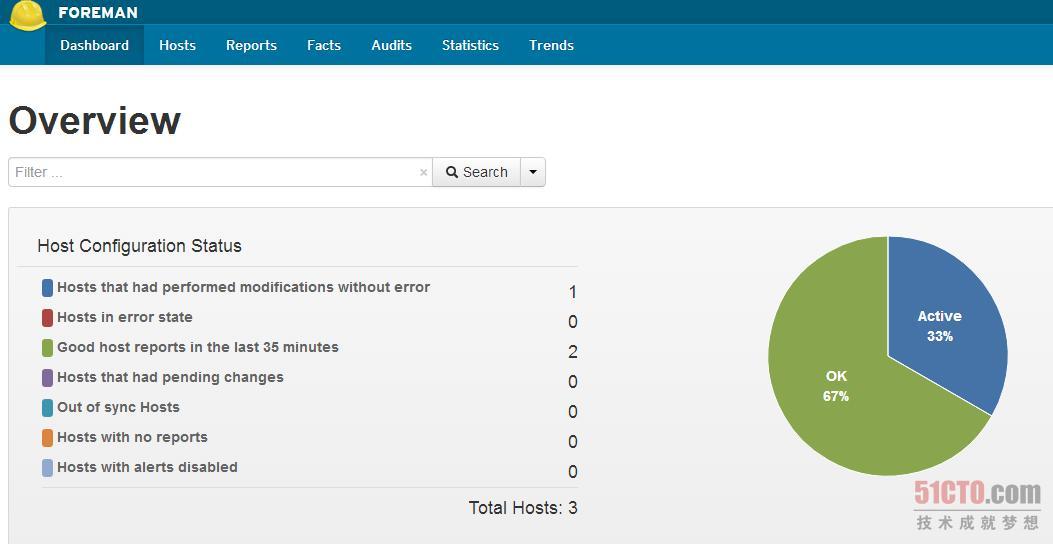
7、基本设置完成
#p#
使用
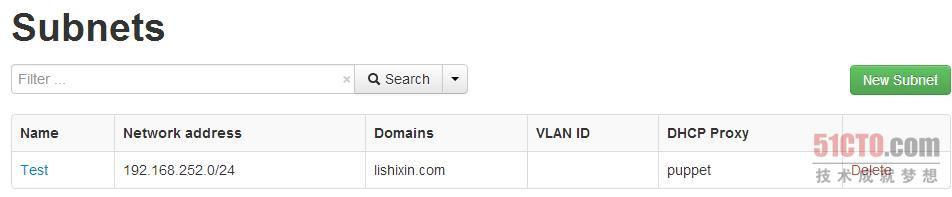
1、添加子网
- More >>Provisioning >> Subnets
如下是我添加好的。
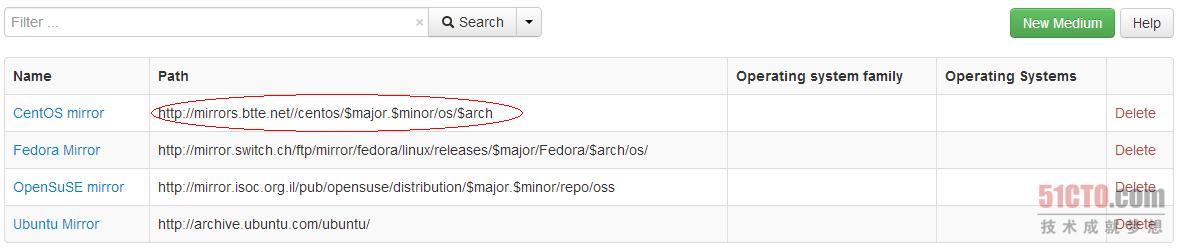
2、添加安装源
- More >>Provisioning >> Installation Media
如图是在原来的基础上面更改的,当然也可以自己添加:
3、添加安装使用模板
More >>Provisioning >> Provisioning Templates
这里的模板分为PXE引导使用的与ks 文件 使用的模板当然这里不仅仅只有这两种,但我们与Cobbler相比,我们经常使用就只有这两种了。
PXELINUX模板
我们使用系统自带的PXE模板即可满足要求:

以下是PXE模板内容:
- default linux
- label linux
- kernel <%= @kernel %>
- <% if @host.operatingsystem.name == "Fedora" and @host.operatingsystem.major.to_i > 16 -%>
- append initrd=<%= @initrd %> ks=<%= foreman_url("provision")%> ks.device=bootif network ks.sendmac
- <% else -%>
- append initrd=<%= @initrd %> ks=<%= foreman_url("provision")%> ksdevice=bootif network kssendmac
- <% end -%>
ks模板
我们也同样使用系统自带的:

但这个是要根据个人的情况做修改的,如果你对ks文件的结构比较了解这个应该不是问题,和普通的KS文件没有太大区别,只是引用了一些变量。
以下是修改后的KS内容:
- # Install OS instead of upgrade
- install
- <%= @mediapath %>
- # SELinux configuration
- selinux --disabled
- # Do not configure the X Window System
- skipx
- # Do not key
- key --skip
- # Use network installation
- # Network DHCP IP
- #network --bootproto <%= @static ? "static" : "dhcp" %> --hostname <%= @host %>
- # Use Static IP
- network --bootproto=static --hostname=<%= @host %> --ip=<%= @host.ip %> --netmask=<%= @host.subnet.mask %> --gateway=<%= @host.subnet.gateway %> --nameserver=<%= @host.subnet.dns_primary %>
- # End network installation
- #Root password
- rootpw --iscrypted <%= root_pass %>
- # System authorization information
- auth --useshadow --enablemd5
- # Firewall configuration
- firewall --disabled
- # System keyboard
- keyboard us
- # System language
- lang en_US
- # Installation logging level
- logging --level=info
- # Use text mode install
- text
- # Reboot after installation
- reboot
- # System timezone
- timezone Asia/Shanghai
- # Disable Service
- services --disabled postfix
- # System bootloader configuration
- bootloader --location=mbr
- # Include diskLayout
- <%= @host.diskLayout %>
- # Install Packages
- %packages --ignoremissing
- @Core
- %end
- %post
- logger "Starting anaconda <%= @host %> postinstall"
- exec < /dev/tty3 > /dev/tty3
- #changing to VT 3 so that we can see whats going on....
- /usr/bin/chvt 3
- (
- # and add the host
- echo "<%= @host.params['PuppetMasterIP'] %> <%= @host.puppetmaster %>" >> /etc/hosts
- echo "<%= @host.ip %> <%= @host %>" >> /etc/hosts
- # and add the puppet package
- rpm -ivh <%= @host.params['epel'] %>
- rpm -ivh <%= @host.params['puppetlabs'] %>
- yum -t -y -e 0 install puppet
- # Setup puppet to run on system reboot
- /sbin/chkconfig --level 345 puppet on
- /usr/bin/puppet agent --server <%= @host.puppetmaster %> --no-daemonize
- sync
- # Inform the build system that we are done.
- echo "Informing Foreman that we are built"
- wget -q -O /dev/null --no-check-certificate <%= foreman_url %>
- # Sleeping an hour for debug
- ) 2>&1 | tee /root/install.post.log
- exit 0
4、添加使用的分区表
- More>>Provisioning>>PartitionTables
这里我们使用系统默认的,当然你也是可以编辑这些内容:

以下是分区表的内容:
- # Clear the Master Boot Record
- zerombr
- # Allow anaconda to partition the system as needed
- autopart
- # Partition clearing information
- clearpart --all -initlabel
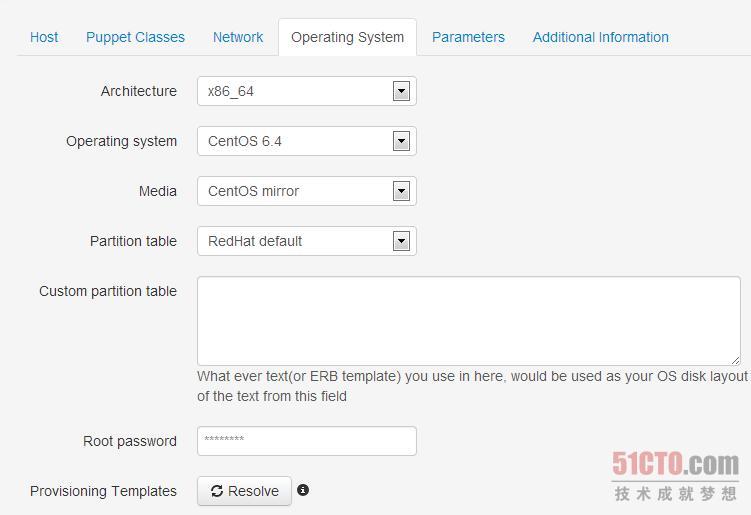
5、添加操作系统
More >>Provisioning >> Operating systems
这里主要是对上面创建的模板及分区表进行关联:

6、安装操作系统
如下变量是在KS文件中使用的。
添加全局变量:
- More >> Configuration >> Global Parameters

这个主要用于指定一个PuppetMaster的IP,因为我没有使用广域网解析,所以这个是在主机安装的过程中添加HOSTS使用的。
添加系统变量
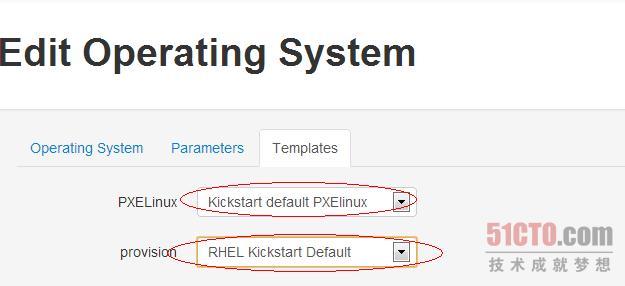
- More >> Provisioning >> Operating systems
Edit Operating System页面
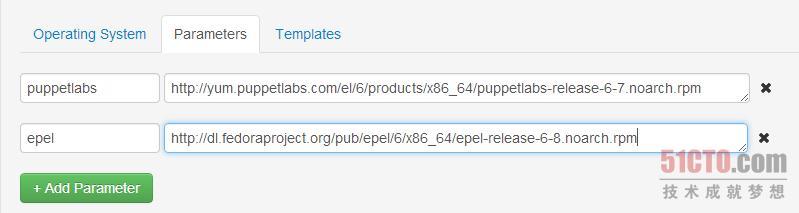
大家一看就知道了,这是添加两个仓库的变量方便以后修改,所以KS引用以后这些地址变了,就只需要在这个地方修改即可。
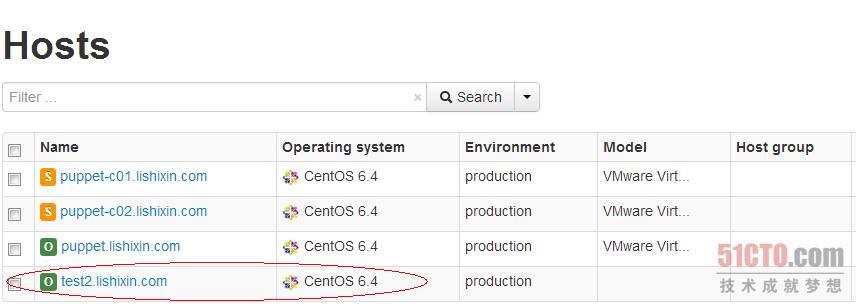
添加主机
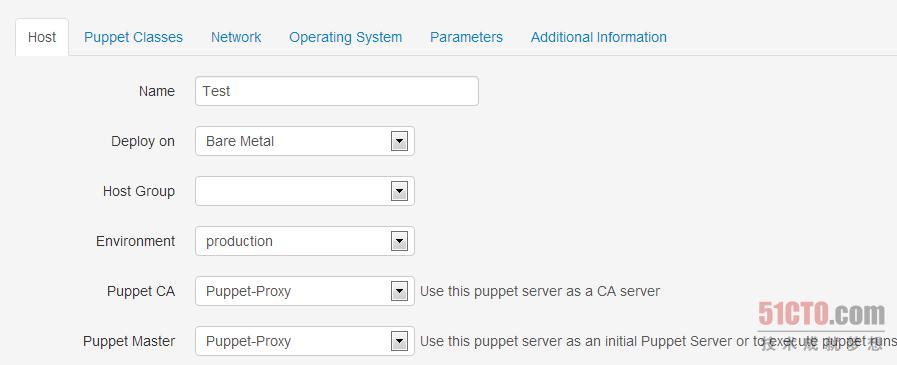
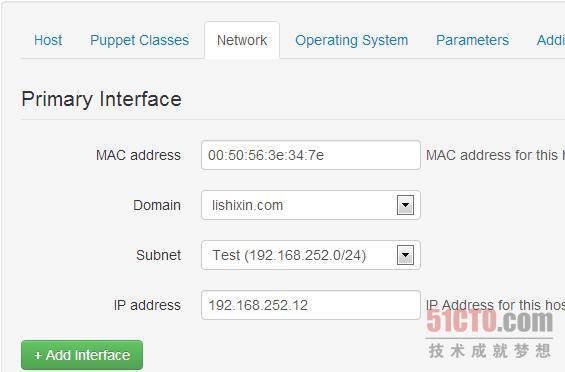
这里面的IP址址会自动分配,如果你的DHCP配置没有问题。
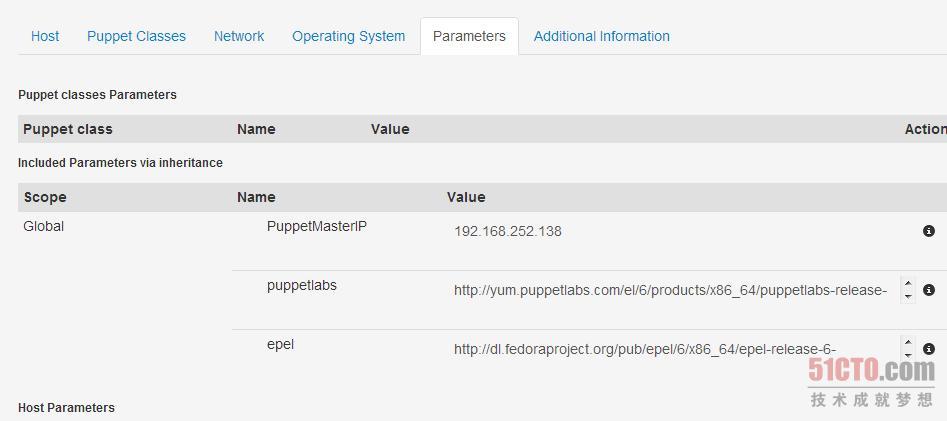
这里面列出了所有的参数。
所有的设置配置完成后,就可以Submit了。
然后打开主机注意MAC地址那台主机,它会自动的生成pxelinux引导文件,及KS文件。然后你就可以等待主机安装成功了.
安装完成
【作者信息】本文作者LSX,个人博客地址:http://blog.lishixin.net/,微博:@warriornew,邮箱:admin@lishixin.net,欢迎留言讨论。