1.设置项目
Step 1
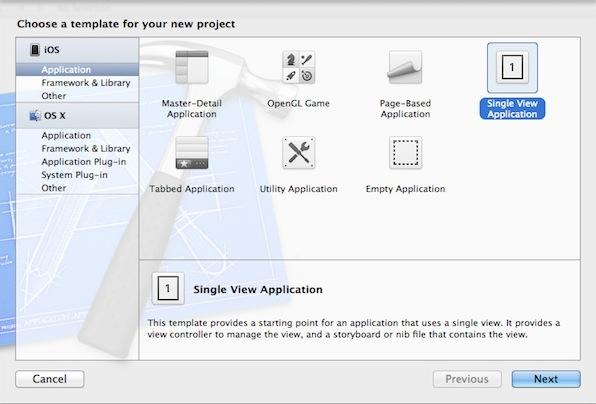
打开Xcode,选择File > New > Project,创建一个新项目,选择iOS Single View Application,再点击Next。
Step 2
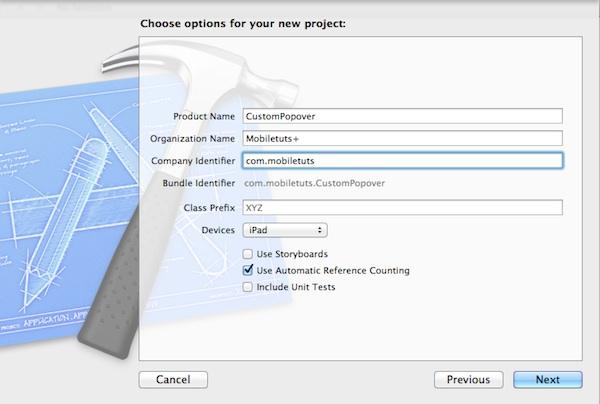
填写一些列表格,项目名称、组织/公司名称以及公司标识符。在设备那个下拉菜单中选择iPad,在这一栏下边仅选择Automatic Reference Counting,点击Next。选择一个地点存放你的文件,点击创建。
2. 添加Navigation Controller
Step 1
添加Navigation Controller,这样就能添加一个按钮来展示popover。点击AppDelegate.m,找到 application:didFinishLaunchingWithOptions:方法。添加下述代码来创建一个 navigation controller,设置为root view controller。
- UINavigationController *navController = [[UINavigationController alloc] initWithRootViewController:self.viewController];
- self.window.rootViewController = navController;
Step 2
在导航栏上添加一个“+”的按钮,然后打开ViewController.m文件,在[super viewDidLoad]下边把如下代码添加至viewDidLoad方法中。
- UIBarButtonItem *popoverButton = [[UIBarButtonItem alloc]
- initWithBarButtonSystemItem:UIBarButtonSystemItemAdd
- target:self
- action:@selector(showPopover:)];
- self.navigationItem.rightBarButtonItem = popoverButton;
UIBarButtonSystemItemAdd创建了一个“+”的按钮,我们将要把它添加至导航栏的右边,接下来我们会使用选择器执行showPopover:方法。
3.展示Popover
Step 1
在执行showPopover:方法前先为popover controller添加一个属性,打开ViewController.h文件,添加如下属性:
- @property (nonatomic, strong) UIPopoverController *popController;
Step 2
回到ViewController.m文件,在类扩展中声明showPopover:方法,如下:
- @interface ViewController ()
- - (void)showPopover:(id)sender;
- @end
Step 3
在@implementation下添加如下代码来定义这个方法:
- - (void)showPopover:(id)sender
- {
- if (self.popController.popoverVisible) {
- [self.popController dismissPopoverAnimated:YES];
- return;
- }
- UIViewController *contentViewController = [[UIViewController alloc] init];
- contentViewController.view.backgroundColor = [UIColor yellowColor];
- UIPopoverController *popController = [[UIPopoverController alloc] initWithContentViewController:contentViewController];
- popController.popoverContentSize = CGSizeMake(300.0f, 600.0f);
- self.popController = popController;
- [self.popController presentPopoverFromBarButtonItem:sender
- permittedArrowDirections:UIPopoverArrowDirectionUp
- animated:YES];
- }
首先检查下popover能否展示在屏幕上。如果popover是可见的,那么会将popover隐藏起来,然后从该方法中直接return。如果 popover不可见,那么我们可以创建一个view controller,让它展示在popover中。然后创建 popover controller,并设置大小。
4. 测试标准的Popover
我们已经创建一个标准的Popover,创建运行你的项目,点击“+”按钮来展现一个基本的Popover。
5. 子类化UIPopoverBackgroundView
Step 1
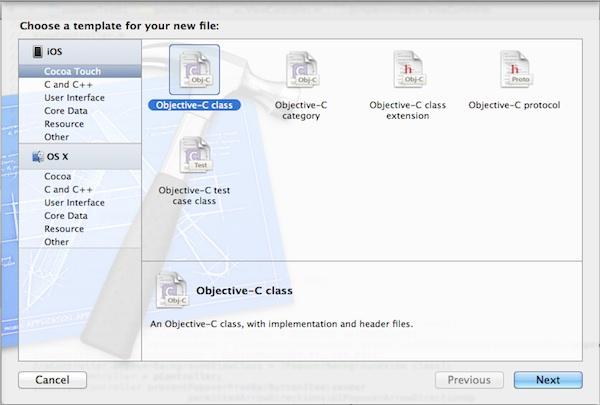
为了自定义popover,我们需要子类化UIPopoverBackgroundView。点击 File > New > File, 选择iOS Cocoa Touch Objective-C Class, 点击Next.
Step 2
给class这一栏填上PopoverBackgroundView,从Subclass of下拉菜单中选择UIPopoverBackgroundView。
Step 3
这里有两个UIPopoverBackgroundView属性需要被覆盖,添加如下代码来定义arrow的方向和位移。
- @synthesize arrowDirection = _arrowDirection;
- @synthesize arrowOffset = _arrowOffset;
Step 4
这里有3个类方法需要覆盖,我们使用这个方法来定义一些值。
- #define kArrowBase 30.0f
- #define kArrowHeight 20.0f
- #define kBorderInset 8.0f
Step 5
添加如下代码覆盖arrowBase, arrowHeight和contentViewInsets方法。
- + (CGFloat)arrowBase
- {
- return kArrowBase;
- }
- + (CGFloat)arrowHeight
- {
- return kArrowHeight;
- }
- + (UIEdgeInsets)contentViewInsets
- {
- return UIEdgeInsetsMake(kBorderInset, kBorderInset, kBorderInset, kBorderInset);
- }
arrowBase方法确定arrow底部的宽度,arrowHeight方法确定arrow的高度。
Step 6
添加背景色,在initWithFrame:方法的条件语句中添加如下代码:
- self.backgroundColor = [UIColor grayColor];
6.设置Popover Background View属性
测试popover之前,我们需要输入和设置popover controller的 popover Background View Class Property。打开ViewController.m文件,输入 popover background view头文件:
- #import "PopoverBackgroundView.h"
还是在ViewController.m文件中,位于我们在showPopover:方法中创建UIPopoverController的下边,添加下边一行代码,
- popController.popoverBackgroundViewClass = [PopoverBackgroundView class];
7.测试Popover Background View
创建、运行项目,点击“+”的按钮来看下popover,可以看到标准的popover已经被取代。
8.设置阴影和圆角
wantsDefaultContentAppearance 方法决定是否在popover中展示默认的内置阴影和圆角,如果返回的是“NO”,Popover Background View将不再展示默认的阴影 和圆角,允许执行你自己的。添加如下代码来覆盖之前的方法:
- + (BOOL)wantsDefaultContentAppearance
- {
- return NO;
- }
9.添加Arrow
Step 1
我们需要创建和管理arrow,我们可以为image view声明一个属性,在类扩展中添加如下代码:
- @property (nonatomic, strong) UIImageView *arrowImageView;
现在可以对image view进行实例化,使用如下代码替代initWithFrame:方法条件语句中的代码:
- self.backgroundColor = [UIColor clearColor];
- UIImageView *arrowImageView = [[UIImageView alloc] initWithFrame:CGRectZero];
- self.arrowImageView = arrowImageView;
- [self addSubview:self.arrowImageView];
Step 2
通过使用以下代码来更新在PopoverBackgroundView.m定义的kBorderInset来改变border inset:
- #define kBorderInset 0.0f
Step 3
为了画这个arrow,我们需要声明一个方法来展现,可以在PopoverBackgroundView.m类扩展中添加下边这个方法声明:
- - (UIImage *)drawArrowImage:(CGSize)size;
Step 4
在@implementation下添加方法定义:
- - (UIImage *)drawArrowImage:(CGSize)size
- {
- UIGraphicsBeginImageContextWithOptions(size, NO, 0);
- CGContextRef ctx = UIGraphicsGetCurrentContext();
- [[UIColor clearColor] setFill];
- CGContextFillRect(ctx, CGRectMake(0.0f, 0.0f, size.width, size.height));
- CGMutablePathRef arrowPath = CGPathCreateMutable();
- CGPathMoveToPoint(arrowPath, NULL, (size.width/2.0f), 0.0f);
- CGPathAddLineToPoint(arrowPath, NULL, size.width, size.height);
- CGPathAddLineToPoint(arrowPath, NULL, 0.0f, size.height);
- CGPathCloseSubpath(arrowPath);
- CGContextAddPath(ctx, arrowPath);
- CGPathRelease(arrowPath);
- UIColor *fillColor = [UIColor yellowColor];
- CGContextSetFillColorWithColor(ctx, fillColor.CGColor);
- CGContextDrawPath(ctx, kCGPathFill);
- UIImage *image = UIGraphicsGetImageFromCurrentImageContext();
- UIGraphicsEndImageContext();
- return image;
- }
不用输入图片,上述代码可以自动生成一个arrow。
Step 5
每次popover的background view的子类的bounds 改变时,这个arrow的frame需要重新计算。我们可以通过覆盖layoutSubviews来达到目的,为layoutSubviews添加如下代码:
- - (void)layoutSubviews
- {
- [super layoutSubviews];
- CGSize arrowSize = CGSizeMake([[self class] arrowBase], [[self class] arrowHeight]);
- self.arrowImageView.image = [self drawArrowImage:arrowSize];
- self.arrowImageView.frame = CGRectMake(((self.bounds.size.width - arrowSize.width) kBorderInset), 0.0f, arrowSize.width, arrowSize.height);
- }
10. 测试Popover
源文件:


