在Android系统上开发游戏是Android开发学习者所向往的,有成就感也有乐趣,还能取得经济上的报酬。那怎样开发Android游戏呢?下面介绍一个简单的入门实例。
一、创建新工程
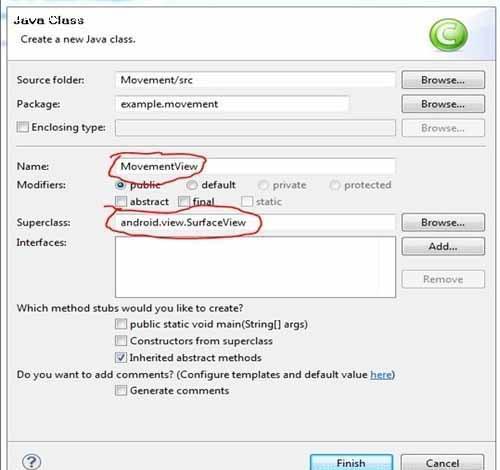
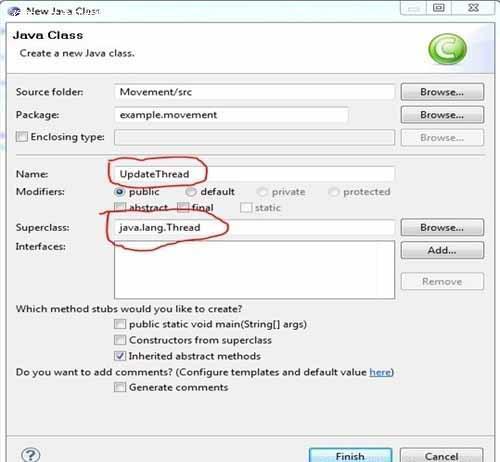
首先,我们在Eclipse中新建一个名为Movement的工程,并且选择合适的Android SDK,在这里,我们选用的API是比较低的1.5版本,这样可以让其适应性更强。接下来,我们新建两个类,一个是UpdateThread类,一个是 SurfaceView类,它们在项目中分别是负责处理线程和画面的两个类,在接下来会有详细介绍,如下图,分别建立这两个类,注意选择正确它们继承的父类:


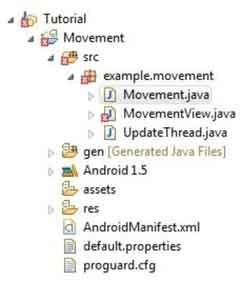
在建立完成后,系统的项目结构看上去应该象如下的样子:

二、编写Movment.java启动程序
任何一个Android应用都必须有一个主启动程序来启动,我们这里把这个启动程序命名为Movment,代码很简单如下:
- public class Movement extends Activity {
- @Override
- public void onCreate(Bundle savedInstanceState) {
- super.onCreate(savedInstanceState);
- setContentView(new MovementView(this));
- }
注意的是,我们这个启动程序不象其他程序一样,在启动的时候,在setContentView中传入界面布局文件,而是直接将MovementView的实例传递进来,也就是说,直接启动了MovementView这个类,在这个类中,我们将绘画我们的小球。
三、什么是SurfaceView
在Android中,SurfaceView是一个重要的绘图容器,它可以可以直接从内存或 者DMA等硬件接口取得图像数据。通常情况程序的View和用户响应都是在同一个线程中处理的,这也是为什么处理长时间事件(例如访问网络)需要放到另外 的线程中去(防止阻塞当前UI线程的操作和绘制)。但是在其他线程中却不能修改UI元素,例如用后台线程更新自定义View(调用View的在自定义 View中的onDraw函数)是不允许的。
如果需要在另外的线程绘制界面、需要迅速的更新界面或则渲染UI界面需要较长的时间,这种情况就要使用SurfaceView了。SurfaceView中包含一个Surface对象,而Surface是可以在后台线程中绘制的。
在本文中,我们将使用它,直接通过代码创建一个小球,并且随着UpdateThread线程的更新,不断改变小球的位置,下面我们开始学习MovementView的编写,先看下如何运用SurfaceView。
首先导入SurfaceView及绘图的相关库文件,如下所示:
- package example.movement;
- import android.content.Context;
- import android.graphics.Canvas;
- import android.graphics.Color;
- import android.graphics.Paint;
- import android.graphics.Rect;
- import android.view.SurfaceHolder;
- import android.view.SurfaceView;
接着,我们要继承SurfaceView并且实现SurfaceHolder.Callback接口,这是一个SurfaceHolder的内部接口,可以实现该接口获得界面改变的信息,代码如下,并且我们声明了一些成员变量:
- public class MovementView extends SurfaceView implements SurfaceHolder.Callback {
- private int xPos;
- private int yPos;
- private int xVel;
- private int yVel;
- private int width;
- private int height;
- private int circleRadius;
- private Paint circlePaint;
- UpdateThread updateThread;
- }
而在MovementView的构造函数中,我们设置了小球的大小和在X,Y方向上的初始坐标,如下:
- public MovementView(Context context) {
- super(context);
- getHolder().addCallback(this);
- circleRadius = 10;
- circlePaint = new Paint();
- circlePaint.setColor(Color.BLUE);
- xVel = 2;
- yVel = 2;
- }
接着我们来看下ondraw方法的编写,在这里,我们将绘画小球,并且每次都把画布Canvas的背景色设置为白色,以重新覆盖之前一帧,代码如下:
- protected void onDraw(Canvas canvas) {
- canvas.drawColor(Color.WHITE);
- canvas.drawCircle(xPos, yPos, circleRadius, circlePaint);
- }
下页将为您带来UpdateThread线程程序 和 启动并运行程序
#p#
我们再来看下updatePhysics这个方法如何编写。这个方法的作用有两个:一是处理小球的运动,二是更新小球的实时位置,因为小球在屏幕中不断地运动,因此当小球到达比如屏幕绘画区域的顶端后,要被弹回,因此代码如下:
- public void updatePhysics() {
- //更新当前的x,y坐标
- xPos += xVel;
- yPos += yVel;
- if (yPos - circleRadius < 0 || yPos + circleRadius > height) {
- if (yPos - circleRadius < 0) {
- //如果小球到达画布区域的上顶端,则弹回
- yPos = circleRadius;
- }else{
- //如果小球到达了画布的下端边界,则弹回
- yPos = height - circleRadius;
- }
- // 将Y坐标设置为相反方向
- yVel *= -1;
- }
- if (xPos - circleRadius < 0 || xPos + circleRadius > width) {
- if (xPos - circleRadius < 0) {
- // 如果小球到达左边缘
- xPos = circleRadius;
- } else {
- // 如果小球到达右边缘
- xPos = width - circleRadius;
- }
- // 重新设置x轴坐标
- xVel *= -1;
- }
- }
***我们看下surfaceCreated这个方法的代码,在这个方法中,主要是取得了可用的SurfaceView的区域的高度和宽度,然后设置了小球的起始坐标(将其设置在屏幕的正中央位置),并且启动了UpdateThread线程,代码如下:
- public void surfaceCreated(SurfaceHolder holder) {
- Rect surfaceFrame = holder.getSurfaceFrame();
- width = surfaceFrame.width();
- height = surfaceFrame.height();
- xPos = width / 2;
- yPos = circleRadius;
- updateThread = new UpdateThread(this);
- updateThread.setRunning(true);
- updateThread.start();
- }
此外,我们要补上surfaceChanged这个方法,这个方法意思是界面尺寸改变时才调用,在我们这个应用中并没用到,所以我们保留为空的方法实现:
- public void surfaceChanged(SurfaceHolder holder, int format, int width, int height)
- {
- }
而surfaceDestroyed方法中,主要实现的是界面被销毁时才调用,这里我们停止了当前的线程所处理的任务,这里使用了线程的join方法:
- public void surfaceDestroyed(SurfaceHolder holder) {
- boolean retry = true;
- updateThread.setRunning(false);
- while (retry) {
- try {
- updateThread.join();
- retry = false;
- } catch (InterruptedException e) {
- }
- }
- }
归纳下,完整的MovementView代码如下:
- package example.movement;
- import android.content.Context;
- import android.graphics.Canvas;
- import android.graphics.Color;
- import android.graphics.Paint;
- import android.graphics.Rect;
- import android.view.SurfaceHolder;
- import android.view.SurfaceView;
- public class MovementView extends SurfaceView implements SurfaceHolder.Callback {
- private int xPos;
- private int yPos;
- private int xVel;
- private int yVel;
- private int width;
- private int height;
- private int circleRadius;
- private Paint circlePaint;
- UpdateThread updateThread;
- public MovementView(Context context) {
- super(context);
- getHolder().addCallback(this);
- circleRadius = 10;
- circlePaint = new Paint();
- circlePaint.setColor(Color.BLUE);
- xVel = 2;
- yVel = 2;
- }
- @Override
- protected void onDraw(Canvas canvas) {
- canvas.drawColor(Color.WHITE);
- canvas.drawCircle(xPos, yPos, circleRadius, circlePaint);
- }
- public void updatePhysics() {
- xPos += xVel;
- yPos += yVel;
- if (yPos - circleRadius < 0 || yPos + circleRadius > height) {
- if (yPos - circleRadius < 0) {
- yPos = circleRadius;
- }else{
- yPos = height - circleRadius;
- }
- yVel *= -1;
- }
- if (xPos - circleRadius < 0 || xPos + circleRadius > width) {
- if (xPos - circleRadius < 0) {
- xPos = circleRadius;
- } else {
- xPos = width - circleRadius;
- }
- xVel *= -1;
- }
- }
- public void surfaceCreated(SurfaceHolder holder) {
- Rect surfaceFrame = holder.getSurfaceFrame();
- width = surfaceFrame.width();
- height = surfaceFrame.height();
- xPos = width / 2;
- yPos = circleRadius;
- updateThread = new UpdateThread(this);
- updateThread.setRunning(true);
- updateThread.start();
- }
- public void surfaceChanged(SurfaceHolder holder, int format, int width, int height) {
- }
- public void surfaceDestroyed(SurfaceHolder holder) {
- boolean retry = true;
- updateThread.setRunning(false);
- while (retry) {
- try {
- updateThread.join();
- retry = false;
- } catch (InterruptedException e) {
- }
- }
- }
- }
四、UpdateThread线程程序
下面,我们开始着手编写UpdateThread线程程序。这个程序主要是启动一个线程去不断更新当前小球的位置。先看声明及构造函数部分:
- package licksquid.movement;
- import android.graphics.Canvas;
- import android.view.SurfaceHolder;
- public class UpdateThread extends Thread {
- private long time;
- private final int fps = 20;
- private boolean toRun = false;
- private MovementView movementView;
- private SurfaceHolder surfaceHolder;
- }
- public UpdateThread(MovementView rMovementView) {
- movementView = rMovementView;
- surfaceHolder = movementView.getHolder();
- }
- public void setRunning(boolean run) {
- toRun = run;
- }
注意这里的setRunning方法中设置了线程是否应该停止的标记,下面来看重要的方法run:
- public void run() {
- Canvas c;
- while (toRun) {
- long cTime = System.currentTimeMillis();
- if ((cTime - time) <= (1000 / fps)) {
- c = null;
- try {
- c = surfaceHolder.lockCanvas(null);
- movementView.updatePhysics();
- movementView.onDraw(c);
- } finally {
- if (c != null) {
- surfaceHolder.unlockCanvasAndPost(c);
- }
- }
- }
- time = cTime;
- }
- }
在run方法中,主要实现了如下几个任务:首先检查是否有允许启动该线程(在开始运行后,由于在MovementView中,启动 UpdateThread的时候,已经设置了其值为true,即updateThread.setRunning(true)),接下来检查是否在指定的 时间内(这里设置的是每秒20帧),如果是的话,则调用surfaceHolder的lockCanvas方法,锁定当前的画布绘画区域,并且调用 movementView的updatePhysics方法及onDraw方法去画小球并判断小球的运动,***记得要在finally中调用 unlockCanvasAndPost方法。
五、启动并运行程序
***启动并运行程序,可以看到如下的效果,可以看到小球在做各个方向的弹跳运动。
到此就完成了这个Android游戏开发的入门实例,其实编写Android游戏就是这么简单。


