1.1 实例描述
对数据文件中的数据进行去重。数据文件中的每行都是一个数据。
样例输入如下所示:
1)file1:
2012-3-1 a
2012-3-2 b
2012-3-3 c
2012-3-4 d
2012-3-5 a
2012-3-6 b
2012-3-7 c
2012-3-3 c
2)file2:
2012-3-1 b
2012-3-2 a
2012-3-3 b
2012-3-4 d
2012-3-5 a
2012-3-6 c
2012-3-7 d
2012-3-3 c
样例输出如下所示:
2012-3-1 a
2012-3-1 b
2012-3-2 a
2012-3-2 b
2012-3-3 b
2012-3-3 c
2012-3-4 d
2012-3-5 a
2012-3-6 b
2012-3-6 c
2012-3-7 c
2012-3-7 d
1.2 设计思路
数据去重的最终目标是让原始数据中出现次数超过一次的数据在输出文件中只出现一次。我们自然而然会想到将同一个数据的所有记录都交给一台reduce机器,无论这个数据出现多少次,只要在最终结果中输出一次就可以了。具体就是reduce的输入应该以数据作为key,而对value-list则没有要求。当reduce接收到一个<key,value-list>时就直接将key复制到输出的key中,并将value设置成空值。
在MapReduce流程中,map的输出<key,value>经过shuffle过程聚集成<key,value-list>后会交给reduce。所以从设计好的reduce输入可以反推出map的输出key应为数据,value任意。继续反推,map输出数据的key为数据,而在这个实例中每个数据代表输入文件中的一行内容,所以map阶段要完成的任务就是在采用Hadoop默认的作业输入方式之后,将value设置为key,并直接输出(输出中的value任意)。map中的结果经过shuffle过程之后交给reduce。reduce阶段不会管每个key有多少个value,它直接将输入的key复制为输出的key,并输出就可以了(输出中的value被设置成空了)。
1.3 程序代码
程序代码如下所示:
- package com.hebut.mr;
- import java.io.IOException;
- import org.apache.hadoop.conf.Configuration;
- import org.apache.hadoop.fs.Path;
- import org.apache.hadoop.io.IntWritable;
- import org.apache.hadoop.io.Text;
- import org.apache.hadoop.mapreduce.Job;
- import org.apache.hadoop.mapreduce.Mapper;
- import org.apache.hadoop.mapreduce.Reducer;
- import org.apache.hadoop.mapreduce.lib.input.FileInputFormat;
- import org.apache.hadoop.mapreduce.lib.output.FileOutputFormat;
- import org.apache.hadoop.util.GenericOptionsParser;
- public class Dedup {
- //map将输入中的value复制到输出数据的key上,并直接输出
- public static class Map extends Mapper<Object,Text,Text,Text>{
- private static Text line=new Text();//每行数据
- //实现map函数
- public void map(Object key,Text value,Context context)
- throws IOException,InterruptedException{
- line=value;
- context.write(line, new Text(""));
- }
- }
- //reduce将输入中的key复制到输出数据的key上,并直接输出
- public static class Reduce extends Reducer<Text,Text,Text,Text>{
- //实现reduce函数
- public void reduce(Text key,Iterable<Text> values,Context context)
- throws IOException,InterruptedException{
- context.write(key, new Text(""));
- }
- }
- public static void main(String[] args) throws Exception{
- Configuration conf = new Configuration();
- //这句话很关键
- conf.set("mapred.job.tracker", "192.168.1.2:9001");
- String[] ioArgs=new String[]{"dedup_in","dedup_out"};
- String[] otherArgs = new GenericOptionsParser(conf, ioArgs).getRemainingArgs();
- if (otherArgs.length != 2) {
- System.err.println("Usage: Data Deduplication <in> <out>");
- System.exit(2);
- }
- Job job = new Job(conf, "Data Deduplication");
- job.setJarByClass(Dedup.class);
- //设置Map、Combine和Reduce处理类
- job.setMapperClass(Map.class);
- job.setCombinerClass(Reduce.class);
- job.setReducerClass(Reduce.class);
- //设置输出类型
- job.setOutputKeyClass(Text.class);
- job.setOutputValueClass(Text.class);
- //设置输入和输出目录
- FileInputFormat.addInputPath(job, new Path(otherArgs[0]));
- FileOutputFormat.setOutputPath(job, new Path(otherArgs[1]));
- System.exit(job.waitForCompletion(true) ? 0 : 1);
- }
- }
1.4 代码结果
1)准备测试数据
通过Eclipse下面的"DFS Locations"在"/user/hadoop"目录下创建输入文件"dedup_in"文件夹(备注:"dedup_out"不需要创建。)如图1.4-1所示,已经成功创建。
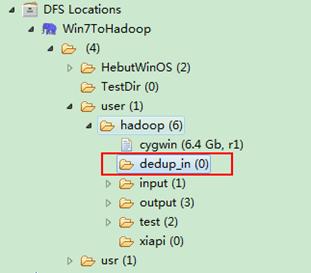
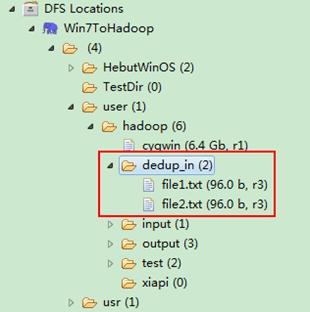
图1.4-1 创建"dedup_in" 图1.4.2 上传"file*.txt"
然后在本地建立两个txt文件,通过Eclipse上传到"/user/hadoop/dedup_in"文件夹中,两个txt文件的内容如"实例描述"那两个文件一样。如图1.4-2所示,成功上传之后。
从SecureCRT远处查看"Master.Hadoop"的也能证实我们上传的两个文件。

查看两个文件的内容如图1.4-3所示:
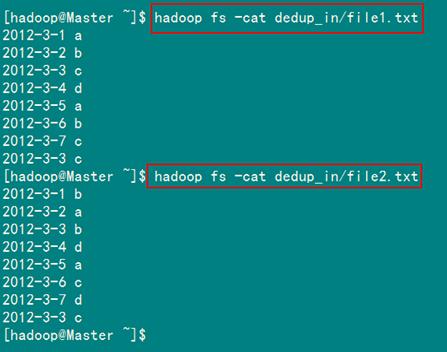
图1.4-3 文件"file*.txt"内容
2)查看运行结果
这时我们右击Eclipse的"DFS Locations"中"/user/hadoop"文件夹进行刷新,这时会发现多出一个"dedup_out"文件夹,且里面有3个文件,然后打开双其"part-r-00000"文件,会在Eclipse中间把内容显示出来。如图1.4-4所示。
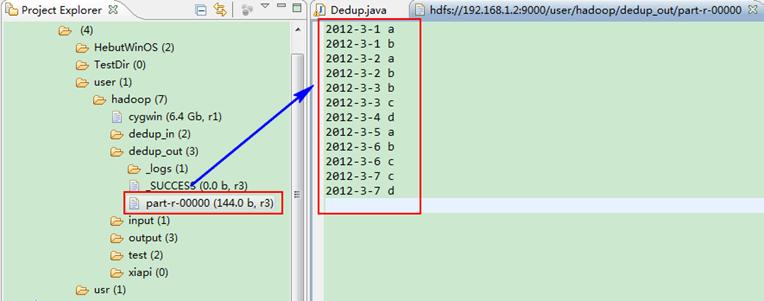
图1.4-4 运行结果
此时,你可以对比一下和我们之前预期的结果是否一致。
2、数据排序
"数据排序"是许多实际任务执行时要完成的第一项工作,比如学生成绩评比、数据建立索引等。这个实例和数据去重类似,都是先对原始数据进行初步处理,为进一步的数据操作打好基础。下面进入这个示例。
2.1 实例描述
对输入文件中数据进行排序。输入文件中的每行内容均为一个数字,即一个数据。要求在输出中每行有两个间隔的数字,其中,第一个代表原始数据在原始数据集中的位次,第二个代表原始数据。
样例输入:
1)file1:
2
32
654
32
15
756
65223
2)file2:
5956
22
650
92
3)file3:
26
54
6
样例输出:
1 2
2 6
3 15
4 22
5 26
6 32
7 32
8 54
9 92
10 650
11 654
12 756
13 5956
14 65223
2.2 设计思路
这个实例仅仅要求对输入数据进行排序,熟悉MapReduce过程的读者会很快想到在MapReduce过程中就有排序,是否可以利用这个默认的排序,而不需要自己再实现具体的排序呢?答案是肯定的。
但是在使用之前首先需要了解它的默认排序规则。它是按照key值进行排序的,如果key为封装int的IntWritable类型,那么MapReduce按照数字大小对key排序,如果key为封装为String的Text类型,那么MapReduce按照字典顺序对字符串排序。
了解了这个细节,我们就知道应该使用封装int的IntWritable型数据结构了。也就是在map中将读入的数据转化成IntWritable型,然后作为key值输出(value任意)。reduce拿到<key,value-list>之后,将输入的key作为value输出,并根据value-list中元素的个数决定输出的次数。输出的key(即代码中的linenum)是一个全局变量,它统计当前key的位次。需要注意的是这个程序中没有配置Combiner,也就是在MapReduce过程中不使用Combiner。这主要是因为使用map和reduce就已经能够完成任务了。
2.3 程序代码
程序代码如下所示
- package com.hebut.mr;
- import java.io.IOException;
- import org.apache.hadoop.conf.Configuration;
- import org.apache.hadoop.fs.Path;
- import org.apache.hadoop.io.IntWritable;
- import org.apache.hadoop.io.Text;
- import org.apache.hadoop.mapreduce.Job;
- import org.apache.hadoop.mapreduce.Mapper;
- import org.apache.hadoop.mapreduce.Reducer;
- import org.apache.hadoop.mapreduce.lib.input.FileInputFormat;
- import org.apache.hadoop.mapreduce.lib.output.FileOutputFormat;
- import org.apache.hadoop.util.GenericOptionsParser;
- public class Sort {
- //map将输入中的value化成IntWritable类型,作为输出的key
- public static class Map extends
- Mapper<Object,Text,IntWritable,IntWritable>{
- private static IntWritable data=new IntWritable();
- //实现map函数
- public void map(Object key,Text value,Context context)
- throws IOException,InterruptedException{
- String line=value.toString();
- data.set(Integer.parseInt(line));
- context.write(data, new IntWritable(1));
- }
- }
- //reduce将输入中的key复制到输出数据的key上,
- //然后根据输入的value-list中元素的个数决定key的输出次数
- //用全局linenum来代表key的位次
- public static class Reduce extends
- Reducer<IntWritable,IntWritable,IntWritable,IntWritable>{
- private static IntWritable linenum = new IntWritable(1);
- //实现reduce函数
- public void reduce(IntWritable key,Iterable<IntWritable> values,Context context)
- throws IOException,InterruptedException{
- for(IntWritable val:values){
- context.write(linenum, key);
- linenum = new IntWritable(linenum.get()+1);
- }
- }
- }
- public static void main(String[] args) throws Exception{
- Configuration conf = new Configuration();
- //这句话很关键
- conf.set("mapred.job.tracker", "192.168.1.2:9001");
- String[] ioArgs=new String[]{"sort_in","sort_out"};
- String[] otherArgs = new GenericOptionsParser(conf, ioArgs).getRemainingArgs();
- if (otherArgs.length != 2) {
- System.err.println("Usage: Data Sort <in> <out>");
- System.exit(2);
- }
- Job job = new Job(conf, "Data Sort");
- job.setJarByClass(Sort.class);
- //设置Map和Reduce处理类
- job.setMapperClass(Map.class);
- job.setReducerClass(Reduce.class);
- //设置输出类型
- job.setOutputKeyClass(IntWritable.class);
- job.setOutputValueClass(IntWritable.class);
- //设置输入和输出目录
- FileInputFormat.addInputPath(job, new Path(otherArgs[0]));
- FileOutputFormat.setOutputPath(job, new Path(otherArgs[1]));
- System.exit(job.waitForCompletion(true) ? 0 : 1);
- }
- }
2.4 代码结果
1)准备测试数据
通过Eclipse下面的"DFS Locations"在"/user/hadoop"目录下创建输入文件"sort_in"文件夹(备注:"sort_out"不需要创建。)如图2.4-1所示,已经成功创建。
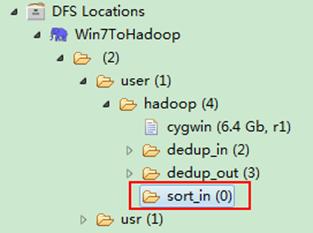
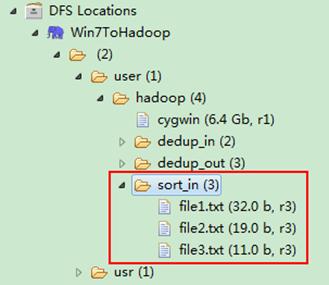
图2.4-1 创建"sort_in" 图2.4.2 上传"file*.txt"
然后在本地建立三个txt文件,通过Eclipse上传到"/user/hadoop/sort_in"文件夹中,三个txt文件的内容如"实例描述"那三个文件一样。如图2.4-2所示,成功上传之后。
从SecureCRT远处查看"Master.Hadoop"的也能证实我们上传的三个文件。

查看两个文件的内容如图2.4-3所示:
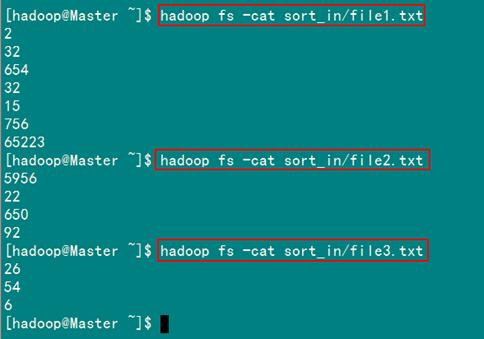
图2.4-3 文件"file*.txt"内容
2)查看运行结果
这时我们右击Eclipse的"DFS Locations"中"/user/hadoop"文件夹进行刷新,这时会发现多出一个"sort_out"文件夹,且里面有3个文件,然后打开双其"part-r-00000"文件,会在Eclipse中间把内容显示出来。如图2.4-4所示。
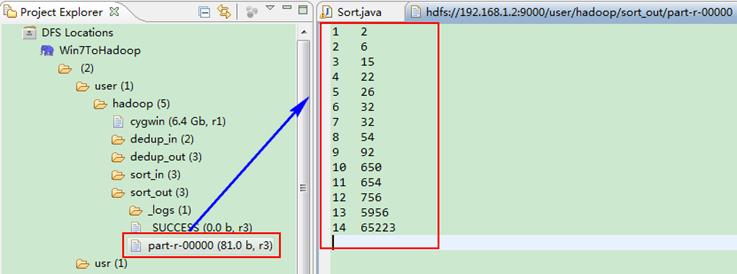
图2.4-4 运行结果
3、平均成绩
"平均成绩"主要目的还是在重温经典"WordCount"例子,可以说是在基础上的微变化版,该实例主要就是实现一个计算学生平均成绩的例子。
3.1 实例描述
对输入文件中数据进行就算学生平均成绩。输入文件中的每行内容均为一个学生的姓名和他相应的成绩,如果有多门学科,则每门学科为一个文件。要求在输出中每行有两个间隔的数据,其中,第一个代表学生的姓名,第二个代表其平均成绩。
样本输入:
1)math:
张三 88
李四 99
王五 66
赵六 77
2)china:
张三 78
李四 89
王五 96
赵六 67
3)english:
张三 80
李四 82
王五 84
赵六 86
样本输出:
张三 82
李四 90
王五 82
赵六 76
3.2 设计思路
计算学生平均成绩是一个仿"WordCount"例子,用来重温一下开发MapReduce程序的流程。程序包括两部分的内容:Map部分和Reduce部分,分别实现了map和reduce的功能。
Map处理的是一个纯文本文件,文件中存放的数据时每一行表示一个学生的姓名和他相应一科成绩。Mapper处理的数据是由InputFormat分解过的数据集,其中InputFormat的作用是将数据集切割成小数据集InputSplit,每一个InputSlit将由一个Mapper负责处理。此外,InputFormat中还提供了一个RecordReader的实现,并将一个InputSplit解析成<key,value>对提供给了map函数。InputFormat的默认值是TextInputFormat,它针对文本文件,按行将文本切割成InputSlit,并用LineRecordReader将InputSplit解析成<key,value>对,key是行在文本中的位置,value是文件中的一行。
Map的结果会通过partion分发到Reducer,Reducer做完Reduce操作后,将通过以格式OutputFormat输出。
Mapper最终处理的结果对<key,value>,会送到Reducer中进行合并,合并的时候,有相同key的键/值对则送到同一个Reducer上。Reducer是所有用户定制Reducer类地基础,它的输入是key和这个key对应的所有value的一个迭代器,同时还有Reducer的上下文。Reduce的结果由Reducer.Context的write方法输出到文件中。
3.3 程序代码
程序代码如下所示:
- package com.hebut.mr;
- import java.io.IOException;
- import java.util.Iterator;
- import java.util.StringTokenizer;
- import org.apache.hadoop.conf.Configuration;
- import org.apache.hadoop.fs.Path;
- import org.apache.hadoop.io.IntWritable;
- import org.apache.hadoop.io.LongWritable;
- import org.apache.hadoop.io.Text;
- import org.apache.hadoop.mapreduce.Job;
- import org.apache.hadoop.mapreduce.Mapper;
- import org.apache.hadoop.mapreduce.Reducer;
- import org.apache.hadoop.mapreduce.lib.input.FileInputFormat;
- import org.apache.hadoop.mapreduce.lib.input.TextInputFormat;
- import org.apache.hadoop.mapreduce.lib.output.FileOutputFormat;
- import org.apache.hadoop.mapreduce.lib.output.TextOutputFormat;
- import org.apache.hadoop.util.GenericOptionsParser;
- public class Score {
- public static class Map extends
- Mapper<LongWritable, Text, Text, IntWritable> {
- // 实现map函数
- public void map(LongWritable key, Text value, Context context)
- throws IOException, InterruptedException {
- // 将输入的纯文本文件的数据转化成String
- String line = value.toString();
- // 将输入的数据首先按行进行分割
- StringTokenizer tokenizerArticle = new StringTokenizer(line, "\n");
- // 分别对每一行进行处理
- while (tokenizerArticle.hasMoreElements()) {
- // 每行按空格划分
- StringTokenizer tokenizerLine = new StringTokenizer(tokenizerArticle.nextToken());
- String strName = tokenizerLine.nextToken();// 学生姓名部分
- String strScore = tokenizerLine.nextToken();// 成绩部分
- Text name = new Text(strName);
- int scoreInt = Integer.parseInt(strScore);
- // 输出姓名和成绩
- context.write(name, new IntWritable(scoreInt));
- }
- }
- }
- public static class Reduce extends
- Reducer<Text, IntWritable, Text, IntWritable> {
- // 实现reduce函数
- public void reduce(Text key, Iterable<IntWritable> values,
- Context context) throws IOException, InterruptedException {
- int sum = 0;
- int count = 0;
- Iterator<IntWritable> iterator = values.iterator();
- while (iterator.hasNext()) {
- sum += iterator.next().get();// 计算总分
- count++;// 统计总的科目数
- }
- int average = (int) sum / count;// 计算平均成绩
- context.write(key, new IntWritable(average));
- }
- }
- public static void main(String[] args) throws Exception {
- Configuration conf = new Configuration();
- // 这句话很关键
- conf.set("mapred.job.tracker", "192.168.1.2:9001");
- String[] ioArgs = new String[] { "score_in", "score_out" };
- String[] otherArgs = new GenericOptionsParser(conf, ioArgs).getRemainingArgs();
- if (otherArgs.length != 2) {
- System.err.println("Usage: Score Average <in> <out>");
- System.exit(2);
- }
- Job job = new Job(conf, "Score Average");
- job.setJarByClass(Score.class);
- // 设置Map、Combine和Reduce处理类
- job.setMapperClass(Map.class);
- job.setCombinerClass(Reduce.class);
- job.setReducerClass(Reduce.class);
- // 设置输出类型
- job.setOutputKeyClass(Text.class);
- job.setOutputValueClass(IntWritable.class);
- // 将输入的数据集分割成小数据块splites,提供一个RecordReder的实现
- job.setInputFormatClass(TextInputFormat.class);
- // 提供一个RecordWriter的实现,负责数据输出
- job.setOutputFormatClass(TextOutputFormat.class);
- // 设置输入和输出目录
- FileInputFormat.addInputPath(job, new Path(otherArgs[0]));
- FileOutputFormat.setOutputPath(job, new Path(otherArgs[1]));
- System.exit(job.waitForCompletion(true) ? 0 : 1);
- }
- }
3.4 代码结果
1)准备测试数据
通过Eclipse下面的"DFS Locations"在"/user/hadoop"目录下创建输入文件"score_in"文件夹(备注:"score_out"不需要创建。)如图3.4-1所示,已经成功创建。
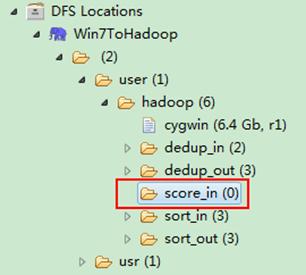
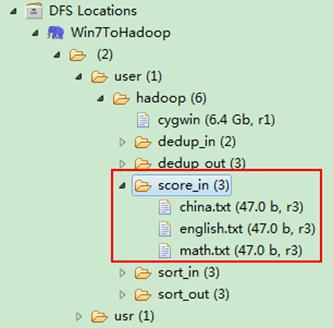
图3.4-1 创建"score_in" 图3.4.2 上传三门分数
然后在本地建立三个txt文件,通过Eclipse上传到"/user/hadoop/score_in"文件夹中,三个txt文件的内容如"实例描述"那三个文件一样。如图3.4-2所示,成功上传之后。
备注:文本文件的编码为"UTF-8",默认为"ANSI",可以另存为时选择,不然中文会出现乱码。
从SecureCRT远处查看"Master.Hadoop"的也能证实我们上传的三个文件。

查看三个文件的内容如图3.4-3所示:
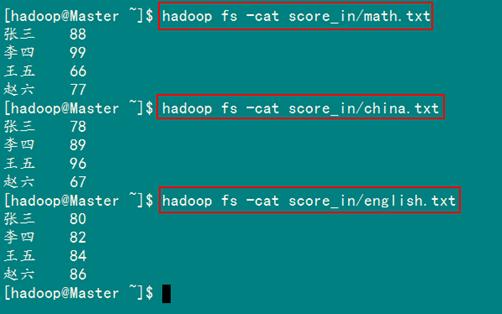
图3.4.3 三门成绩的内容
2)查看运行结果
这时我们右击Eclipse的"DFS Locations"中"/user/hadoop"文件夹进行刷新,这时会发现多出一个"score_out"文件夹,且里面有3个文件,然后打开双其"part-r-00000"文件,会在Eclipse中间把内容显示出来。如图3.4-4所示。
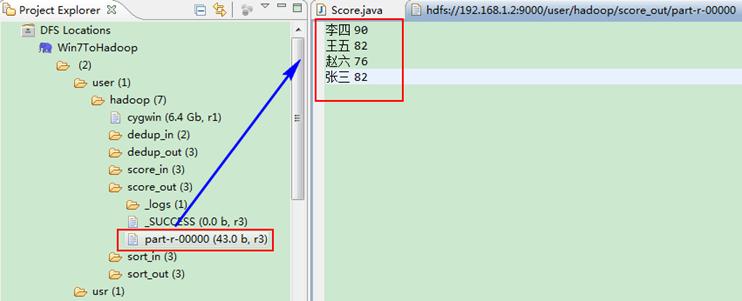
图3.4-4 运行结果
4、单表关联
前面的实例都是在数据上进行一些简单的处理,为进一步的操作打基础。"单表关联"这个实例要求从给出的数据中寻找所关心的数据,它是对原始数据所包含信息的挖掘。下面进入这个实例。
4.1 实例描述
实例中给出child-parent(孩子——父母)表,要求输出grandchild-grandparent(孙子——爷奶)表。
样例输入如下所示。
file:
child parent
Tom Lucy
Tom Jack
Jone Lucy
Jone Jack
Lucy Mary
Lucy Ben
Jack Alice
Jack Jesse
Terry Alice
Terry Jesse
Philip Terry
Philip Alma
Mark Terry
Mark Alma
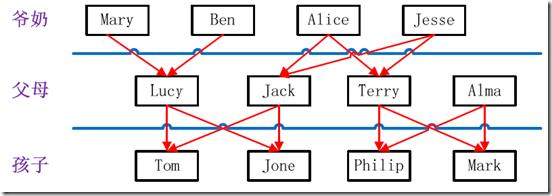
家族树状关系谱:
图4.2-1 家族谱
样例输出如下所示。
file:
grandchild grandparent
Tom Alice
Tom Jesse
Jone Alice
Jone Jesse
Tom Mary
Tom Ben
Jone Mary
Jone Ben
Philip Alice
Philip Jesse
Mark Alice
Mark Jesse
4.2 设计思路
分析这个实例,显然需要进行单表连接,连接的是左表的parent列和右表的child列,且左表和右表是同一个表。
连接结果中除去连接的两列就是所需要的结果——"grandchild--grandparent"表。要用MapReduce解决这个实例,首先应该考虑如何实现表的自连接;其次就是连接列的设置;最后是结果的整理。
考虑到MapReduce的shuffle过程会将相同的key会连接在一起,所以可以将map结果的key设置成待连接的列,然后列中相同的值就自然会连接在一起了。再与最开始的分析联系起来:
要连接的是左表的parent列和右表的child列,且左表和右表是同一个表,所以在map阶段将读入数据分割成child和parent之后,会将parent设置成key,child设置成value进行输出,并作为左表;再将同一对child和parent中的child设置成key,parent设置成value进行输出,作为右表。为了区分输出中的左右表,需要在输出的value中再加上左右表的信息,比如在value的String最开始处加上字符1表示左表,加上字符2表示右表。这样在map的结果中就形成了左表和右表,然后在shuffle过程中完成连接。reduce接收到连接的结果,其中每个key的value-list就包含了"grandchild--grandparent"关系。取出每个key的value-list进行解析,将左表中的child放入一个数组,右表中的parent放入一个数组,然后对两个数组求笛卡尔积就是最后的结果了。
4.3 程序代码
程序代码如下所示。
- package com.hebut.mr;
- import java.io.IOException;
- import java.util.*;
- import org.apache.hadoop.conf.Configuration;
- import org.apache.hadoop.fs.Path;
- import org.apache.hadoop.io.IntWritable;
- import org.apache.hadoop.io.Text;
- import org.apache.hadoop.mapreduce.Job;
- import org.apache.hadoop.mapreduce.Mapper;
- import org.apache.hadoop.mapreduce.Reducer;
- import org.apache.hadoop.mapreduce.lib.input.FileInputFormat;
- import org.apache.hadoop.mapreduce.lib.output.FileOutputFormat;
- import org.apache.hadoop.util.GenericOptionsParser;
- public class STjoin {
- public static int time = 0;
- /*
- * map将输出分割child和parent,然后正序输出一次作为右表,
- * 反序输出一次作为左表,需要注意的是在输出的value中必须
- * 加上左右表的区别标识。
- */
- public static class Map extends Mapper<Object, Text, Text, Text> {
- // 实现map函数
- public void map(Object key, Text value, Context context)
- throws IOException, InterruptedException {
- String childname = new String();// 孩子名称
- String parentname = new String();// 父母名称
- String relationtype = new String();// 左右表标识
- // 输入的一行预处理文本
- StringTokenizer itr=new StringTokenizer(value.toString());
- String[] values=new String[2];
- int i=0;
- while(itr.hasMoreTokens()){
- values[i]=itr.nextToken();
- i++;
- }
- if (values[0].compareTo("child") != 0) {
- childname = values[0];
- parentname = values[1];
- // 输出左表
- relationtype = "1";
- context.write(new Text(values[1]), new Text(relationtype +
- "+"+ childname + "+" + parentname));
- // 输出右表
- relationtype = "2";
- context.write(new Text(values[0]), new Text(relationtype +
- "+"+ childname + "+" + parentname));
- }
- }
- }
- public static class Reduce extends Reducer<Text, Text, Text, Text> {
- // 实现reduce函数
- public void reduce(Text key, Iterable<Text> values, Context context)
- throws IOException, InterruptedException {
- // 输出表头
- if (0 == time) {
- context.write(new Text("grandchild"), new Text("grandparent"));
- time++;
- }
- int grandchildnum = 0;
- String[] grandchild = new String[10];
- int grandparentnum = 0;
- String[] grandparent = new String[10];
- Iterator ite = values.iterator();
- while (ite.hasNext()) {
- String record = ite.next().toString();
- int len = record.length();
- int i = 2;
- if (0 == len) {
- continue;
- }
- // 取得左右表标识
- char relationtype = record.charAt(0);
- // 定义孩子和父母变量
- String childname = new String();
- String parentname = new String();
- // 获取value-list中value的child
- while (record.charAt(i) != '+') {
- childname += record.charAt(i);
- i++;
- }
- i = i + 1;
- // 获取value-list中value的parent
- while (i < len) {
- parentname += record.charAt(i);
- i++;
- }
- // 左表,取出child放入grandchildren
- if ('1' == relationtype) {
- grandchild[grandchildnum] = childname;
- grandchildnum++;
- }
- // 右表,取出parent放入grandparent
- if ('2' == relationtype) {
- grandparent[grandparentnum] = parentname;
- grandparentnum++;
- }
- }
- // grandchild和grandparent数组求笛卡尔儿积
- if (0 != grandchildnum && 0 != grandparentnum) {
- for (int m = 0; m < grandchildnum; m++) {
- for (int n = 0; n < grandparentnum; n++) {
- // 输出结果
- context.write(new Text(grandchild[m]), new Text(grandparent[n]));
- }
- }
- }
- }
- }
- public static void main(String[] args) throws Exception {
- Configuration conf = new Configuration();
- // 这句话很关键
- conf.set("mapred.job.tracker", "192.168.1.2:9001");
- String[] ioArgs = new String[] { "STjoin_in", "STjoin_out" };
- String[] otherArgs = new GenericOptionsParser(conf, ioArgs).getRemainingArgs();
- if (otherArgs.length != 2) {
- System.err.println("Usage: Single Table Join <in> <out>");
- System.exit(2);
- }
- Job job = new Job(conf, "Single Table Join");
- job.setJarByClass(STjoin.class);
- // 设置Map和Reduce处理类
- job.setMapperClass(Map.class);
- job.setReducerClass(Reduce.class);
- // 设置输出类型
- job.setOutputKeyClass(Text.class);
- job.setOutputValueClass(Text.class);
- // 设置输入和输出目录
- FileInputFormat.addInputPath(job, new Path(otherArgs[0]));
- FileOutputFormat.setOutputPath(job, new Path(otherArgs[1]));
- System.exit(job.waitForCompletion(true) ? 0 : 1);
- }
- }
4.4 代码结果
1)准备测试数据
通过Eclipse下面的"DFS Locations"在"/user/hadoop"目录下创建输入文件"STjoin_in"文件夹(备注:"STjoin_out"不需要创建。)如图4.4-1所示,已经成功创建。
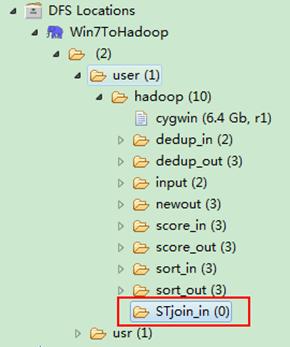
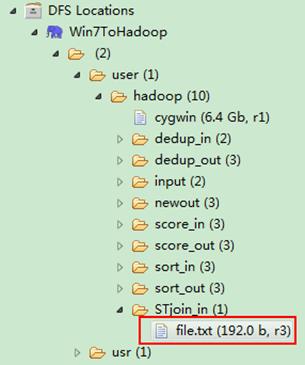
图4.4-1 创建"STjoin_in" 图4.4.2 上传"child-parent"表
然后在本地建立一个txt文件,通过Eclipse上传到"/user/hadoop/STjoin_in"文件夹中,一个txt文件的内容如"实例描述"那个文件一样。如图4.4-2所示,成功上传之后。
从SecureCRT远处查看"Master.Hadoop"的也能证实我们上传的文件,显示其内容如图4.4-3所示:
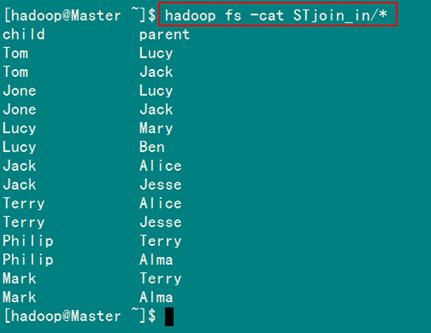
图4.4-3 表"child-parent"内容
2)运行详解
(1)Map处理:
map函数输出结果如下所示。
child parent àà 忽略此行
Tom Lucy àà <Lucy,1+Tom+Lucy>
<Tom,2+Tom+Lucy >
Tom Jack àà <Jack,1+Tom+Jack>
<Tom,2+Tom+Jack>
Jone Lucy àà <Lucy,1+Jone+Lucy>
<Jone,2+Jone+Lucy>
Jone Jack àà <Jack,1+Jone+Jack>
<Jone,2+Jone+Jack>
Lucy Mary àà <Mary,1+Lucy+Mary>
<Lucy,2+Lucy+Mary>
Lucy Ben àà <Ben,1+Lucy+Ben>
<Lucy,2+Lucy+Ben>
Jack Alice àà <Alice,1+Jack+Alice>
<Jack,2+Jack+Alice>
Jack Jesse àà <Jesse,1+Jack+Jesse>
<Jack,2+Jack+Jesse>
Terry Alice àà <Alice,1+Terry+Alice>
<Terry,2+Terry+Alice>
Terry Jesse àà <Jesse,1+Terry+Jesse>
<Terry,2+Terry+Jesse>
Philip Terry àà <Terry,1+Philip+Terry>
<Philip,2+Philip+Terry>
Philip Alma àà <Alma,1+Philip+Alma>
<Philip,2+Philip+Alma>
Mark Terry àà <Terry,1+Mark+Terry>
<Mark,2+Mark+Terry>
Mark Alma àà <Alma,1+Mark+Alma>
<Mark,2+Mark+Alma>
(2)Shuffle处理
在shuffle过程中完成连接。
|
map函数输出 |
排序结果 |
shuffle连接 |
|
<Lucy,1+Tom+Lucy> <Tom,2+Tom+Lucy> <Jack,1+Tom+Jack> <Tom,2+Tom+Jack> <Lucy,1+Jone+Lucy> <Jone,2+Jone+Lucy> <Jack,1+Jone+Jack> <Jone,2+Jone+Jack> <Mary,1+Lucy+Mary> <Lucy,2+Lucy+Mary> <Ben,1+Lucy+Ben> <Lucy,2+Lucy+Ben> <Alice,1+Jack+Alice> <Jack,2+Jack+Alice> <Jesse,1+Jack+Jesse> <Jack,2+Jack+Jesse> <Alice,1+Terry+Alice> <Terry,2+Terry+Alice> <Jesse,1+Terry+Jesse> <Terry,2+Terry+Jesse> <Terry,1+Philip+Terry> <Philip,2+Philip+Terry> <Alma,1+Philip+Alma> <Philip,2+Philip+Alma> <Terry,1+Mark+Terry> <Mark,2+Mark+Terry> <Alma,1+Mark+Alma> <Mark,2+Mark+Alma> |
<Alice,1+Jack+Alice> <Alice,1+Terry+Alice> <Alma,1+Philip+Alma> <Alma,1+Mark+Alma> <Ben,1+Lucy+Ben> <Jack,1+Tom+Jack> <Jack,1+Jone+Jack> <Jack,2+Jack+Alice> <Jack,2+Jack+Jesse> <Jesse,1+Jack+Jesse> <Jesse,1+Terry+Jesse> <Jone,2+Jone+Lucy> <Jone,2+Jone+Jack> <Lucy,1+Tom+Lucy> <Lucy,1+Jone+Lucy> <Lucy,2+Lucy+Mary> <Lucy,2+Lucy+Ben> <Mary,1+Lucy+Mary> <Mark,2+Mark+Terry> <Mark,2+Mark+Alma> <Philip,2+Philip+Terry> <Philip,2+Philip+Alma> <Terry,2+Terry+Alice> <Terry,2+Terry+Jesse> <Terry,1+Philip+Terry> <Terry,1+Mark+Terry> <Tom,2+Tom+Lucy> <Tom,2+Tom+Jack> |
<Alice,1+Jack+Alice, 1+Terry+Alice , 1+Philip+Alma, 1+Mark+Alma > <Ben,1+Lucy+Ben> <Jack,1+Tom+Jack, 1+Jone+Jack, 2+Jack+Alice, 2+Jack+Jesse > <Jesse,1+Jack+Jesse, 1+Terry+Jesse > <Jone,2+Jone+Lucy, 2+Jone+Jack> <Lucy,1+Tom+Lucy, 1+Jone+Lucy, 2+Lucy+Mary, 2+Lucy+Ben> <Mary,1+Lucy+Mary, 2+Mark+Terry, 2+Mark+Alma> <Philip,2+Philip+Terry, 2+Philip+Alma> <Terry,2+Terry+Alice, 2+Terry+Jesse, 1+Philip+Terry, 1+Mark+Terry> <Tom,2+Tom+Lucy, 2+Tom+Jack> |
(3)Reduce处理
首先由语句"0 != grandchildnum && 0 != grandparentnum"得知,只要在"value-list"中没有左表或者右表,则不会做处理,可以根据这条规则去除无效的shuffle连接。
|
无效的shuffle连接 |
有效的shuffle连接 |
|
<Alice,1+Jack+Alice, 1+Terry+Alice , 1+Philip+Alma, 1+Mark+Alma > <Ben,1+Lucy+Ben> <Jesse,1+Jack+Jesse, 1+Terry+Jesse > <Jone,2+Jone+Lucy, 2+Jone+Jack> <Mary,1+Lucy+Mary, 2+Mark+Terry, 2+Mark+Alma> <Philip,2+Philip+Terry, 2+Philip+Alma> <Tom,2+Tom+Lucy, 2+Tom+Jack> |
<Jack,1+Tom+Jack, 1+Jone+Jack, 2+Jack+Alice, 2+Jack+Jesse > <Lucy,1+Tom+Lucy, 1+Jone+Lucy, 2+Lucy+Mary, 2+Lucy+Ben> <Terry,2+Terry+Alice, 2+Terry+Jesse, 1+Philip+Terry, 1+Mark+Terry> |
然后根据下面语句进一步对有效的shuffle连接做处理。
- // 左表,取出child放入grandchildren
- if ('1' == relationtype) {
- grandchild[grandchildnum] = childname;
- grandchildnum++;
- }
- // 右表,取出parent放入grandparent
- if ('2' == relationtype) {
- grandparent[grandparentnum] = parentname;
- grandparentnum++;
- }
针对一条数据进行分析:
<Jack,1+Tom+Jack,
1+Jone+Jack,
2+Jack+Alice,
2+Jack+Jesse >
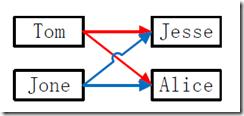
分析结果:左表用"字符1"表示,右表用"字符2"表示,上面的<key,value-list>中的"key"表示左表与右表的连接键。而"value-list"表示以"key"连接的左表与右表的相关数据。
根据上面针对左表与右表不同的处理规则,取得两个数组的数据如下所示:
|
grandchild |
Tom、Jone(grandchild[grandchildnum] = childname;) |
|
grandparent |
Alice、Jesse(grandparent[grandparentnum] = parentname;) |
然后根据下面语句进行处理。
- for (int m = 0; m < grandchildnum; m++) {
- for (int n = 0; n < grandparentnum; n++) {
- context.write(new Text(grandchild[m]), new Text(grandparent[n]));
- }
- }
处理结果如下面所示:
|
Tom Jesse Tom Alice Jone Jesse Jone Alice |
其他的有效shuffle连接处理都是如此。
3)查看运行结果
这时我们右击Eclipse的"DFS Locations"中"/user/hadoop"文件夹进行刷新,这时会发现多出一个"STjoin_out"文件夹,且里面有3个文件,然后打开双其"part-r-00000"文件,会在Eclipse中间把内容显示出来。如图4.4-4所示。
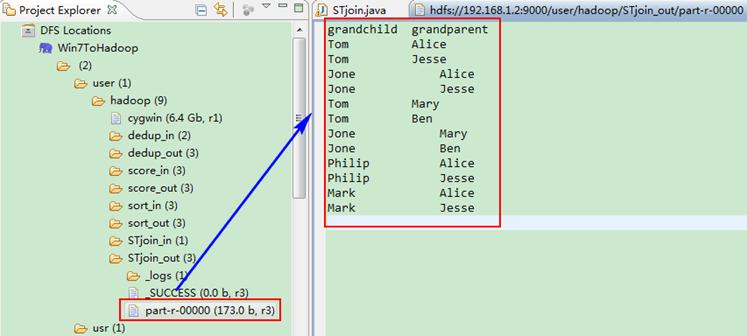
图4.4-4 运行结果
5、多表关联
多表关联和单表关联类似,它也是通过对原始数据进行一定的处理,从其中挖掘出关心的信息。下面进入这个实例。
5.1 实例描述
输入是两个文件,一个代表工厂表,包含工厂名列和地址编号列;另一个代表地址表,包含地址名列和地址编号列。要求从输入数据中找出工厂名和地址名的对应关系,输出"工厂名——地址名"表。
样例输入如下所示。
1)factory:
factoryname addressed
Beijing Red Star 1
Shenzhen Thunder 3
Guangzhou Honda 2
Beijing Rising 1
Guangzhou Development Bank 2
Tencent 3
Back of Beijing 1
2)address:
addressID addressname
1 Beijing
2 Guangzhou
3 Shenzhen
4 Xian
样例输出如下所示。
factoryname addressname
Back of Beijing Beijing
Beijing Red Star Beijing
Beijing Rising Beijing
Guangzhou Development Bank Guangzhou
Guangzhou Honda Guangzhou
Shenzhen Thunder Shenzhen
Tencent Shenzhen
5.2 设计思路
多表关联和单表关联相似,都类似于数据库中的自然连接。相比单表关联,多表关联的左右表和连接列更加清楚。所以可以采用和单表关联的相同的处理方式,map识别出输入的行属于哪个表之后,对其进行分割,将连接的列值保存在key中,另一列和左右表标识保存在value中,然后输出。reduce拿到连接结果之后,解析value内容,根据标志将左右表内容分开存放,然后求笛卡尔积,最后直接输出。
这个实例的具体分析参考单表关联实例。下面给出代码。
5.3 程序代码
程序代码如下所示:
- package com.hebut.mr;
- import java.io.IOException;
- import java.util.*;
- import org.apache.hadoop.conf.Configuration;
- import org.apache.hadoop.fs.Path;
- import org.apache.hadoop.io.IntWritable;
- import org.apache.hadoop.io.Text;
- import org.apache.hadoop.mapreduce.Job;
- import org.apache.hadoop.mapreduce.Mapper;
- import org.apache.hadoop.mapreduce.Reducer;
- import org.apache.hadoop.mapreduce.lib.input.FileInputFormat;
- import org.apache.hadoop.mapreduce.lib.output.FileOutputFormat;
- import org.apache.hadoop.util.GenericOptionsParser;
- public class MTjoin {
- public static int time = 0;
- /*
- * 在map中先区分输入行属于左表还是右表,然后对两列值进行分割,
- * 保存连接列在key值,剩余列和左右表标志在value中,最后输出
- */
- public static class Map extends Mapper<Object, Text, Text, Text> {
- // 实现map函数
- public void map(Object key, Text value, Context context)
- throws IOException, InterruptedException {
- String line = value.toString();// 每行文件
- String relationtype = new String();// 左右表标识
- // 输入文件首行,不处理
- if (line.contains("factoryname") == true
- || line.contains("addressed") == true) {
- return;
- }
- // 输入的一行预处理文本
- StringTokenizer itr = new StringTokenizer(line);
- String mapkey = new String();
- String mapvalue = new String();
- int i = 0;
- while (itr.hasMoreTokens()) {
- // 先读取一个单词
- String token = itr.nextToken();
- // 判断该地址ID就把存到"values[0]"
- if (token.charAt(0) >= '0' && token.charAt(0) <= '9') {
- mapkey = token;
- if (i > 0) {
- relationtype = "1";
- } else {
- relationtype = "2";
- }
- continue;
- }
- // 存工厂名
- mapvalue += token + " ";
- i++;
- }
- // 输出左右表
- context.write(new Text(mapkey), new Text(relationtype + "+"+ mapvalue));
- }
- }
- /*
- * reduce解析map输出,将value中数据按照左右表分别保存,
- * 然后求出笛卡尔积,并输出。
- */
- public static class Reduce extends Reducer<Text, Text, Text, Text> {
- // 实现reduce函数
- public void reduce(Text key, Iterable<Text> values, Context context)
- throws IOException, InterruptedException {
- // 输出表头
- if (0 == time) {
- context.write(new Text("factoryname"), new Text("addressname"));
- time++;
- }
- int factorynum = 0;
- String[] factory = new String[10];
- int addressnum = 0;
- String[] address = new String[10];
- Iterator ite = values.iterator();
- while (ite.hasNext()) {
- String record = ite.next().toString();
- int len = record.length();
- int i = 2;
- if (0 == len) {
- continue;
- }
- // 取得左右表标识
- char relationtype = record.charAt(0);
- // 左表
- if ('1' == relationtype) {
- factory[factorynum] = record.substring(i);
- factorynum++;
- }
- // 右表
- if ('2' == relationtype) {
- address[addressnum] = record.substring(i);
- addressnum++;
- }
- }
- // 求笛卡尔积
- if (0 != factorynum && 0 != addressnum) {
- for (int m = 0; m < factorynum; m++) {
- for (int n = 0; n < addressnum; n++) {
- // 输出结果
- context.write(new Text(factory[m]),
- new Text(address[n]));
- }
- }
- }
- }
- }
- public static void main(String[] args) throws Exception {
- Configuration conf = new Configuration();
- // 这句话很关键
- conf.set("mapred.job.tracker", "192.168.1.2:9001");
- String[] ioArgs = new String[] { "MTjoin_in", "MTjoin_out" };
- String[] otherArgs = new GenericOptionsParser(conf, ioArgs).getRemainingArgs();
- if (otherArgs.length != 2) {
- System.err.println("Usage: Multiple Table Join <in> <out>");
- System.exit(2);
- }
- Job job = new Job(conf, "Multiple Table Join");
- job.setJarByClass(MTjoin.class);
- // 设置Map和Reduce处理类
- job.setMapperClass(Map.class);
- job.setReducerClass(Reduce.class);
- // 设置输出类型
- job.setOutputKeyClass(Text.class);
- job.setOutputValueClass(Text.class);
- // 设置输入和输出目录
- FileInputFormat.addInputPath(job, new Path(otherArgs[0]));
- FileOutputFormat.setOutputPath(job, new Path(otherArgs[1]));
- System.exit(job.waitForCompletion(true) ? 0 : 1);
- }
- }
5.4 代码结果
1)准备测试数据
通过Eclipse下面的"DFS Locations"在"/user/hadoop"目录下创建输入文件"MTjoin_in"文件夹(备注:"MTjoin_out"不需要创建。)如图5.4-1所示,已经成功创建。
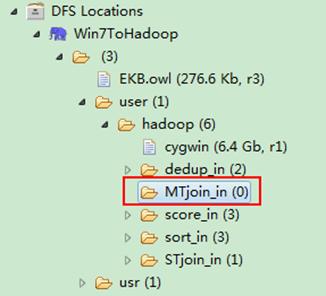
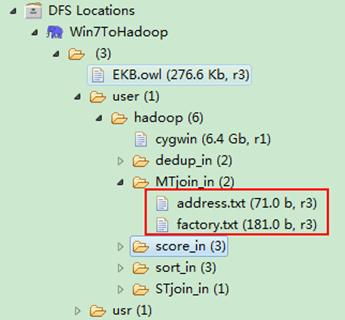
图5.4-1 创建"MTjoin_in" 图5.4.2 上传两个数据表
然后在本地建立两个txt文件,通过Eclipse上传到"/user/hadoop/MTjoin_in"文件夹中,两个txt文件的内容如"实例描述"那两个文件一样。如图5.4-2所示,成功上传之后。
从SecureCRT远处查看"Master.Hadoop"的也能证实我们上传的两个文件。
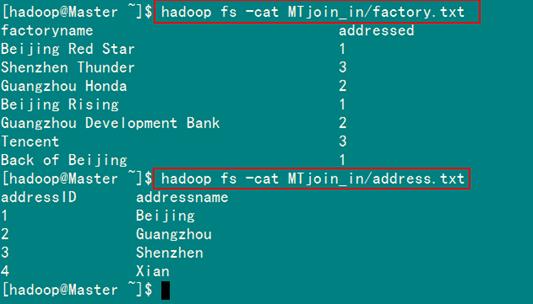
图5.4.3 两个数据表的内容
2)查看运行结果
这时我们右击Eclipse的"DFS Locations"中"/user/hadoop"文件夹进行刷新,这时会发现多出一个"MTjoin_out"文件夹,且里面有3个文件,然后打开双其"part-r-00000"文件,会在Eclipse中间把内容显示出来。如图5.4-4所示。
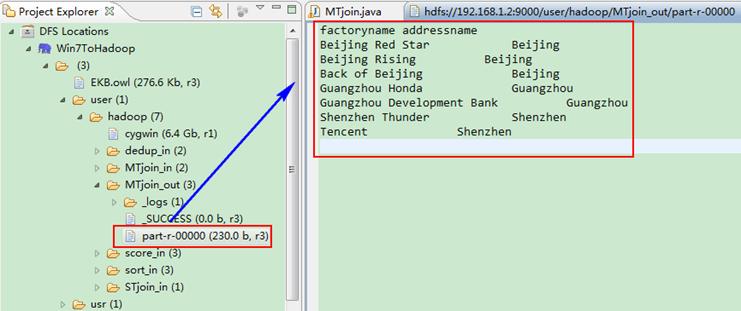
图5.4-4 运行结果
6、倒排索引
"倒排索引"是文档检索系统中最常用的数据结构,被广泛地应用于全文搜索引擎。它主要是用来存储某个单词(或词组)在一个文档或一组文档中的存储位置的映射,即提供了一种根据内容来查找文档的方式。由于不是根据文档来确定文档所包含的内容,而是进行相反的操作,因而称为倒排索引(Inverted Index)。
6.1 实例描述
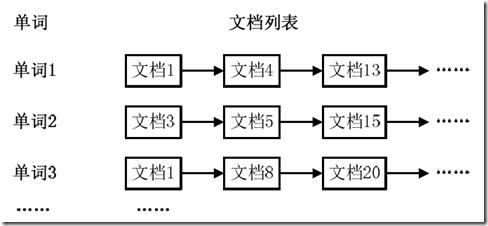
通常情况下,倒排索引由一个单词(或词组)以及相关的文档列表组成,文档列表中的文档或者是标识文档的ID号,或者是指文档所在位置的URL,如图6.1-1所示。
图6.1-1 倒排索引结构
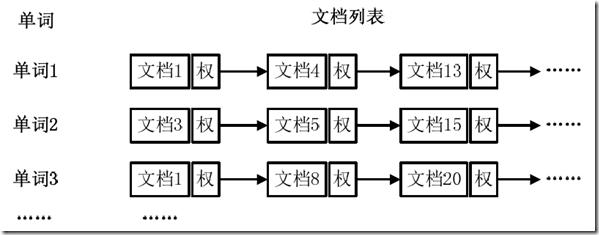
从图6.1-1可以看出,单词1出现在{文档1,文档4,文档13,……}中,单词2出现在{文档3,文档5,文档15,……}中,而单词3出现在{文档1,文档8,文档20,……}中。在实际应用中,还需要给每个文档添加一个权值,用来指出每个文档与搜索内容的相关度,如图6.1-2所示。
图6.1-2 添加权重的倒排索引
最常用的是使用词频作为权重,即记录单词在文档中出现的次数。以英文为例,如图6.1-3所示,索引文件中的"MapReduce"一行表示:"MapReduce"这个单词在文本T0中出现过1次,T1中出现过1次,T2中出现过2次。当搜索条件为"MapReduce"、"is"、"Simple"时,对应的集合为:{T0,T1,T2}∩{T0,T1}∩{T0,T1}={T0,T1},即文档T0和T1包含了所要索引的单词,而且只有T0是连续的。
图6.1-3 倒排索引示例
更复杂的权重还可能要记录单词在多少个文档中出现过,以实现TF-IDF(Term Frequency-Inverse Document Frequency)算法,或者考虑单词在文档中的位置信息(单词是否出现在标题中,反映了单词在文档中的重要性)等。
样例输入如下所示。
1)file1:
MapReduce is simple
2)file2:
MapReduce is powerful is simple
3)file3:
Hello MapReduce bye MapReduce
样例输出如下所示。
MapReduce file1.txt:1;file2.txt:1;file3.txt:2;
is file1.txt:1;file2.txt:2;
simple file1.txt:1;file2.txt:1;
powerful file2.txt:1;
Hello file3.txt:1;
bye file3.txt:1;
6.2 设计思路
实现"倒排索引"只要关注的信息为:单词、文档URL及词频,如图3-11所示。但是在实现过程中,索引文件的格式与图6.1-3会略有所不同,以避免重写OutPutFormat类。下面根据MapReduce的处理过程给出倒排索引的设计思路。
1)Map过程
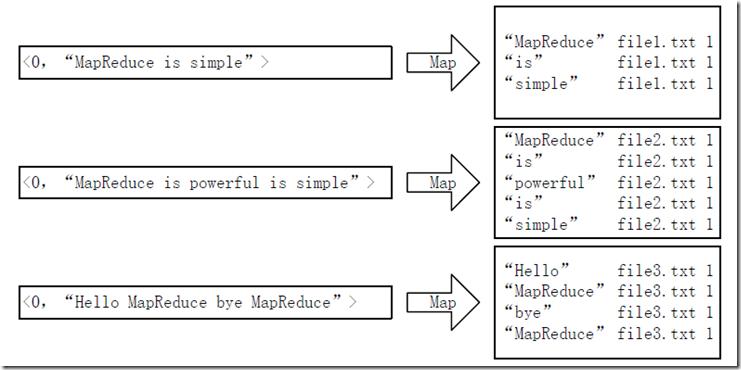
首先使用默认的TextInputFormat类对输入文件进行处理,得到文本中每行的偏移量及其内容。显然,Map过程首先必须分析输入的<key,value>对,得到倒排索引中需要的三个信息:单词、文档URL和词频,如图6.2-1所示。
图6.2-1 Map过程输入/输出
这里存在两个问题:第一,<key,value>对只能有两个值,在不使用Hadoop自定义数据类型的情况下,需要根据情况将其中两个值合并成一个值,作为key或value值;第二,通过一个Reduce过程无法同时完成词频统计和生成文档列表,所以必须增加一个Combine过程完成词频统计。
这里讲单词和URL组成key值(如"MapReduce:file1.txt"),将词频作为value,这样做的好处是可以利用MapReduce框架自带的Map端排序,将同一文档的相同单词的词频组成列表,传递给Combine过程,实现类似于WordCount的功能。
2)Combine过程
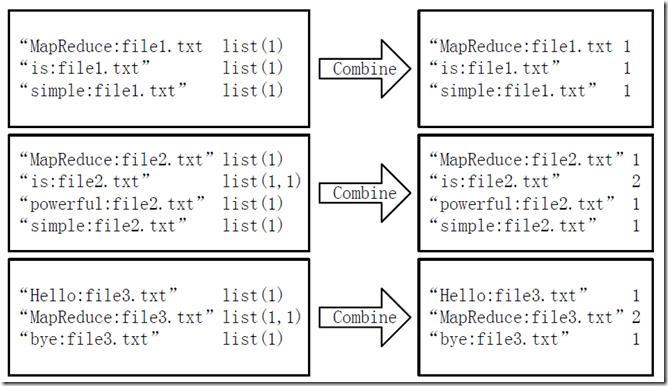
经过map方法处理后,Combine过程将key值相同的value值累加,得到一个单词在文档在文档中的词频,如图6.2-2所示。如果直接将图6.2-2所示的输出作为Reduce过程的输入,在Shuffle过程时将面临一个问题:所有具有相同单词的记录(由单词、URL和词频组成)应该交由同一个Reducer处理,但当前的key值无法保证这一点,所以必须修改key值和value值。这次将单词作为key值,URL和词频组成value值(如"file1.txt:1")。这样做的好处是可以利用MapReduce框架默认的HashPartitioner类完成Shuffle过程,将相同单词的所有记录发送给同一个Reducer进行处理。
图6.2-2 Combine过程输入/输出
3)Reduce过程
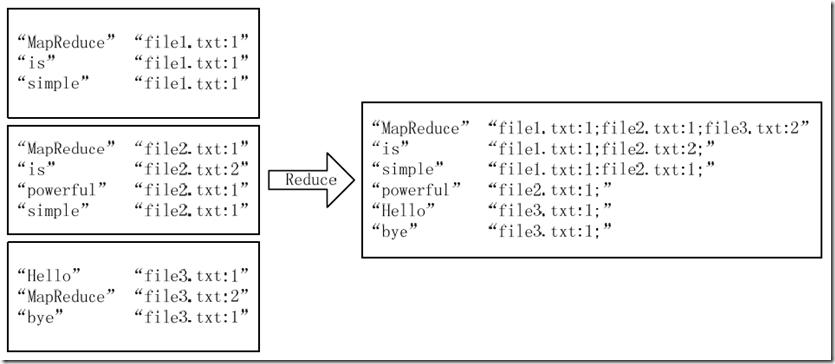
经过上述两个过程后,Reduce过程只需将相同key值的value值组合成倒排索引文件所需的格式即可,剩下的事情就可以直接交给MapReduce框架进行处理了。如图6.2-3所示。索引文件的内容除分隔符外与图6.1-3解释相同。
4)需要解决的问题
本实例设计的倒排索引在文件数目上没有限制,但是单词文件不宜过大(具体值与默认HDFS块大小及相关配置有关),要保证每个文件对应一个split。否则,由于Reduce过程没有进一步统计词频,最终结果可能会出现词频未统计完全的单词。可以通过重写InputFormat类将每个文件为一个split,避免上述情况。或者执行两次MapReduce,第一次MapReduce用于统计词频,第二次MapReduce用于生成倒排索引。除此之外,还可以利用复合键值对等实现包含更多信息的倒排索引。
图6.2-3 Reduce过程输入/输出
6.3 程序代码
程序代码如下所示:
- package com.hebut.mr;
- import java.io.IOException;
- import java.util.StringTokenizer;
- import org.apache.hadoop.conf.Configuration;
- import org.apache.hadoop.fs.Path;
- import org.apache.hadoop.io.IntWritable;
- import org.apache.hadoop.io.Text;
- import org.apache.hadoop.mapreduce.Job;
- import org.apache.hadoop.mapreduce.Mapper;
- import org.apache.hadoop.mapreduce.Reducer;
- import org.apache.hadoop.mapreduce.lib.input.FileInputFormat;
- import org.apache.hadoop.mapreduce.lib.input.FileSplit;
- import org.apache.hadoop.mapreduce.lib.output.FileOutputFormat;
- import org.apache.hadoop.util.GenericOptionsParser;
- public class InvertedIndex {
- public static class Map extends Mapper<Object, Text, Text, Text> {
- private Text keyInfo = new Text(); // 存储单词和URL组合
- private Text valueInfo = new Text(); // 存储词频
- private FileSplit split; // 存储Split对象
- // 实现map函数
- public void map(Object key, Text value, Context context)
- throws IOException, InterruptedException {
- // 获得<key,value>对所属的FileSplit对象
- split = (FileSplit) context.getInputSplit();
- StringTokenizer itr = new StringTokenizer(value.toString());
- while (itr.hasMoreTokens()) {
- // key值由单词和URL组成,如"MapReduce:file1.txt"
- // 获取文件的完整路径
- // keyInfo.set(itr.nextToken()+":"+split.getPath().toString());
- // 这里为了好看,只获取文件的名称。
- int splitsplitIndex = split.getPath().toString().indexOf("file");
- keyInfo.set(itr.nextToken() + ":"
- + split.getPath().toString().substring(splitIndex));
- // 词频初始化为1
- valueInfo.set("1");
- context.write(keyInfo, valueInfo);
- }
- }
- }
- public static class Combine extends Reducer<Text, Text, Text, Text> {
- private Text info = new Text();
- // 实现reduce函数
- public void reduce(Text key, Iterable<Text> values, Context context)
- throws IOException, InterruptedException {
- // 统计词频
- int sum = 0;
- for (Text value : values) {
- sum += Integer.parseInt(value.toString());
- }
- int splitIndex = key.toString().indexOf(":");
- // 重新设置value值由URL和词频组成
- info.set(key.toString().substring(splitIndex + 1) + ":" + sum);
- // 重新设置key值为单词
- key.set(key.toString().substring(0, splitIndex));
- context.write(key, info);
- }
- }
- public static class Reduce extends Reducer<Text, Text, Text, Text> {
- private Text result = new Text();
- // 实现reduce函数
- public void reduce(Text key, Iterable<Text> values, Context context)
- throws IOException, InterruptedException {
- // 生成文档列表
- String fileList = new String();
- for (Text value : values) {
- fileList += value.toString() + ";";
- }
- result.set(fileList);
- context.write(key, result);
- }
- }
- public static void main(String[] args) throws Exception {
- Configuration conf = new Configuration();
- // 这句话很关键
- conf.set("mapred.job.tracker", "192.168.1.2:9001");
- String[] ioArgs = new String[] { "index_in", "index_out" };
- String[] otherArgs = new GenericOptionsParser(conf, ioArgs)
- .getRemainingArgs();
- if (otherArgs.length != 2) {
- System.err.println("Usage: Inverted Index <in> <out>");
- System.exit(2);
- }
- Job job = new Job(conf, "Inverted Index");
- job.setJarByClass(InvertedIndex.class);
- // 设置Map、Combine和Reduce处理类
- job.setMapperClass(Map.class);
- job.setCombinerClass(Combine.class);
- job.setReducerClass(Reduce.class);
- // 设置Map输出类型
- job.setMapOutputKeyClass(Text.class);
- job.setMapOutputValueClass(Text.class);
- // 设置Reduce输出类型
- job.setOutputKeyClass(Text.class);
- job.setOutputValueClass(Text.class);
- // 设置输入和输出目录
- FileInputFormat.addInputPath(job, new Path(otherArgs[0]));
- FileOutputFormat.setOutputPath(job, new Path(otherArgs[1]));
- System.exit(job.waitForCompletion(true) ? 0 : 1);
- }
- }
6.4 代码结果
1)准备测试数据
通过Eclipse下面的"DFS Locations"在"/user/hadoop"目录下创建输入文件"index_in"文件夹(备注:"index_out"不需要创建。)如图6.4-1所示,已经成功创建。
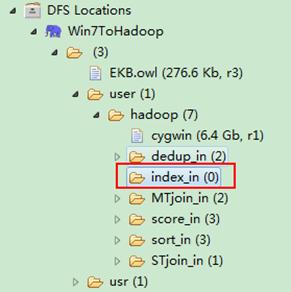
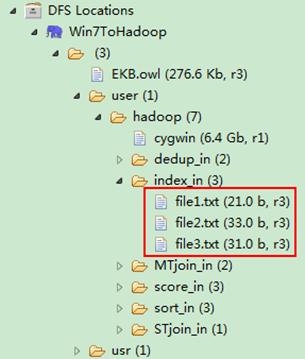
图6.4-1 创建"index_in" 图6.4.2 上传"file*.txt"
然后在本地建立三个txt文件,通过Eclipse上传到"/user/hadoop/index_in"文件夹中,三个txt文件的内容如"实例描述"那三个文件一样。如图6.4-2所示,成功上传之后。
从SecureCRT远处查看"Master.Hadoop"的也能证实我们上传的三个文件。

图6.4.3 三个"file*.txt"的内容
2)查看运行结果
这时我们右击Eclipse的"DFS Locations"中"/user/hadoop"文件夹进行刷新,这时会发现多出一个"index_out"文件夹,且里面有3个文件,然后打开双其"part-r-00000"文件,会在Eclipse中间把内容显示出来。如图6.4-4所示。
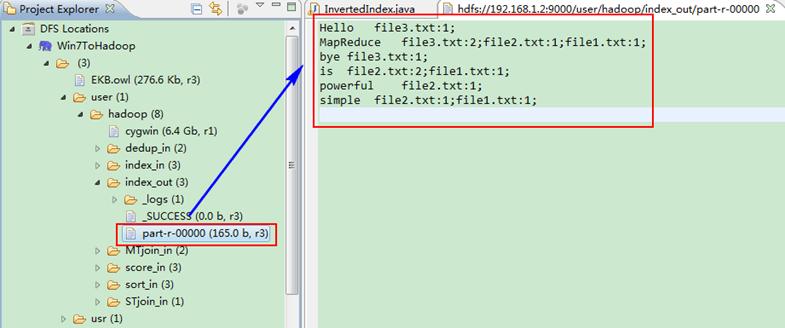
图6.4-4 运行结果
原文链接:http://www.cnblogs.com/xia520pi/archive/2012/06/04/2534533.html


