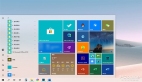
对“磁贴”的理解是一点也不抽象的,为什么呢?只要你愿意启动WP系统,无论你是在模拟器中还是在真机中,是的,桌面上那一块块像地板的玩意儿,就是磁贴了。
(图:磁贴)
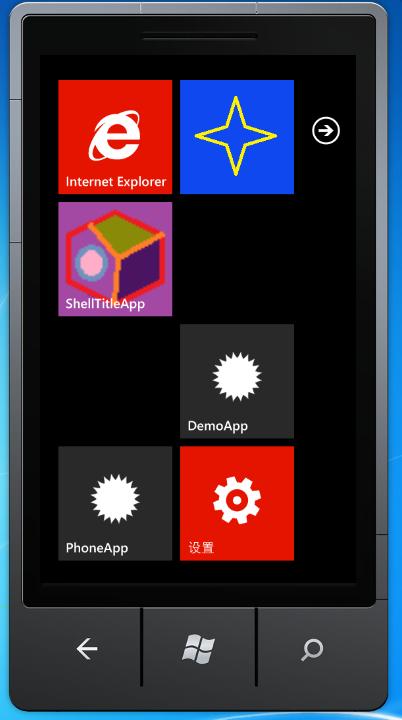
在上图中,我们很直观地看到磁贴图块的“真”面目,呵呵,其实很明显,这个设计真的很有个性,老实说,WP刚推出的时候,很多人说它这个那个的,其实这些人只过是起起哄罢了。
我是挺喜欢桌面上那一块块的图块的,这也是WP第一次给我留下的深刻印象,毕竟在安卓和IOS上,我们看到的都是传统手机的图标显示方式,而WP总让我觉得很有个性。
好的,看完了整体的,我们来看看局部的,好吗?别小看这些正方形的图块,里面可是大有文章的哦。不信?一起去瞧瞧。
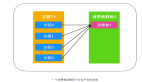
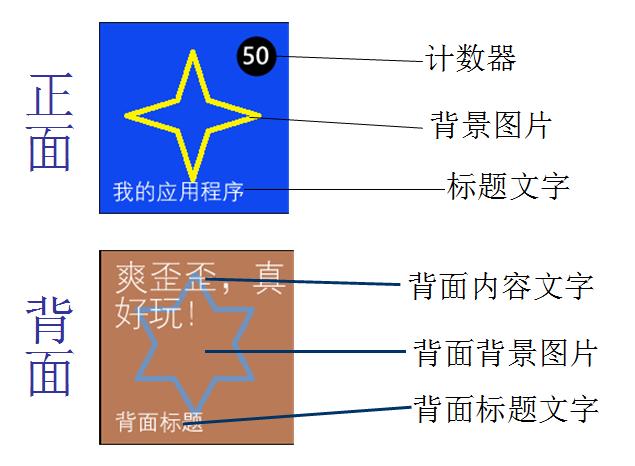
磁贴的一个图块基本上由三个元素组成——背景图,标题文字以及计数器,嗯,当然了,图块最有意思的地方,就是它有正反两面。
下图为图块正反两面的元素组成结构图。
磁贴的分类。
磁贴分为应用程序磁贴和次要磁贴。
好不好理解呢?好,首先我们看看应用程序磁贴,它是指通过用户应用程序列表中长按应用程序来把应用程序固定到“开始”屏幕。
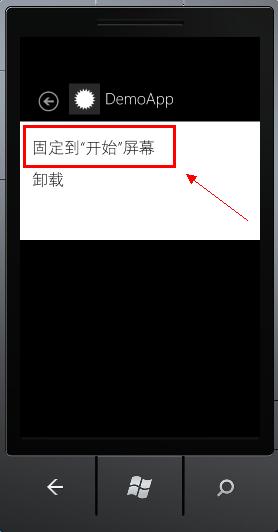
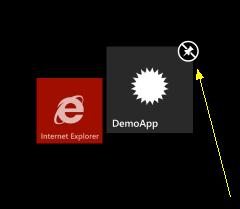
那么,如何删除呢?在“开始”屏幕上找到你要移除的图块,长按,图块左上角会出现一个小图标,我们点击这小图标即可移除该磁贴。当然了,如果你想把移动到其它位置,在此时,你只需把图标拖到对应的位置,然后在桌面上随便点一下即可完成移动操作。
次要磁贴就是相对于刚才的上面的应用程序磁贴而言的,它是由应用程序通过特定参数创建的,说直接一点嘛,就是通过我们开发者,用代码来创建的。
这个好比我们Windows桌面上的快捷方式,有的是直接指向可执行程序的,而有的是应用程序创建的,它后面带了命令行参数。举个例子吧,最典型的 要数IE了,我经常上新浪微博,我希望在桌面上创建一个IE的快捷方式图标,双击运行IE的时候新打开新浪微博主页,那怎么做呢?请看下图。
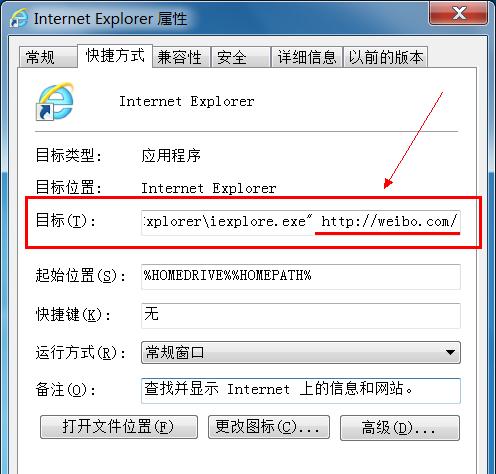
这样一来,你双击快捷方式启动IE就自动打开新浪微博首页。呵呵,次要磁贴也和这相类似。
动手实战。
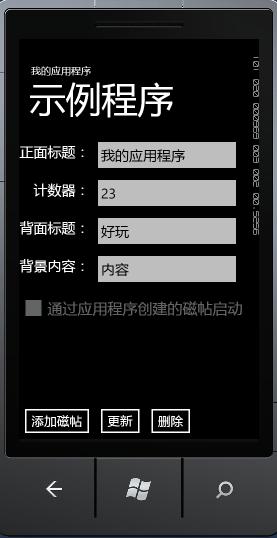
下面,我们一起来动手做一个稍微综合一点的例子,嗯,现在,你可以坐下来,先喝几口奶茶,然后启动VS,新建一个WP项目。 界面布局大致如下,你可以自由发挥。
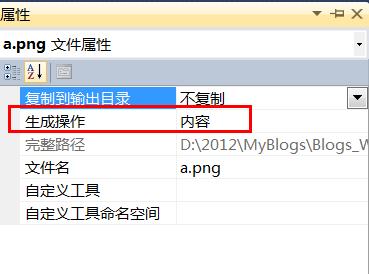
准备好两张美图,图片内容你喜欢,但要键康哦,尺寸为173*173像素,.jpg或.png都行,一张作为磁贴的正面背景,另一张作为磁贴的背面背景。
注意:把图片的生成操作改为“内容”。
别走开,下页为您提供具体代码
#p#
当然,为了方便大家练习参考,我把XAML贴出来,希望大家不要直接复制,而是认认真真的在VS里面输一遍,要多写代码多练习才会找到感觉的哦。
<phone:PhoneApplicationPage
    x:Class="ShellTitleApp.MainPage"
    xmlns="http://schemas.microsoft.com/winfx/2006/xaml/presentation"
    xmlns:x="http://schemas.microsoft.com/winfx/2006/xaml"
    xmlns:phone="clr-namespace:Microsoft.Phone.Controls;assembly=Microsoft.Phone"
    xmlns:shell="clr-namespace:Microsoft.Phone.Shell;assembly=Microsoft.Phone"
    xmlns:d="http://schemas.microsoft.com/expression/blend/2008"
    xmlns:mc="http://schemas.openxmlformats.org/markup-compatibility/2006"
    mc:Ignorable="d" d:DesignWidth="480" d:DesignHeight="768"
    FontFamily="{StaticResource PhoneFontFamilyNormal}"
    FontSize="{StaticResource PhoneFontSizeNormal}"
    Foreground="{StaticResource PhoneForegroundBrush}"
    SupportedOrientations="Portrait" Orientation="Portrait"
    shell:SystemTray.IsVisible="True">

    <phone:PhoneApplicationPage.Resources>
        <Style x:Key="textblStyle" TargetType="TextBlock">
            <Setter Property="FontSize" Value="28"/>
            <Setter Property="Margin" Value="0,12,5,6"/>
            <Setter Property="HorizontalAlignment" Value="Right"/>
        </Style>
        <Style x:Key="textboxStyle" TargetType="TextBox">
            <Setter Property="FontSize" Value="28"/>
            <Setter Property="Width" Value="300"/>
            <Setter Property="Height" Value="auto"/>
            <Setter Property="HorizontalAlignment" Value="Left"/>
        </Style>
    </phone:PhoneApplicationPage.Resources>

    <!--LayoutRoot 是包含所有页面内容的根网格-->
    <Grid x:Name="LayoutRoot" Background="Transparent">
        <Grid.RowDefinitions>
            <RowDefinition Height="Auto"/>
            <RowDefinition Height="*"/>
        </Grid.RowDefinitions>

        <!--TitlePanel 包含应用程序的名称和页标题-->
        <StackPanel x:Name="TitlePanel" Grid.Row="0" Margin="12,17,0,28">
            <TextBlock x:Name="ApplicationTitle" Text="我的应用程序" Style="{StaticResource PhoneTextNormalStyle}"/>
            <TextBlock x:Name="PageTitle" Text="示例程序" Margin="9,-7,0,0" Style="{StaticResource PhoneTextTitle1Style}"/>
        </StackPanel>

        <!--ContentPanel - 在此处放置其他内容-->
        <Grid x:Name="ContentPanel" Margin="0" Grid.Row="1">
            <Grid.RowDefinitions>
                <RowDefinition Height="*" />
                <RowDefinition Height="auto" />
            </Grid.RowDefinitions>
            <ScrollViewer HorizontalScrollBarVisibility="Auto" Grid.Row="0">
                <Grid Margin="1">
                    <Grid.RowDefinitions>
                        <RowDefinition Height="auto"/>
                        <RowDefinition Height="auto"/>
                        <RowDefinition Height="auto"/>
                        <RowDefinition Height="auto"/>
                        <RowDefinition Height="auto"/>
                    </Grid.RowDefinitions>
                    <Grid.ColumnDefinitions>
                        <ColumnDefinition Width="auto"/>
                        <ColumnDefinition Width="*"/>
                    </Grid.ColumnDefinitions>
                    <TextBlock Grid.Row="0"
                               Grid.Column="0"
                               Text="正面标题:" Style="{StaticResource textblStyle}" />
                    <TextBox x:Name="txtForeTitle"
                             Style="{StaticResource textboxStyle}"
                             Grid.Row="0"
                             Grid.Column="1"/>
                    <TextBlock Text="计数器:" Style="{StaticResource textblStyle}"
                               Grid.Row="1"
                               Grid.Column="0"/>
                    <TextBox x:Name="txtCount"
                             Grid.Column="1"
                             Grid.Row="1" Style="{StaticResource textboxStyle}" >
                        <!--只允许输入数字-->
                        <TextBox.InputScope>
                            <InputScope >
                                <InputScopeName NameValue="Number"/>
                            </InputScope>
                        </TextBox.InputScope>
                    </TextBox>
                    <TextBlock Text="背面标题:"
                               Grid.Row="2"
                               Grid.Column="0" Style="{StaticResource textblStyle}" />
                    <TextBox x:Name="txtBackTitle"
                             Grid.Row="2"
                             Grid.Column="1" Style="{StaticResource textboxStyle}" />
                    <TextBlock Text="背景内容:"
                               Grid.Row="3"
                               Grid.Column="0" Style="{StaticResource textblStyle}" />
                    <TextBox x:Name="txtBackContent"
                             Grid.Row="3"
                             Grid.Column="1" Style="{StaticResource textboxStyle}" />
                    <!--提示是以何种方式启动-->
                    <CheckBox x:Name="chkStartType"
                              IsChecked="False"
                              Grid.Row="4"
                              Grid.Column="0"
                              Grid.ColumnSpan="2"
                              FontSize="30"
                              Content="通过应用程序创建的磁贴启动" IsEnabled="False" />
                </Grid>
            </ScrollViewer>
            <StackPanel Grid.Row="1" Orientation="Horizontal">
                <Button x:Name="btnAddToShellTitle"
                        Content="添加磁贴" Click="btnAddToShellTitle_Click" />
                <Button x:Name="btnUpdateShellTitle"
                        Content="更新" Click="btnUpdateShellTitle_Click" />
                <Button x:Name="btnDeleteShellTitle"
                        Content="删除" Click="btnDeleteShellTitle_Click" />
            </StackPanel>
        </Grid>
    </Grid>

</phone:PhoneApplicationPage>
- 1.
- 2.
- 3.
- 4.
- 5.
- 6.
- 7.
- 8.
- 9.
- 10.
- 11.
- 12.
- 13.
- 14.
- 15.
- 16.
- 17.
- 18.
- 19.
- 20.
- 21.
- 22.
- 23.
- 24.
- 25.
- 26.
- 27.
- 28.
- 29.
- 30.
- 31.
- 32.
- 33.
- 34.
- 35.
- 36.
- 37.
- 38.
- 39.
- 40.
- 41.
- 42.
- 43.
- 44.
- 45.
- 46.
- 47.
- 48.
- 49.
- 50.
- 51.
- 52.
- 53.
- 54.
- 55.
- 56.
- 57.
- 58.
- 59.
- 60.
- 61.
- 62.
- 63.
- 64.
- 65.
- 66.
- 67.
- 68.
- 69.
- 70.
- 71.
- 72.
- 73.
- 74.
- 75.
- 76.
- 77.
- 78.
- 79.
- 80.
- 81.
- 82.
- 83.
- 84.
- 85.
- 86.
- 87.
- 88.
- 89.
- 90.
- 91.
- 92.
- 93.
- 94.
- 95.
- 96.
- 97.
- 98.
- 99.
- 100.
- 101.
- 102.
- 103.
- 104.
- 105.
- 106.
- 107.
- 108.
- 109.
- 110.
- 111.
- 112.
- 113.
- 114.
- 115.
好的,最后,当然是把C#代码也写完。
using System;
using System.Collections.Generic;
using System.Linq;
using System.Net;
using System.Windows;
using System.Windows.Controls;
using System.Windows.Documents;
using System.Windows.Input;
using System.Windows.Media;
using System.Windows.Media.Animation;
using System.Windows.Shapes;
using Microsoft.Phone.Controls;
using Microsoft.Phone.Shell;
using System.Windows.Threading;
namespace ShellTitleApp
{
    public partial class MainPage : PhoneApplicationPage
    {
        // 要用的图片的相对路径
        private const string FORE_PIC = "images/a.png";
        private const string BACK_PIC = "images/b.png";
        // 构造函数
        public MainPage()
        {
            InitializeComponent();
        }
        protected override void OnNavigatedTo(System.Windows.Navigation.NavigationEventArgs e)
        {
            base.OnNavigatedTo(e);
            // 创建的磁贴的启动地址其实是指向 /MainPage.xaml?s=1
            // s=1参数是为了区别用户是不是通过程序所创建的磁贴来进入启动当前程序的,
            // 就像面前例子中讲到的把IE桌面快捷方式的参数指定为新浪微博的主页一个道理。

            // 检测是否存在s=1来判断是否通过程序创建的磁贴来启动。
            ShellTile myTitle = ShellTile.ActiveTiles.FirstOrDefault(n => n.NavigationUri.ToString().Contains("s=1"));
            if (myTitle != null)
            {
                this.chkStartType.IsChecked = true;
            }
            else
            {
                this.chkStartType.IsChecked = false;
            }
        }
        // 创建图块
        private void btnAddToShellTitle_Click(object sender, RoutedEventArgs e)
        {
            // 不管我们的程序是否创建“开始”屏幕磁贴,ActiveTiles的第一个元素必是当前正在前台运行的
            // 应用程序。所以,在取出第一个ShellTile时,一定要通过判断是否存在s=1。
            // 这个s=1参数是随便取的。
            ShellTile myTitle = ShellTile.ActiveTiles.FirstOrDefault(m => m.NavigationUri.ToString().Contains("s=1"));
            // 如果已经创建就不建了。
            if (myTitle != null)
            {
                MessageBox.Show("此应用程序的磁贴已经存在。");
            }
            else
            {
                // 创建新磁贴
                int Counter = 0;
                // StandardTileData就是用来传递ShellTitle的属性参数的,
                // 如正面背景图的URI,标题,计数器等。
                StandardTileData myData = new StandardTileData()
                {
                    Title = string.IsNullOrEmpty(txtForeTitle.Text) == true ? string.Empty : txtForeTitle.Text,
                    Count = int.TryParse(txtCount.Text, out Counter) == true ? Counter : 0,
                    BackTitle = string.IsNullOrEmpty(txtBackTitle.Text) == true ? string.Empty : txtBackTitle.Text,
                    BackContent = string.IsNullOrEmpty(txtBackContent.Text) == true ? string.Empty : txtBackContent.Text,
                    BackgroundImage = new Uri(FORE_PIC, UriKind.Relative),
                    BackBackgroundImage = new Uri(BACK_PIC, UriKind.Relative)
                };

                // ShellTile.Create方法的第一个参数是我们启动应用程序时应该导航到哪里。
                // 因为本示例主有一个页面,当然是导航到主页面,
                // 因为是从我们创建的磁贴来启动的,所以不要忘了带上s=1参数。
                ShellTile.Create(new Uri("/MainPage.xaml?s=1", UriKind.Relative), myData);
                MessageBox.Show("磁贴图块创建成功。");
            }
        }
        // 更新磁贴信息
        private void btnUpdateShellTitle_Click(object sender, RoutedEventArgs e)
        {
            // 同理,先要判断是否从我们创建的磁贴启动
            ShellTile myTitle = ShellTile.ActiveTiles.FirstOrDefault(m => m.NavigationUri.ToString().Contains("s=1"));
            if (myTitle != null)
            {
                int Counter = 0;
                StandardTileData data = new StandardTileData();
                if (!string.IsNullOrEmpty(txtForeTitle.Text))
                {
                    data.Title = txtForeTitle.Text;
                }
                if (int.TryParse(txtCount.Text,out Counter))
                {
                    data.Count = Counter;
                }
                if (!string.IsNullOrEmpty(txtBackTitle.Text))
                {
                    data.BackTitle = txtBackTitle.Text;
                }
                if (!string.IsNullOrEmpty(txtBackContent.Text))
                {
                    data.BackContent = txtBackContent.Text;
                }
                myTitle.Update(data);
                MessageBox.Show("磁贴数据更新完成。");
            }
        }
        // 删除磁贴
        // 注意:我们使用代码只可删除次要磁贴,也就是我们用代码创建的,
        // 不要去删除应用程序磁贴,即通过在应用程序项上长按创建的。
        private void btnDeleteShellTitle_Click(object sender, RoutedEventArgs e)
        {
            // 记着,要先判断是否找到通过我们代码创建的磁贴。
            ShellTile title = ShellTile.ActiveTiles.FirstOrDefault(x => x.NavigationUri.ToString().Contains("s=1"));
            if (title != null)
            {
                title.Delete();
                MessageBox.Show("磁贴图块删除成功。");
            }
        }
    }
}
- 1.
- 2.
- 3.
- 4.
- 5.
- 6.
- 7.
- 8.
- 9.
- 10.
- 11.
- 12.
- 13.
- 14.
- 15.
- 16.
- 17.
- 18.
- 19.
- 20.
- 21.
- 22.
- 23.
- 24.
- 25.
- 26.
- 27.
- 28.
- 29.
- 30.
- 31.
- 32.
- 33.
- 34.
- 35.
- 36.
- 37.
- 38.
- 39.
- 40.
- 41.
- 42.
- 43.
- 44.
- 45.
- 46.
- 47.
- 48.
- 49.
- 50.
- 51.
- 52.
- 53.
- 54.
- 55.
- 56.
- 57.
- 58.
- 59.
- 60.
- 61.
- 62.
- 63.
- 64.
- 65.
- 66.
- 67.
- 68.
- 69.
- 70.
- 71.
- 72.
- 73.
- 74.
- 75.
- 76.
- 77.
- 78.
- 79.
- 80.
- 81.
- 82.
- 83.
- 84.
- 85.
- 86.
- 87.
- 88.
- 89.
- 90.
- 91.
- 92.
- 93.
- 94.
- 95.
- 96.
- 97.
- 98.
- 99.
- 100.
- 101.
- 102.
- 103.
- 104.
- 105.
- 106.
- 107.
- 108.
- 109.
- 110.
- 111.
- 112.
- 113.
- 114.
- 115.
- 116.
- 117.
- 118.
- 119.
- 120.
- 121.
- 122.
- 123.
示例中我们重点是使用了ShellTile类,它并不复杂,成员不多,大家多玩几次就熟了。
运行之后,我们在“开始”屏幕中创建我们的磁贴,然后回到桌面,我们盯着它别动,你会发现,它的正面与反面会每隔几秒钟自动轮回切换。