地图覆盖物概述
所有叠加或覆盖到地图的内容,我们统称为地图覆盖物。如标注、矢量图形元素(包括:折线和多边形和圆)、定位图标等。覆盖物拥有自己的地理坐标,当您拖动或缩放地图时,它们会相应的移动。
地图API提供了如下几种覆盖物:
- Overlay:覆盖物的抽象基类,所有的覆盖物均继承此类的方法,实现用户自定义图层显示。
- MyLocationOverlay:一个负责显示用户当前位置的Overlay。
-
ItemizedOverlay<Item extends OverlayItem>:Overlay的一个基类,包含了一个OverlayItem列表,相当于一组分条的Overlay,通过继承此类,将一组兴趣点显示在地图上。
-
PoiOverlay:本地搜索图层,提供某一特定地区的位置搜索服务,比如在北京市搜索“公园”,通过此图层将公园显示在地图上。
-
RouteOverlay:步行、驾车导航线路图层,将步行、驾车出行方案的路线及关键点显示在地图上。
-
TransitOverlay:公交换乘线路图层,将某一特定地区的公交出行方案的路线及换乘位置显示在地图上。
覆盖物的抽象基类:Overlay
一般来说,在MapView中添加一个Overlay需要经过以下步骤:
- 自定义类继承Overlay,并Override其draw()方法,如果需要点击、按键、触摸等交互操作,还需Override onTap()等方法。
package xiaosi.baiduMap;
import android.graphics.Canvas;
import android.graphics.Paint;
import android.graphics.Point;
import android.os.Bundle;
import android.view.View;
import android.view.View.OnClickListener;
import android.widget.Button;
import com.baidu.mapapi.BMapManager;
import com.baidu.mapapi.GeoPoint;
import com.baidu.mapapi.MapActivity;
import com.baidu.mapapi.MapController;
import com.baidu.mapapi.MapView;
import com.baidu.mapapi.Overlay;
public class BaiduMapActivity extends MapActivity
{
/** Called when the activity is first created. */
private BMapManager mapManager = null;
private String key = "1B79478DA01F7800AEA8602517A6D89B38151105";
private MapView mapView = null;
@Override
public void onCreate(Bundle savedInstanceState)
{
super.onCreate(savedInstanceState);
setContentView(R.layout.main);
mapManager = new BMapManager(getApplication());
mapManager.init(key, null);
super.initMapActivity(mapManager);
mapView = (MapView) findViewById(R.id.mapsView);
mapView.setBuiltInZoomControls(true); // 设置启用内置的缩放控件
MapController mapController = mapView.getController(); // 得到mMapView的控制权,可以用它控制和驱动平移和缩放
// GeoPoint point = new GeoPoint((int) (39.915 * 1E6),
// (int) (116.404 * 1E6)); // 用给定的经纬度构造一个GeoPoint,单位是微度 (度 * 1E6)
// mapController.setCenter(point); // 设置地图中心点
mapController.setZoom(12); // 设置地图zoom级别
mapView.getOverlays().add(new MyOverlay()); ///++++++++++++++++++++++++++++++++++++++++++++++++++++++++++++++++++
}
@Override
protected boolean isRouteDisplayed()
{
return false;
}
@Override
protected void onDestroy()
{
if (mapManager != null)
{
mapManager.destroy();
mapManager = null;
}
super.onDestroy();
}
@Override
protected void onPause()
{
if (mapManager != null)
{
mapManager.stop();
}
super.onPause();
}
@Override
protected void onResume()
{
if (mapManager != null)
{
mapManager.start();
}
super.onResume();
}
public class MyOverlay extends Overlay
{
GeoPoint geoPoint = new GeoPoint((int) (39.915 * 1E6),
(int) (116.404 * 1E6));
Paint paint = new Paint();
@Override
public void draw(Canvas canvas, MapView mapView, boolean shadow)
{
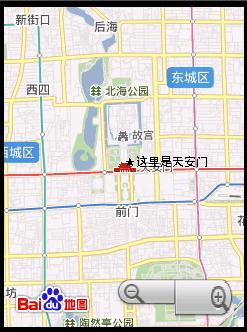
// 在天安门的位置绘制一个String
Point point = mapView.getProjection().toPixels(geoPoint, null);
canvas.drawText("★这里是天安门", point.x, point.y, paint);
}
}
}
- 1.
- 2.
- 3.
- 4.
- 5.
- 6.
- 7.
- 8.
- 9.
- 10.
- 11.
- 12.
- 13.
- 14.
- 15.
- 16.
- 17.
- 18.
- 19.
- 20.
- 21.
- 22.
- 23.
- 24.
- 25.
- 26.
- 27.
- 28.
- 29.
- 30.
- 31.
- 32.
- 33.
- 34.
- 35.
- 36.
- 37.
- 38.
- 39.
- 40.
- 41.
- 42.
- 43.
- 44.
- 45.
- 46.
- 47.
- 48.
- 49.
- 50.
- 51.
- 52.
- 53.
- 54.
- 55.
- 56.
- 57.
- 58.
- 59.
- 60.
- 61.
- 62.
- 63.
- 64.
- 65.
- 66.
- 67.
- 68.
- 69.
- 70.
- 71.
- 72.
- 73.
- 74.
- 75.
- 76.
- 77.
- 78.
- 79.
- 80.
- 81.
- 82.
- 83.
- 84.
- 85.
- 86.
- 87.
- 88.
- 89.
- 90.
- 91.
- 92.
- 93.
- 94.