教程说明
- 技术工具: Corona SDK
- 执行难度: 普通
- 操作时间: 30 到60分钟
书接上文
在本系列文章的前编中,我们了解了平衡球小游戏的基本概念并创建出基础用户界面。在后编中,我们将共同完成基础物理效果创建、游戏互动性编写等工作,并最终制作出能够给用户带来乐趣的应用成品。
步骤二十九: 添加物理效果
为游戏中的各个图形元素分配物理属性,要注意静态元素是不能移动的。另外还要检查玩家操控的小球与陷阱洞的半径,这些元素必须声明使用圆形物理属性而不能用一般的方形,这样会提高物理碰撞效果、提高游戏性。
-- Add Physics to GFX

physics.addBody(left, 'static')
physics.addBody(right, 'static')
physics.addBody(top, 'static')
physics.addBody(bottom, 'static')

physics.addBody(b1, 'static')
physics.addBody(b2, 'static')
physics.addBody(b3, 'static')
physics.addBody(b4, 'static')

physics.addBody(h1, 'static', {radius = 15})
physics.addBody(h2, 'static', {radius = 15})
physics.addBody(h3, 'static', {radius = 15})
physics.addBody(h4, 'static', {radius = 15})
physics.addBody(h5, 'static', {radius = 15})

physics.addBody(player, {radius = 14})
physics.addBody(goal, 'static', {radius = 15})
- 1.
- 2.
- 3.
- 4.
- 5.
- 6.
- 7.
- 8.
- 9.
- 10.
- 11.
- 12.
- 13.
- 14.
- 15.
- 16.
- 17.
- 18.
- 19.
- 20.
步骤三十: 将陷阱小洞设置为感应器
由于作为陷阱的小洞本身不会产生物理碰撞效果,因此我们只要为其设置接触感应器即可。
-- Set Holes as Sensors

    h1.isSensor = true
    h2.isSensor = true
    h3.isSensor = true
    h4.isSensor = true
    h5.isSensor = true

    --gameListeners('add')
end
- 1.
- 2.
- 3.
- 4.
- 5.
- 6.
- 7.
- 8.
- 9.
- 10.
步骤三十一: 代码审查
以下列出的是本教程所提到全部代码纲要,大家可以从宏观角度对作品进行核查,确定所有要素都已经包含在程序成品当中:
-- Teeter like Game

-- Developed by Carlos Yanez


-- Hide Status Bar


display.setStatusBar(display.HiddenStatusBar)


-- Physics


local physics = require('physics')

physics.start()

physics.setGravity(0, 0)


-- Graphics


-- [Background]


local bg = display.newImage('bg.png')


-- [Title View]


local titleBg

local playBtn

local creditsBtn

local titleView


-- [Credits]


local creditsView


-- [Player]


local player


-- [Bars Table]


local bars = {}


-- [Holes Table]


local holes = {}


-- [Goal]


local goal


-- Sounds


local bell = audio.loadSound('bell.caf')

local buzz = audio.loadSound('buzz.caf')


-- Functions


local Main = {}

local startButtonListeners = {}

local showCredits = {}

local hideCredits = {}

local showGameView = {}

local gameListeners = {}

local movePlayer = {}

local onCollision = {}

local alert = {}

local dragPaddle = {}


-- Main Function


function Main()

    titleBg = display.newImage('titleBg.png')

    playBtn = display.newImage('playBtn.png', display.contentCenterX - 35.5, display.contentCenterY + 10)

    creditsBtn = display.newImage('creditsBtn.png', display.contentCenterX - 50.5, display.contentCenterY + 65)

    titleView = display.newGroup(titleBg, playBtn, creditsBtn)


    startButtonListeners('add')

end


function startButtonListeners(action)

    if(action == 'add') then

        playBtn:addEventListener('tap', showGameView)

        creditsBtn:addEventListener('tap', showCredits)

    else

        playBtn:removeEventListener('tap', showGameView)

        creditsBtn:removeEventListener('tap', showCredits)

    end

end


function showCredits:tap(e)

    playBtn.isVisible = false

    creditsBtn.isVisible = false

    creditsView = display.newImage('credits.png', 0, display.contentHeight+40)

    transition.to(creditsView, {time = 300, y = display.contentHeight-20, onComplete = function() creditsView:addEventListener('tap', hideCredits) end})

end


function hideCredits:tap(e)

    playBtn.isVisible = true

    creditsBtn.isVisible = true

    transition.to(creditsView, {time = 300, y = display.contentHeight+creditsView.height, onComplete = function() creditsView:removeEventListener('tap', hideCredits) display.remove(creditsView) creditsView = nil end})

end


function showGameView:tap(e)

    transition.to(titleView, {time = 300, x = -titleView.height, onComplete = function() startButtonListeners('rmv') display.remove(titleView) titleView = nil end})


    -- [Add GFX]


    -- Goal


    goal = display.newImage('goal.png')

    goal.x = 439

    goal.y = 31

    goal.name = 'g'


    -- Walls


    local left = display.newLine(-1, 0, -1, display.contentHeight)

    local right = display.newLine(display.contentWidth+1, 0, display.contentWidth+1, display.contentHeight)

    local top = display.newLine(0, -3, display.contentWidth, -3)

    local bottom = display.newLine(0, display.contentHeight, display.contentWidth, display.contentHeight)


    -- Bars


    local b1 = display.newImage('bar.png', 92, 67)

    local b2 = display.newImage('bar.png', 192, -2)

    local b3 = display.newImage('bar.png', 287, 67)

    local b4 = display.newImage('bar.png', 387, -2)


    -- Holes


    local h1 = display.newImage('hole.png', 62, 76)

    local h2 = display.newImage('hole.png', 124, 284)

    local h3 = display.newImage('hole.png', 223, 224)

    local h4 = display.newImage('hole.png', 356, 114)

    local h5 = display.newImage('hole.png', 380, 256)


    h1.name = 'h'

    h2.name = 'h'

    h3.name = 'h'

    h4.name = 'h'

    h5.name = 'h'


    -- Player


    player = display.newImage('player.png')

    player.x = 49

    player.y = 288

    player:setReferencePoint(display.CenterReferencePoint)


    -- Add Physics to GFX


    physics.addBody(left, 'static')

    physics.addBody(right, 'static')

    physics.addBody(top, 'static')

    physics.addBody(bottom, 'static')


    physics.addBody(b1, 'static')

    physics.addBody(b2, 'static')

    physics.addBody(b3, 'static')

    physics.addBody(b4, 'static')


    physics.addBody(h1, 'static', {radius = 15})

    physics.addBody(h2, 'static', {radius = 15})

    physics.addBody(h3, 'static', {radius = 15})

    physics.addBody(h4, 'static', {radius = 15})

    physics.addBody(h5, 'static', {radius = 15})


    physics.addBody(player, {radius = 14})

    physics.addBody(goal, 'static', {radius = 15})


    -- Set Holes as Sensors


    h1.isSensor = true

    h2.isSensor = true

    h3.isSensor = true

    h4.isSensor = true

    h5.isSensor = true


    gameListeners('add')

end
- 1.
- 2.
- 3.
- 4.
- 5.
- 6.
- 7.
- 8.
- 9.
- 10.
- 11.
- 12.
- 13.
- 14.
- 15.
- 16.
- 17.
- 18.
- 19.
- 20.
- 21.
- 22.
- 23.
- 24.
- 25.
- 26.
- 27.
- 28.
- 29.
- 30.
- 31.
- 32.
- 33.
- 34.
- 35.
- 36.
- 37.
- 38.
- 39.
- 40.
- 41.
- 42.
- 43.
- 44.
- 45.
- 46.
- 47.
- 48.
- 49.
- 50.
- 51.
- 52.
- 53.
- 54.
- 55.
- 56.
- 57.
- 58.
- 59.
- 60.
- 61.
- 62.
- 63.
- 64.
- 65.
- 66.
- 67.
- 68.
- 69.
- 70.
- 71.
- 72.
- 73.
- 74.
- 75.
- 76.
- 77.
- 78.
- 79.
- 80.
- 81.
- 82.
- 83.
- 84.
- 85.
- 86.
- 87.
- 88.
- 89.
- 90.
- 91.
- 92.
- 93.
- 94.
- 95.
- 96.
- 97.
- 98.
- 99.
- 100.
- 101.
- 102.
- 103.
- 104.
- 105.
- 106.
- 107.
- 108.
- 109.
- 110.
- 111.
- 112.
- 113.
- 114.
- 115.
- 116.
- 117.
- 118.
- 119.
- 120.
- 121.
- 122.
- 123.
- 124.
- 125.
- 126.
- 127.
- 128.
- 129.
- 130.
- 131.
- 132.
- 133.
- 134.
- 135.
- 136.
- 137.
- 138.
- 139.
- 140.
- 141.
- 142.
- 143.
- 144.
- 145.
- 146.
- 147.
- 148.
- 149.
- 150.
- 151.
- 152.
- 153.
- 154.
- 155.
- 156.
- 157.
- 158.
- 159.
- 160.
- 161.
- 162.
- 163.
- 164.
- 165.
- 166.
- 167.
- 168.
- 169.
- 170.
- 171.
- 172.
- 173.
- 174.
- 175.
- 176.
- 177.
- 178.
- 179.
- 180.
- 181.
- 182.
- 183.
- 184.
- 185.
- 186.
- 187.
- 188.
- 189.
- 190.
- 191.
- 192.
- 193.
- 194.
- 195.
- 196.
- 197.
- 198.
- 199.
- 200.
- 201.
- 202.
- 203.
- 204.
- 205.
- 206.
- 207.
- 208.
- 209.
- 210.
- 211.
- 212.
- 213.
- 214.
- 215.
- 216.
- 217.
- 218.
- 219.
- 220.
- 221.
- 222.
- 223.
- 224.
- 225.
- 226.
- 227.
- 228.
- 229.
- 230.
- 231.
- 232.
- 233.
- 234.
- 235.
- 236.
- 237.
- 238.
- 239.
- 240.
- 241.
- 242.
- 243.
- 244.
- 245.
- 246.
- 247.
- 248.
- 249.
- 250.
- 251.
- 252.
- 253.
- 254.
- 255.
- 256.
- 257.
- 258.
- 259.
- 260.
- 261.
- 262.
- 263.
- 264.
- 265.
- 266.
- 267.
- 268.
- 269.
- 270.
- 271.
- 272.
- 273.
- 274.
- 275.
- 276.
- 277.
- 278.
- 279.
- 280.
- 281.
- 282.
- 283.
- 284.
- 285.
- 286.
- 287.
- 288.
- 289.
- 290.
- 291.
- 292.
- 293.
- 294.
- 295.
- 296.
- 297.
- 298.
- 299.
- 300.
- 301.
- 302.
- 303.
- 304.
- 305.
- 306.
- 307.
- 308.
- 309.
- 310.
- 311.
- 312.
- 313.
- 314.
- 315.
- 316.
- 317.
- 318.
- 319.
- 320.
- 321.
- 322.
- 323.
- 324.
- 325.
- 326.
- 327.
- 328.
- 329.
- 330.
- 331.
- 332.
- 333.
- 334.
- 335.
- 336.
- 337.
- 338.
- 339.
- 340.
- 341.
- 342.
- 343.
- 344.
- 345.
- 346.
- 347.
- 348.
- 349.
- 350.
- 351.
步骤三十二: 游戏监听器
下列代码的作用是为应用程序添加重力加速及物理碰撞监听器。代码还能通过递交参数来移除这些效果。
function gameListeners(action)

    if(action == 'add') then

        Runtime:addEventListener('accelerometer', movePlayer)

        player:addEventListener('collision', onCollision)

        player:addEventListener('touch', dragPaddle)

    else

        Runtime:removeEventListener('accelerometer', movePlayer)

        player:removeEventListener('collision', onCollision)

        player:removeEventListener('touch', dragPaddle)

    end

end
- 1.
- 2.
- 3.
- 4.
- 5.
- 6.
- 7.
- 8.
- 9.
- 10.
- 11.
- 12.
- 13.
- 14.
- 15.
- 16.
- 17.
- 18.
- 19.
- 20.
- 21.
步骤三十三: 移动小球
以下函数用来捕捉物理加速值,并根据结果给小球的X及Y属性赋值。
function movePlayer:accelerometer(e)

    player.x = player.x + (e.yGravity*-15)

    player.y = player.y + (e.xGravity*-15)

end
- 1.
- 2.
- 3.
- 4.
- 5.
- 6.
- 7.
步骤三十四: 物理碰撞
当小球与其它对象发生碰撞时,其名称会与触碰对象相比照。根据对象类型的不同(陷阱小洞及目的地),游戏会给出不同的提示信息。
function onCollision(e)

    if(e.other.name == 'h') then

        alert()

    elseif(e.other.name == 'g') then

        alert('win')

    end

end
- 1.
- 2.
- 3.
- 4.
- 5.
- 6.
- 7.
- 8.
- 9.
- 10.
- 11.
- 12.
- 13.
步骤三十五: 提示信息
提示信息被触发时,游戏中的所有监听器都会被移除,并在播放音效的同时显示正确的文本内容。
function alert(action)

    local alert


    gameListeners('rmv')


    if(action == 'win') then

        alert = display.newImage('complete.png')

        alert.x = display.contentCenterX

        alert.y = display.contentCenterY

        transition.from(alert, {time = 300, xScale = 0.3, yScale = 0.3})

        audio.play(bell)

    else

        alert = display.newImage('gameOver.png')

        alert.x = display.contentCenterX

        alert.y = display.contentCenterY

        transition.from(alert, {time = 300, xScale = 0.3, yScale = 0.3})

        audio.play(buzz)

    end

end
- 1.
- 2.
- 3.
- 4.
- 5.
- 6.
- 7.
- 8.
- 9.
- 10.
- 11.
- 12.
- 13.
- 14.
- 15.
- 16.
- 17.
- 18.
- 19.
- 20.
- 21.
- 22.
- 23.
- 24.
- 25.
- 26.
- 27.
- 28.
- 29.
- 30.
- 31.
- 32.
- 33.
- 34.
- 35.
- 36.
- 37.
步骤三十六: 模拟移动
这一步纯属建议,大家可以将下列代表添加进来,借以在模拟环境下拖动小球,观察移动方式是否与预期相符。
function dragPaddle(e)

    if(e.phase == 'began') then

        lastY = e.y - player.y

        lastX = e.x - player.x

    elseif(e.phase == 'moved') then

        player.y = e.y - lastY

        player.x = e.x- lastX

    end

end
- 1.
- 2.
- 3.
- 4.
- 5.
- 6.
- 7.
- 8.
- 9.
- 10.
- 11.
- 12.
- 13.
- 14.
- 15.
- 16.
- 17.
步骤三十七: 调用Main函数
为了在应用启动时进行初始化,我们需要调用Main函数。上述代码编写完成之后,我们只需编辑以下内容即可实现初始化需求:
Main()
- 1.
步骤三十八: 载入界面
当我们启动指南针应用时,iOS系统会逐项载入基本数据,这时Default.png文件将作为背景图案显示在主屏幕当中。将这张图片保存到我们的项目资源文件夹中,这样它就会被自动添加到Corona的编译器中。
步骤三十九: 图标
现在大家的做图功力就该派上用场了,快为自己的应用打造一款美观又令人印象深刻的图标吧。在非视网膜屏的iPhone设备上,图标文件的尺寸应为57x57像素,而视网膜屏则需要114x114像素,另外我们还需要为iTunes软件商店打造一个512x512的大版图形。我建议大家先以512x512像素为基准设计,然后再缩小成其它两种尺寸。
大家没必要在图标制作方面过分投入精力,制作圆角或者添加半透明特效完全是种花蛇添足——因为iTunes与iPhone会自动为你实现这些效果。
步骤四十: 在模拟环境下进行测试
是时候进行最终测试了。打开Corona模拟器,选择我们的项目文件夹并点击“打开”。如果一切都依照预期效果顺利运行,那么我们就可以着手做***一项工作了。
步骤四十一: 创建
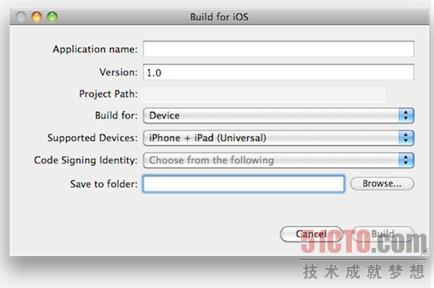
在Corona模拟器中,点选文件选项下的创建项并选择目标设备平台。在对话框中输入项目数据并点击创建按钮。等上几秒,我们的应用作品就大功告成啦!接下来大家可以在设备上进行实机测试,或者直接将应用发布到软件商店中。
总结
后期测试总是越多越好,当我们对自己的应用作品详加打磨后,发行用户版吧——这也许会成为辉煌成功的***步!
希望这篇指南文章能够帮助大家在移动开发的道路上越走越好,感谢朋友们的支持!
原文链接: