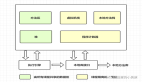
传统的树形菜单只适用于展示,本控件提供了一个可视化的组织图展示,并实现了一个对树形图的CRUD拖拽操作,可用于OA的人员维护或是部门关系图。
1. 使用此控件只需要定义根节点的模板:
- <localControls:BranchNode Grid.Column="0" x:Name="unAllocateBranchNode" Margin="30">
- <localControls:BranchNode.Template>
- <ControlTemplate TargetType="localControls:BranchNode">
- <Grid x:Name="rootPanel" VerticalAlignment="Top" Height="{TemplateBinding Height}">
- <StackPanel Orientation="Vertical" HorizontalAlignment="Stretch" DataContext="{TemplateBinding Branch}">
- <Border x:Name="titlePanel" HorizontalAlignment="Stretch" Background="{TemplateBinding Background}" BorderBrush="{TemplateBinding BorderBrush}" CornerRadius="3" BorderThickness="1">
- <Border.Resources>
- <SolidColorBrush x:Key="normalBorder" Color="#9fa8b7"/>
- <SolidColorBrush x:Key="hightlightBorder" Color="Red"/>
- </Border.Resources>
- <StackPanel>
- <StackPanel Orientation="Horizontal">
- <ContentPresenter Content="{Binding Name}" VerticalAlignment="Center" Margin="5"/>
- </StackPanel>
- <ItemsControl ItemsSource="{Binding Embranchment}">
- <ItemsControl.ItemsPanel>
- <ItemsPanelTemplate>
- <StackPanel/>
- </ItemsPanelTemplate>
- </ItemsControl.ItemsPanel>
- <ItemsControl.ItemTemplate>
- <DataTemplate>
- <localControls:BranchNode Branch="{Binding}" Margin="3"/>
- </DataTemplate>
- </ItemsControl.ItemTemplate>
- </ItemsControl>
- </StackPanel>
- </Border>
- </StackPanel>
- </Grid>
- </ControlTemplate>
- </localControls:BranchNode.Template>
- </localControls:BranchNode>
2. 然后绑定数据源
- Branch branch = new Branch();
- branch.Name = "财务部";
- branch.Embranchment = new ObservableCollection<Branch>()
- {
- new Branch(){Name="财务部1"},
- new Branch(){Name="财务部2"},
- new Branch(){Name="财务部3"}
- };
- branch.AppendBranch += new Action<Branch>(branch_AppendBranch);
- this.unAllocateBranchNode.Branch = branch;
3. 核心使用了通用的推拽原型
- private void BindDragEvent()
- {
- bool isDragging = false;
- Point lastPosition = new Point(0, 0);
- Popup rootPopup = new Popup();
- BranchNode ghostContainer = null;
- Branch parentBranch = null;
- Border lastTitlePanel = null;
- ...
- this.titlePanel.MouseLeftButtonDown += (source, eventArgs) =>
- {
- this.IsHitTestVisible = false;
- isDragging = true;
- lastPosition = eventArgs.GetPosition(null);
- ...
- ghostContainer.MouseLeftButtonUp += (s, e) =>
- {
- rootPopup.Child = null;
- ...
- isDragging = false;
- this.ReleaseMouseCapture();
- this.IsHitTestVisible = true;
- };
- ghostContainer.MouseMove += (s, e) =>
- {
- if (!isDragging)
- return;
- ...
- MatrixTransform mt = new MatrixTransform();
- mt.Matrix = rt.Value;
- ghostContainer.RenderTransform = mt;
- };
- };
- }
4. 源代码下载: https://199.47.216.171/u/10032723/EasyOA.rar
5. 预览
http://rapidsl2.guozili.25u.com/ (admin/admin 点左边菜单 控件展示 - 组织树形图)


原文链接:http://www.cnblogs.com/guozili/archive/2012/07/08/2581422.html