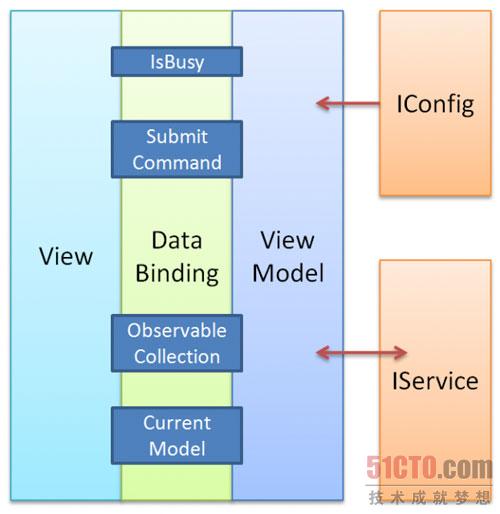
MVVM这个模式在WPF和Silverlight开发中已经非常流行了,因为WP7的应用开发也是Silverlight的,MVVM的一样可以适用。虽然MVVM有不少明确的定义,但是我也没有找到比较统一的来描述它,所以大概说一下我的总结:
MVVM和MVC、MVP一样都是为了分离呈现和业务为目标的设计模式,MVVM使用了WPF系列库特有的绑定机制从视图层移除绝大部分的业务处理和业务数据提供的逻辑。于独立的视图模型层更有利于测试。
大概结构如下:

View更关注界面的呈现,ViewModel更关注业务处理,Model作为之间交互的模型数据。
MVVM的绑定Binding
WPF和Silverlight提供了强大的绑定功能,为MVVM提供了必要的基础:
1.数据来源
在使用绑定之前,需要有基础的数据的来源,如CLR对象和XML形式,在MVVM里就应该这个View视图对于的ViewModel视图模型。将ViewModel对象设定到视图根元素的FrameworkElement. DataContext属性上完成数据来源的设置,根元素一般就是phone:PhoneApplicationPage。
代码很简单:
- public partial class MainPageView
- {
- // 构造函数
- public MainPageView()
- {
- InitializeComponent();
- DataContext = new MainPageViewModel();
- }
- }
2.数据绑定
数据绑定是在应用程序 UI 与业务逻辑之间建立连接的过程。如果绑定具有正确设置并且数据提供正确通知,则当数据更改其值时,绑定到数据的元素会自动反映更改。

在MVVM里,简单的说就是能够让视图View和视图模型ViewModel的数据能够动态同步更新,并且支持更新的方法。实现同步更新需要让ViewModel实现INotifyPropertyChanged接口。
- public interface INotifyPropertyChanged
- {
- //在更改属性值时发生。
- event PropertyChangedEventHandler PropertyChanged;
- }
- PropertyChangedEventArgs的定义如下:
- public class PropertyChangedEventArgs : EventArgs
- {
- // propertyName: 已更改的属性的名称。
- public PropertyChangedEventArgs(string propertyName);
- public string PropertyName { get; }
- }
只需要在ViewModel的属性更新时触发PropertyChanged并传入更改的属性名称就可以了。
完整示例:
- public class DemoCustomer : INotifyPropertyChanged
- {
- public event PropertyChangedEventHandler PropertyChanged;
- private void NotifyPropertyChanged(String info)
- {
- if (PropertyChanged != null)
- {
- PropertyChanged(this, new PropertyChangedEventArgs(info));
- }
- }
- public string CustomerName
- {
- get
- {
- return this.customerNameValue;
- }
- set
- {
- if (value != this.customerNameValue)
- {
- this.customerNameValue = value;
- NotifyPropertyChanged("CustomerName");
- }
- }
- }
- }
在XAML里面添加下面的代码就可以实现数据绑定。
- <TextBox Text="{Binding Path=CustomerName, Mode=TwoWay}" />
这样在界面修改TextBox 或 后台程序修改CustomerName的时候都可以同步更新(内部还解决线程切换的问题)数据绑定可以方便的同步View和ViewModel,并很好的减少了耦合。
3.命令绑定
命令是WPF中的输入机制,它提供的输入处理比设备输入具有更高的语义级别。例如,在许多应用程序中都能找到的“复制”、 “剪切”和 “粘贴”操作就是命令。
命令支持自定义命令,实现自定义命令需要实现ICommand接口。
- public interface ICommand
- {
- // 当出现影响是否应执行该命令的更改时发生。
- event EventHandler CanExecuteChanged;
- // 定义用于确定此命令是否可以在其当前状态下执行的方法。
- bool CanExecute(object parameter);
- // 定义在调用此命令时调用的方法。
- void Execute(object parameter);
- }
自定义命令是MVVM命令绑定的基础。实现一个最简单的自定义Command,暂时无视CanExecuteChanged变更和传入参数。
- public class InvokeCommand : ICommand
- {
- private readonly Action action;
- public event EventHandler CanExecuteChanged;
- public InvokeCommand(Action action)
- {
- this.action = action;
- }
- public bool CanExecute(object parameter)
- {
- return true;
- }
- public void Execute(object parameter)
- {
- action();
- }
- }
在ViewModel里面添加属性:
- public ICommand HelloCommand{ get; set; }
ViewModel构造函数内添加:
- HelloCommand = new InvokeCommand(() => MessageBox.Show(“Hello world”));
在ButtonBase类里面有一个 Command属性,获取或设置当按此按钮时要调用的命令。
- <button command="{Binding HelloCommand}" />
这样点击button就会触发MessageBox.Show(“Hello world”)); 命令绑定提供了简单的机制,让业务处理的消息可以在ViewModel里执行。
4.扩展命令绑定为动作绑定(事件绑定)
命令绑定仅仅提供了ButtonBase的点击事件,要是有更复杂的事件需要使用到动作绑定,这个基础是由System.Windows.Interactivity提供的,在C:\Program Files (x86)\Microsoft SDKs\Expression\Blend\Windows Phone\v7.1\Libraries里面可以找到。
另外动作绑定并没有正式的名称,我只是为了统一随口叫的。动作绑定就稍微复杂一点,首先我们需要实现一个自定义的动作,继承TriggerAction实现自己的InvokeAction。
- public class InvokeAction:TriggerAction<FrameworkElement>
- {
- public static readonly DependencyProperty CommandProperty
- = DependencyProperty.Register("Command", typeof (ICommand), typeof (InvokeAction));
- public ICommand Command
- {
- get { return (ICommand) GetValue(CommandProperty); }
- set { SetCurrentValue(CommandProperty, value); }
- }
- protected override void Invoke(object parameter)
- {
- ICommand command = Command;
- if (command == null)return;
- if (!command.CanExecute(parameter)) return;
- command.Execute(parameter);
- }
- }
里面定义了一个Command的依赖属性,用法和ButtonBase一样,这样就可以方便绑定命令了。
XAML代码如下:
首先引用System.Windows.Interactivity添加命名空间:xmlns:i="clr-namespace:System.Windows.Interactivity;assembly=System.Windows.Interactivity"
- <Button Content="Button">
- <i:Interaction.Triggers>
- <i:EventTrigger EventName="Click">
- <local:InvokeAction Command="{Binding HelloCommand}" />
- </i:EventTrigger>
- </i:Interaction.Triggers>
- </Button>
i:EventTrigger的EventName可以设置该控件上的各种事件,这里为了方便还是用的点击Clicklocal:InvokeAction将自定义动作InvokeAction元素添加进去,还是继续使用上一节定义的HelloCommand,同样点击Button 之后Hello World就显示出来了。当然使用i:InvokeCommandAction 更方便,我只是演示一下。
原文链接:http://www.cnblogs.com/kiminozo/archive/2012/01/27/2330112.html


