Xcode中创建和添加Libary 实例操作是本文要介绍的内容,主要介绍如何在xcode中创建自定义libary,以及如何将外部Libary添加到项目中。
1.新建 "Libary" -> "Cocoa Touch static libary" 项目 "LibaryTest";
2.新建 "HellowWorld" 类:
//HelloWorld.h
#import <Foundation/Foundation.h>
@interface HelloWorld : NSObject {}
-(void)helloWorld;
@end
//---------------//
HelloWorld.m
#import "HelloWorld.h"
@implementation HelloWorld
-(void)helloWorld{  NSLog(@"hello world");
}
@end
- 1.
- 2.
- 3.
- 4.
- 5.
- 6.
- 7.
- 8.
- 9.
- 10.
- 11.
- 12.
3.新建 "Window-based Application" 项目 "TempTest";
4.在TempTest下新建“new Group” 名为 “Dependencies”;
5.在"Dependencies"下"Existing Files...",
选择 "LibaryTest.xcodeproj",点击"Add",
在弹出的面板中选中"Reference Type" 的 "Relative to project"选项, 然后确定.
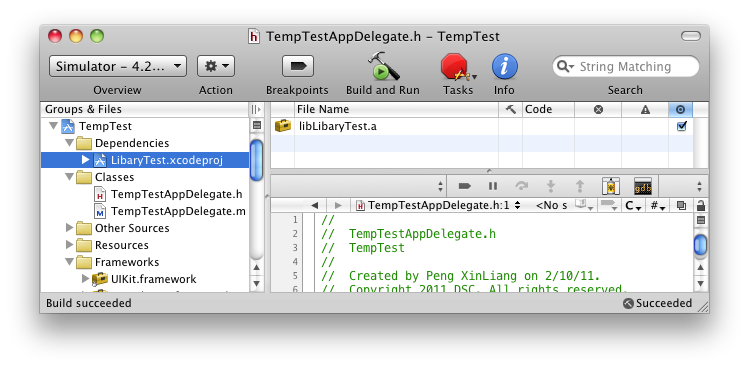
6. 在 Dependencies 的详情窗口勾选 LibaryTest.a 项,如图(单击可放大):
7.在LibaryTest.xcodeproj 上右键 "get info"窗口,我们可以看到它相对于当前项目的相对路径为"../LibaryTest/LibaryTest.xcodeproj".打开当前项目的"get info"窗口,在build中搜索head,将会找到"Header Search Paths"项, 双击该选项,将"../LibaryTest"添加进去,如图:
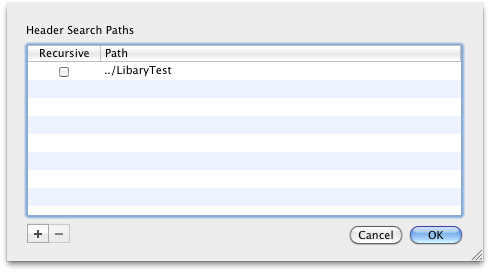
点OK. 这时在当前项目(TempTest)中,应该就能正常的提示LibaryTest中的类和方法了.
8.修改TempTestAppDelegate.m后,代码如下:
#import "TempTestAppDelegate.h"
#import "HelloWorld.h"
@implementation TempTestAppDelegate
@synthesize window;
#pragma mark -
#pragma mark Application lifecycle
- (BOOL)application:(UIApplication *)application didFinishLaunchingWithOptions:(NSDictionary *)launchOptions {
// Override point for customization after application launch.  HelloWorld *helloworld = [[HelloWorld alloc] init];
[helloworld helloWorld];
 [self.window makeKeyAndVisible];
 return YES;}#pragma mark -#pragma mark Memory management- (void)dealloc {
  [window release];
  [super dealloc];}
@end
- 1.
- 2.
- 3.
- 4.
- 5.
- 6.
- 7.
- 8.
- 9.
- 10.
- 11.
- 12.
- 13.
- 14.
"Command + B"编译,没有问题. 修改"LibaryTest"后编译依然没有问题,但" Command + R"运行可能会有问题.因为到目前为止,我们还只是将LibaryTest和当前项目添加了关联,但在编译当前项目时,它不会去编译LibaryTest库. 所以我们还需要在当前项目添加对LibaryTest的依赖关系.
9. 在打开Targets 下 TempTest 的 "get info"窗口. 选中genaral标签. 在 "direct dependencies" 中 添加对LibaryTest的依赖.
小结:Xcode中创建和添加Libary 实例操作的内容介绍完了,希望本文对你有所帮助!