


Cocos2d项目整体框架和启动流程是本文要介绍的内容,在这里我们新建一个名为“Test2d”的项目,在xcode中的Group&Files中看到的文件结构如下所示:
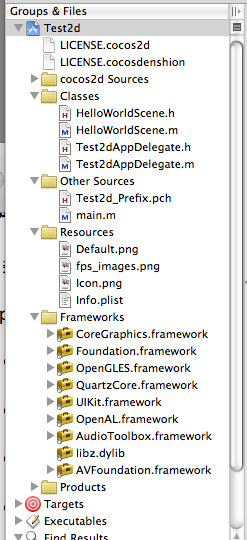
cocos2d Sources:存放的是cocos2d源代码
Classes:存放本应用程序源代码
Other Sources: 程序的入口main函数
Resources:存放本项目的图片、图标、声音文件等等
Frameworks:框架,顺一下启动流程
从main函数进入:
#import <UIKit/UIKit.h>

 int main(int argc, char *argv[]) {
     NSAutoreleasePool *pool = [NSAutoreleasePool new];
    int retVal = UIApplicationMain(argc, argv, nil, @"Test2dAppDelegate");
     [pool release];
     return retVal;
 }
- 1.
- 2.
- 3.
- 4.
- 5.
- 6.
- 7.
- 8.
第5行标识将程序的控制权传递给了应用代理程序对象Test2dAppDelegate、Test2dAppDelegate
Test2dAppDelegate<SPAN style="FONT-SIZE: 14px; LINE-HEIGHT: 21px; FONT-FAMILY: verdana, 'courier new'; WHITE-SPACE: normal">头文件如下</SPAN>
 #import <UIKit/UIKit.h>

 @interface Test2dAppDelegate : NSObject <UIApplicationDelegate> {
     UIWindow *window;
 }
 @property (nonatomic, retain) UIWindow *window;
@end
- 1.
- 2.
- 3.
- 4.
- 5.
- 6.
- 7.
- 8.
第三行能看出Test2dAppDelegate实现了系统定义的应用程序接口 UIApplicationDelegate
当前应用程序需要处理的各种系统事件:
放弃控制权:applicationWillResignActive
获得控制权:applicationDidBecomeActive
内存报警:applicationDidReceiveMemoryWarning
程序退出提示:applicationWillTerminate
系统时间变化:applicationSignificantTimeChange
//放弃控制权
(void)applicationWillResignActive:(UIApplication *)application {
    [[CCDirector sharedDirector] pause];


//获得控制权
void)applicationDidBecomeActive:(UIApplication *)application {
   [[CCDirector sharedDirector] resume];
}

//内存报警
(void)applicationDidReceiveMemoryWarning:(UIApplication *)application {
    [[CCDirector sharedDirector] purgeCachedData];


//
(void) applicationDidEnterBackground:(UIApplication*)application {
   [[CCDirector sharedDirector] stopAnimation];
}
    //
void) applicationWillEnterForeground:(UIApplication*)application {
   [[CCDirector sharedDirector] startAnimation];
}
//程序退出提示
(void)applicationWillTerminate:(UIApplication *)application {
    [[CCDirector sharedDirector] end];


//系统时间变化
 (void)applicationSignificantTimeChange:(UIApplication *)application {
    [[CCDirector sharedDirector] setNextDeltaTimeZero:YES];
}
- 1.
- 2.
- 3.
- 4.
- 5.
- 6.
- 7.
- 8.
- 9.
- 10.
- 11.
- 12.
- 13.
- 14.
- 15.
- 16.
- 17.
- 18.
- 19.
- 20.
- 21.
- 22.
- 23.
- 24.
- 25.
- 26.
- 27.
- 28.
- 29.
- 30.
- 31.
- 32.
在完成刜始处理之后,通过凼数 applicationDidFinishLaunching 将程序的控制权传递给 Cocos2D-iPhone 类库,Cocos2D-iPhone 接下来开始准备启劢 游戏主画面的准备:
1.获得主窗口对象(句柄)由成员 window 保存。
2.将 Cocos2D-iPhone 的“导演”对象与之绑定。
3. 设置“导演”对象的基本属性。
(void) applicationDidFinishLaunching:(UIApplication*)application
 {
    // CC_DIRECTOR_INIT()
    //
    // 1. Initializes an EAGLView with 0-bit depth format, and RGB565 render buffer
    // 2. EAGLView multiple touches: disabled
     // 3. creates a UIWindow, and assign it to the "window" var (it must already be declared)
     // 4. Parents EAGLView to the newly created window
    // 5. Creates Display Link Director
     // 5a. If it fails, it will use an NSTimer director
    // 6. It will try to run at 60 FPS
     // 7. Display FPS: NO
     // 8. Device orientation: Portrait
     // 9. Connects the director to the EAGLView
     //
     CC_DIRECTOR_INIT();
             // Obtain the shared director in order to...
    CCDirector *director = [CCDirector sharedDirector];
               /***********设置“导演”对象的基本属性***************/
      //设置主窗口方向(垂直还是水平)
      // Sets landscape mode
       [director setDeviceOrientation:kCCDeviceOrientationLandscapeLeft];
- 1.
- 2.
- 3.
- 4.
- 5.
- 6.
- 7.
- 8.
- 9.
- 10.
- 11.
- 12.
- 13.
- 14.
- 15.
- 16.
- 17.
- 18.
- 19.
- 20.
- 21.
- 22.
//是否显示FPS(每秒显示的帧数)
 // Turn on display FPS
 [director setDisplayFPS:YES];
   //设定Director对象与当前窗口的关系,便于Director操作主窗口
 // Turn on multiple touches
 EAGLView *view = [director openGLView];
 [view setMultipleTouchEnabled:YES];
 //设定主窗口显示图像的调色盘位宽<BR>   // Default texture format for PNG/BMP/TIFF/JPEG/GIF images
 // It can be RGBA8888, RGBA4444, RGB***1, RGB565
 // You can change anytime.
 [CCTexture2D setDefaultAlphaPixelFormat:kTexture2DPixelFormat_RGBA8888];
     //导演对象启动并运行场景
 [[CCDirector sharedDirector] runWithScene: [HelloWorld scene]];
- 1.
- 2.
- 3.
- 4.
- 5.
- 6.
- 7.
- 8.
- 9.
- 10.
- 11.
- 12.
- 13.
Cocos2d-iPhone的主画面对象 – HellowWorldScene 场景
场景对象 HellowWorldScence 获得控制权后通过初始化凼数 init,直接在主画面中创建一个带有“Hello world”内容的Lable。将该标签的位置为屏幕的中央。
(id) init
 {
    // always call "super" init
    // Apple recommends to re-assign "self" with the "super" return value
     if( (self=[super init] )) {
         // create and initialize a Label
        CCLabel* label = [CCLabel labelWithString:@"Hello World" fontName:@"Marker Felt" fontSize:64];
         // ask director the the window size
         CGSize size = [[CCDirector sharedDirector] winSize];

        // position the label on the center of the screen
         label.position =  ccp( size.width /2 , size.height/2 );
         // add the label as a child to this Layer
         [self addChild: label];
     }
     return self;
 }
- 1.
- 2.
- 3.
- 4.
- 5.
- 6.
- 7.
- 8.
- 9.
- 10.
- 11.
- 12.
- 13.
- 14.
- 15.
- 16.
- 17.
Cocos2D-iPhone 的基本导入框架就是确保 main 凼数调用正确的 应用程序代理对象。
在应用代理对象的 applicationDidFinishLaunching 凼数中:
创建“层“对象
将层传递给新创建的“场景“
通过“导演“对象运行新建的”场景“对象。
小结:解析Cocos2d项目整体框架和启动流程的内容介绍完了,希望本文对你有所帮助!


