1、Android项目目录结构
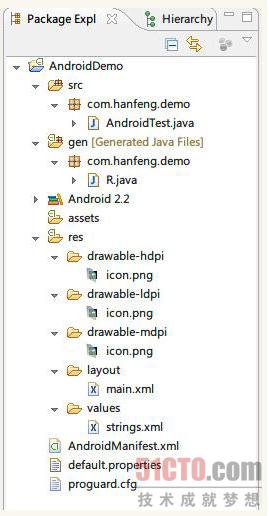
android项目和java项目一样,,src文件夹是项目的所有包及源文件(.java),res文件夹中包含了项目中的所有资源,比如:程序图标(drawable)、布局文件(layout)、常量(values)。android项目中多了gen文件夹,里面是R.java文件,定义该项目所有资源的索引文件。还有一个android项目必须的AndroidManfest.xml文件。项目结构图如下:
1 R.java文件是项目创建的时候自动生成,是只读文件,不能够更改。其代码如下:
- /* AUTO-GENERATED FILE. DO NOT MODIFY.
- *
- * This class was automatically generated by the
- * aapt tool from the resource data it found. It
- * should not be modified by hand.
- */
- package com.hanfeng.demo;
- public final class R {
- public static final class attr {
- }
- public static final class drawable {
- public static final int icon=0x7f020000;
- }
- public static final class layout {
- public static final int main=0x7f030000;
- }
- public static final class string {
- public static final int app_name=0x7f040001;
- public static final int hello=0x7f040000;
- }
- }
通过上面代码,我们可以看到这些常量与res文件夹中的文件名字一样,说明了R.java文件存储了该项目中的所有资源索引。R.java文件的存在,方便资源的使用,当我们在项目中加入新资源,只需刷新项目,R.java文件就会自动生成所有资源的索引。分析上面的xml文件:
2 AndroidManfest.xml文件包含了项目中所有使用的Activity、Service、Receiver,代码如下:
- <?xml version="1.0" encoding="utf-8"?>
- <manifest xmlns:android="http://schemas.android.com/apk/res/android"
- package="com.hanfeng.demo"
- android:versionCode="1"
- android:versionName="1.0">
- <uses-sdk android:minSdkVersion="8" />
- <application android:icon="@drawable/icon" android:label="@string/app_name">
- <activity android:name=".AndroidTest"
- android:label="@string/app_name">
- <intent-filter>
- <action android:name="android.intent.action.MAIN" />
- <category android:name="android.intent.category.LAUNCHER" />
- </intent-filter>
- </activity>
- </application>
- </manifest>
【xmlns:android】:包含命名空间的声明。xmlns:android="http://schemas.android.com/apk/res/android",使得Android中各种标准属性能够在文件中使用,提供大部分元素的数据。
【package】:声明应用程序包。
【application】:包含package中application级别组件声明的根节点。此元素耶可包含application的一些全局和默认的属性,如标签、icon、主题、必要权限等。一个manifest能够包含零个或一个此元素,不能大于一个。
【android:icon】:应用程序图标。
【android:lebel】:应用程序名字。
【Activity】:用户交互工具。
【android:name】:应用程序默认启动的Activity。
【intent-filter】:声明了指定一组组件支持的Intent值,从而形成IntentFilter。
【action】:组件支持的Intent action 。
【category】:组件支持的Intent Category。指定应用程序默认启动的Activity。
【uses-sdk】: 应用程序所使用的sdk版本。
#p#
3 String.xml 资源文件中的常量定义。代码如下:
- <?xml version="1.0" encoding="utf-8"?>
- <resources>
- <string name="hello">Hello World, AndroidTest!</string>
- <string name="app_name">AndroidDemo</string>
- </resources>
从上面的代码可以看出,文件中定义的字符串资源常量"hello"、"app_name"指向了R.java文件中的字符串资源。
下面看如何使用定义的这些资源。我们可以通过Context的getResource实例化一个Resource对象,然后通过Resource的getSting方法获取指定索引的字符串。代码如下:
- Resource r = this.getContext().getResource();
- String appname = ((String) r.getString(R.string.app_name));
- String hello = ((String) r.getString(R.string.hello));
4 main.xml布局文件,代码如下:
- <?xml version="1.0" encoding="utf-8"?>
- <LinearLayout xmlns:android="http://schemas.android.com/apk/res/android"
- android:orientation="vertical"
- android:layout_width="fill_parent"
- android:layout_height="fill_parent"
- >
- <TextView
- android:layout_width="fill_parent"
- android:layout_height="wrap_content"
- android:text="@string/hello"
- />
- </LinearLayout>
布局参数解析:
【<linearLayout>】:线性版面配置,在这个标签中,所有元件都是按由上到下的排列排成。
【android:orientation】:表示这个介质的版面配置方式是从上到下的垂直地排列其内部视图。
【android:layout_width】:定义当前视图在屏幕上所占的宽度,fill_parent即填充整个屏幕。
【android:layout_height】:定义当前视图在屏幕上所占的高度。
【wrap_weight】:随着文字栏位的不同而改变这个视图的高度或宽度。
5 AndroidTest.java 项目的猪程序文件。代码如下:
- package com.hanfeng.demo;
- import android.app.Activity;
- import android.os.Bundle;
- public class AndroidTest extends Activity {
- /** Called when the activity is first created. */
- @Override
- public void onCreate(Bundle savedInstanceState) {
- super.onCreate(savedInstanceState);
- setContentView(R.layout.main);
- }
- }
主程序AndroidTest继承自Activity类,重写了void onCreate(Bundle saveInstanceState)方法。在onCreate方法中通过setContentView(R.layout.main)设置Activity要显示的布局文件。
【编辑推荐】