Command在Mongodb中是一类特殊操作,它提供了强大的管理及各项操作(比如建库,索引,删除集合等)。可以说通过Command可以完成几乎所有想做的事情。同时Mongodb开发者在Command上又做了非常清晰体系架构和设计,便于管理和高效执行各种类型的Command。
今天就专门用一篇篇幅来着重介绍一下其Command的体系架构,并用例子来介绍mongod是如何将Command引入其中的。
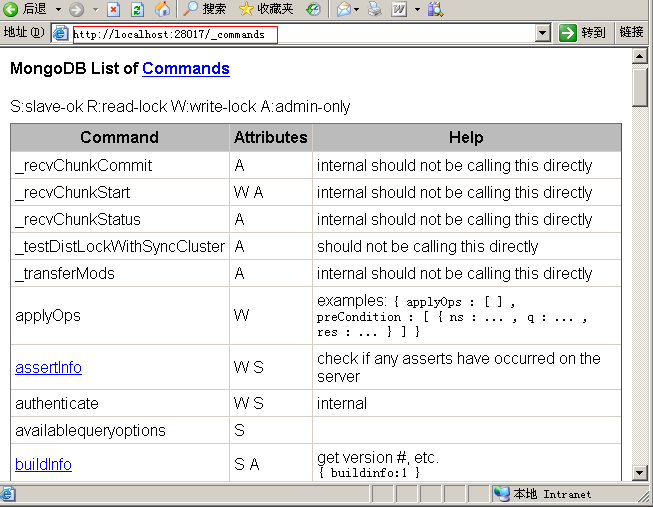
为了对其中大部分command对一个大致的了解,我们可以用下面指令来显示一个command列表:
- mongod --dbpath d:\mongodb\db --port 27017 --rest
- 在浏览器上输入链接地址:http://localhost:28017/_commands
这里mongod就会为我们显示command列表,大约有90多个,这是显示截图:
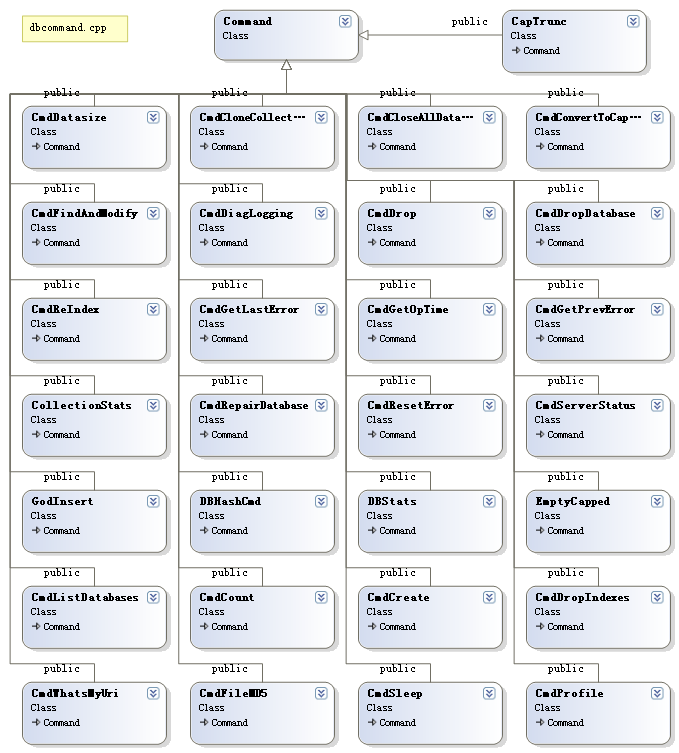
上面90多个类中,按其使用场景可以为分如下几类,分别是:
- dbcommand.cpp:一般数据库指令,如数据库,索引的创建,重建,打开/关闭等
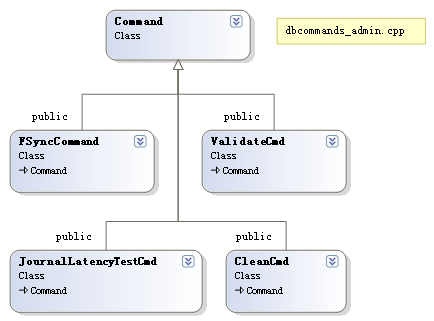
- dbcommands_admin.cpp:管理指令,如CleanCmd,JournalLatencyTestCmd,ValidateCmd,FSyncCommand
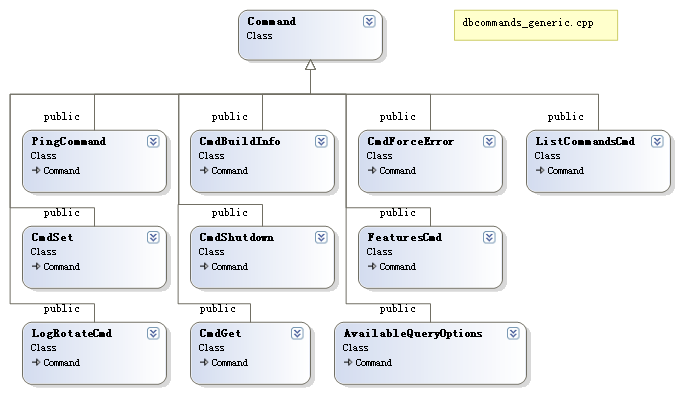
- dbcommands_generic.cpp:常用指令,ListCommandsCmd,LogRotateCmd,PingCommand,CmdSet,CmdGet等
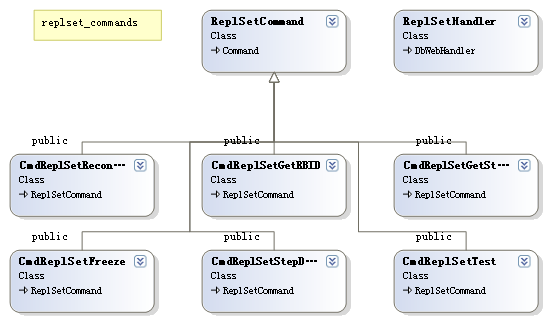
- replset_commands.cpp:复制集指令,CmdReplSetTest,CmdReplSetGetStatus,CmdReplSetReconfig等
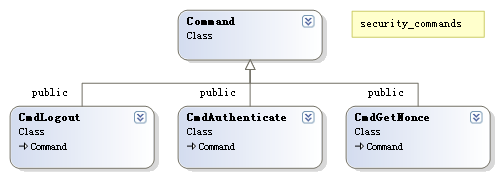
- security_commands.cpp:安全指令,CmdGetNonce,CmdLogout,CmdAuthenticate
- commands_admin.cpp:shard管理操作,因其位于mongos项目,这里暂不介绍
- commands_public.cpp:shard公用操作,因其位于mongos项目,这里暂不介绍
下面是相关类图:
-----------------------------分割线--------------------------------
-----------------------------分割线--------------------------------
-----------------------------分割线--------------------------------
-----------------------------分割线--------------------------------
#p#
首先我们看一下在Command的基类,其用于定义子类要实现的方法及属性,自身也实现了一些通用方法,比如htmlHelp(用于以html方法显示该command的帮助信息),构造方法,findCommand(查询命令)等,其声明如下:
- //commands.h
- class Command {
- public:
- //执行当前Command时所使用的锁类型
- enum LockType { READ = -1/*读*/ , NONE = 0 /*无锁*/, WRITE = 1 /*写*/};
- const string name;
- /* 运行指定的命令,需要子类实现
- fromRepl - command is being invoked as part of replication syncing. In this situation you
- normally do not want to log the command to the local oplog.
- 如执行成功返回true,否则为false, errmsg记录错误信息
- */
- virtual bool run(const string& db, BSONObj& cmdObj, string& errmsg, BSONObjBuilder& result, bool fromRepl) = 0;
- /*
- note: logTheTop() MUST be false if READ
- if NONE, can't use Client::Context setup
- use with caution
- */
- virtual LockType locktype() const = 0;
- /* 是否有管理特权才可运行该命令 has privileges to run this command. */
- virtual bool adminOnly() const {
- return false;
- }
- //html格式的帮助信息
- void htmlHelp(stringstream&) const;
- /* 与adminOnly相似,但更严格: 要么被验证,要么只运行在本地接口(local interface)
- 注:当本属性为true时,adminOnly()也必须为true.
- */
- virtual bool localHostOnlyIfNoAuth(const BSONObj& cmdObj) { return false; }
- /* 如果replication pair 的slaves可以运行命令的,则返回true
- (the command directly from a client -- if fromRepl, always allowed).
- */
- virtual bool slaveOk() const = 0;
- /* 通过在查询命令中打开 'slaveok'选项,客户端强制在一个slave上运行一个命令时,返回true.
- */
- virtual bool slaveOverrideOk() {
- return false;
- }
- /* Override and return true to if true,log the operation (logOp()) to the replication log.
- (not done if fromRepl of course)
- Note if run() returns false, we do NOT log.
- */
- virtual bool logTheOp() { return false; }
- virtual void help( stringstream& help ) const;
- /* Return true if authentication and security applies to the commands. Some commands
- (e.g., getnonce, authenticate) can be done by anyone even unauthorized.
- */
- virtual bool requiresAuth() { return true; }
- /** @param webUI:在web上暴露当前command,形如 localhost:28017/<name>
- @param oldName: 旧选项,表示当前command的旧(已弃用)名称
- */
- Command(const char *_name, bool webUI = false, const char *oldName = 0);
- virtual ~Command() {}
- protected:
- BSONObj getQuery( const BSONObj& cmdObj ) {
- if ( cmdObj["query"].type() == Object )
- return cmdObj["query"].embeddedObject();
- if ( cmdObj["q"].type() == Object )
- return cmdObj["q"].embeddedObject();
- return BSONObj();
- }
- static void logIfSlow( const Timer& cmdTimer, const string& msg);
- //command map,其包含系统实现的所有command对象,以便findCommand查询时使用
- //注意也包含该command的旧名称(构造方法中的oldName参数)所对应的对象,
- static map<string,Command*> * _commands;
- //与上面形同,但不含旧名称的command map
- static map<string,Command*> * _commandsByBestName;
- //将web类型的command放到该map中
- static map<string,Command*> * _webCommands;
- public:
- static const map<string,Command*>* commandsByBestName() { return _commandsByBestName; }
- static const map<string,Command*>* webCommands() { return _webCommands; }
- /** @return 返回是否找到或已执行command */
- static bool runAgainstRegistered(const char *ns, BSONObj& jsobj, BSONObjBuilder& anObjBuilder);
- static LockType locktype( const string& name );
- //根据命令名称在集合中找到相应Command对象
- static Command * findCommand( const string& name );
- };
Command基类中提供了几个map<string,Command*>类型的集合map,用于将系统实现的Command进行收集,以便后面findCommand进行便历查询时使用。如下:
- //commands.cpp
- Command* Command::findCommand( const string& name ) {
- //从_commands map中找到指定name的Command对象
- map<string,Command*>::iterator i = _commands->find( name );
- if ( i == _commands->end() )//如果已到结尾,表示未找到
- return 0;
- return i->second;//返回Command对象
- }
看到上面代码中的_commands大家可能要问,该map是如何初始化并将系统实现的各个Command注册到其中呢?答案就在Command的构造方法中,如下:
- //command.cpp
- Command::Command(const char *_name, bool web, const char *oldName) : name(_name) {
- // register ourself.
- //如为空(系统刚启动时)则实例化_commands
- if ( _commands == 0 )
- _commands = new map<string,Command*>;
- //如为空(系统刚启动时)则实例化_commandsByBestName
- if( _commandsByBestName == 0 )
- _commandsByBestName = new map<string,Command*>;
- Command*& c = (*_commands)[name];//获取指定名称的command对象
- if ( c )//如有,表示之前已注册了该command
- log() << "warning: 2 commands with name: " << _name << endl;
- //将当前command(this)赋值到map中相应name的command上
- c = this;
- //绑定到_commandsByBestName中的相应name上
- (*_commandsByBestName)[name] = this;
- //如果命令支持web方式
- if( web ) {
- //如为空(系统刚启动时)则实例化_webCommands
- if( _webCommands == 0 )
- _webCommands = new map<string,Command*>;
- //绑定到_webCommands中的相应name上
- (*_webCommands)[name] = this;
- }
- //如有旧名称,则也绑到_commands的oldName所指向的command
- if( oldName )
- (*_commands)[oldName] = this;
- }
有了这些还不够,我们还要从90多个command子类中找出一个来实际分析其实现的方式,这里以最经常使用的count(获取指定条件的记录数)来分析其向map中注册command的流程,参见下面代码段:
- //dbcommands.cpp
- /* select count(*) */
- class CmdCount : public Command {
- public:
- virtual LockType locktype() const { return READ; }
- //调用基类的构造方法
- CmdCount() : Command("count") { }
- virtual bool logTheOp() {
- return false;
- }
- virtual bool slaveOk() const {
- // ok on --slave setups, not ok for nonmaster of a repl pair (unless override)
- return replSettings.slave == SimpleSlave;
- }
- virtual bool slaveOverrideOk() {
- return true;
- }
- virtual bool adminOnly() const {
- return false;
- }
- virtual void help( stringstream& help ) const { help << "count objects in collection"; }
- virtual bool run(const string& dbname, BSONObj& cmdObj, string& errmsg, BSONObjBuilder& result, bool) {
- string ns = dbname + '.' + cmdObj.firstElement().valuestr();
- string err;
- long long n = runCount(ns.c_str(), cmdObj, err);//执行查询
- long long nn = n;
- bool ok = true;
- if ( n == -1 ) {
- nn = 0;
- result.appendBool( "missing" , true );
- }
- else if ( n < 0 ) {
- nn = 0;
- ok = false;
- if ( !err.empty() )
- errmsg = err;
- }
- result.append("n", (double) nn);
- return ok;
- }
- } cmdCount;
上面的CmdCount类即是在命令行模式下使用count指令时对应的代码块,其自身的构造函数就直接调用了基类(Command)的构造方法。但这里只是定义了还不够,还需要一个定义类实例代码(用于启动构造函数),而这个任务就交给了该类定义的代码结尾处的下面代码来实现了:
- } cmdCount;
可以看到,这里使用的是在类声明后定义对象的方式来执行构造方法(这时并未使用new实例化方式来创建对象指针),进而注册该command到map。当然继承自Command的子类必须要实现其中的run()方法,因为只有它是具体command要执行的具体逻辑(可参见上面CmdCount的具体实现)。
到这里只能说mongod在系统启动到实始化了相应的Command集合map信息,但mongod是如何将client发来的操作请求进行转换并进而执行相应的command指令的呢?我们接下来继续分析。
之前看过我的这篇文章的朋友可能还有印象,在mongod启动之后,会循环侦听指向端口上的用户(client)请求,这些请求在mongod中被改装成了message在各个功能类中传递。当用户发送一个count指令操作时,其会在query.cpp中执行下面方法(以count查询指令的执行流程为例来进行分析):
- //query.cpp
- const char *runQuery(Message& m, QueryMessage& q, CurOp& curop, Message &result) {
- StringBuilder& ss = curop.debug().str;
- //构造ParsedQuery查询对象,该对象包括查询记录数字,以及记录跳转偏移量等信息,
- //这些值会在访问磁盘查询时使用,用法参见:query.cpp 662行的virtual void _init()方法
- shared_ptr<ParsedQuery> pq_shared( new ParsedQuery(q) );
- ParsedQuery& pq( *pq_shared );
- ......
- //对查询命令判断,指令形如abc.$cmd.findOne( { ismaster:1 } )
- if ( pq.couldBeCommand() ) {//_ns中包括$cmd字符串
- BufBuilder bb;
- bb.skip(sizeof(QueryResult));
- BSONObjBuilder cmdResBuf;
- //对查询权限判断,并执行相应查询指令
- if ( runCommands(ns, jsobj, curop, bb, cmdResBuf, false, queryOptions) ) {
- ss << " command: ";
- jsobj.toString( ss );
- curop.markCommand();
- auto_ptr< QueryResult > qr;
- qr.reset( (QueryResult *) bb.buf() );
- bb.decouple();
- qr->setResultFlagsToOk();
- qr->len = bb.len();
- ss << " reslen:" << bb.len();
- qr->setOperation(opReply);
- qr->cursorId = 0;
- qr->startingFrom = 0;
- qr->nReturned = 1;
- result.setData( qr.release(), true );//设置返回结果
- }
- else {
- uasserted(13530, "bad or malformed command request?");
- }
- return 0;
- }
- .....
- }
上面代码对传递来的查询消息QueryMessage进行分析之后,如果发现其为command时,执行runCommands方法:
- //query.cpp
- bool runCommands(const char *ns, BSONObj& jsobj, CurOp& curop, BufBuilder &b, BSONObjBuilder& anObjBuilder, bool fromRepl, int queryOptions) {
- try {
- return _runCommands(ns, jsobj, b, anObjBuilder, fromRepl, queryOptions);
- }
- catch ( AssertionException& e ) {
- e.getInfo().append( anObjBuilder , "assertion" , "assertionCode" );
- }
- curop.debug().str << " assertion ";
- anObjBuilder.append("errmsg", "db assertion failure");
- anObjBuilder.append("ok", 0.0);
- BSONObj x = anObjBuilder.done();
- b.appendBuf((void*) x.objdata(), x.objsize());
- return true;
- }
接着其会执行dbcommands.cpp中的_runCommands()方法
- //dbcommands.cpp
- bool _runCommands(const char *ns, BSONObj& _cmdobj, BufBuilder &b, BSONObjBuilder& anObjBuilder, bool fromRepl, int queryOptions) {
- cc().curop()->ensureStarted();
- string dbname = nsToDatabase( ns );
- if( logLevel >= 1 )
- log() << "run command " << ns << ' ' << _cmdobj << endl;
- const char *p = strchr(ns, '.');
- if ( !p ) return false;
- //再次进行cmd判断,以确定是command
- if ( strcmp(p, ".$cmd") != 0 ) return false;
- BSONObj jsobj;
- {
- BSONElement e = _cmdobj.firstElement();
- if ( e.type() == Object && string("query") == e.fieldName() ) {
- jsobj = e.embeddedObject();
- }
- else {
- jsobj = _cmdobj;
- }
- }
- Client& client = cc();
- bool ok = false;
- BSONElement e = jsobj.firstElement();
- //根据command名称从map中找出相应的command对象
- Command * c = e.type() ? Command::findCommand( e.fieldName() ) : 0;
- if ( c ) {
- //执行该对象
- ok = execCommand( c , client , queryOptions , ns , jsobj , anObjBuilder , fromRepl );
- }
- else {
- anObjBuilder.append("errmsg", str::stream() << "no such cmd: " << e.fieldName() );
- anObjBuilder.append("bad cmd" , _cmdobj );
- }
- // switch to bool, but wait a bit longer before switching?
- // anObjBuilder.append("ok", ok);
- anObjBuilder.append("ok", ok?1.0:0.0);
- BSONObj x = anObjBuilder.done();
- b.appendBuf((void*) x.objdata(), x.objsize());
- return true;
上面代码主要是从map中找出相应的command对象,并将该对象及操作命令参数和client(用于获取其中的认证信息,以确定其执行权限)作为参数,来调用 execCommand方法:
- //dbcommands.cpp
- bool execCommand( Command * c ,
- Client& client , int queryOptions ,
- const char *cmdns, BSONObj& cmdObj ,
- BSONObjBuilder& result /*返回command执行结果*/,
- bool fromRepl ) {
- string dbname = nsToDatabase( cmdns );
- AuthenticationInfo *ai = client.getAuthenticationInfo();
- if( c->adminOnly() /*如果需要有管理特权开可运行*/
- && c->localHostOnlyIfNoAuth( cmdObj ) /*要么被验证,要么只运行在本地接口*/
- && noauth && !ai->isLocalHost ) {//未认证 且 不是在本地运行
- result.append( "errmsg" ,
- "unauthorized: this command must run from localhost when running db without auth" );
- log() << "command denied: " << cmdObj.toString() << endl;
- return false;
- }
- if ( c->adminOnly() && ! fromRepl && dbname != "admin" ) {
- result.append( "errmsg" , "access denied; use admin db" );
- log() << "command denied: " << cmdObj.toString() << endl;
- return false;
- }
- if ( cmdObj["help"].trueValue() ) {
- stringstream ss;
- ss << "help for: " << c->name << " ";
- c->help( ss );
- result.append( "help" , ss.str() );
- result.append( "lockType" , c->locktype() );
- return true;
- }
- bool canRunHere =
- isMaster( dbname.c_str() ) /*如为master库*/||
- c->slaveOk() /*如果replication pair 的slaves可以运行命令*/||
- ( c->slaveOverrideOk() && ( queryOptions & QueryOption_SlaveOk ) ) ||
- fromRepl;
- if ( ! canRunHere ) {
- result.append( "errmsg" , "not master" );
- return false;
- }
- if ( c->adminOnly() )
- log( 2 ) << "command: " << cmdObj << endl;
- //如当前command无须锁时
- if ( c->locktype() == Command::NONE ) {
- // we also trust that this won't crash
- string errmsg;
- //运行当前command
- int ok = c->run( dbname , cmdObj , errmsg , result , fromRepl );
- if ( ! ok )
- result.append( "errmsg" , errmsg );
- return ok;
- }
- //判断执行当前command是否需要'写锁'(每个command子类都有该属性),枚举定义如下(command.h):
- //enum LockType { READ = -1/*读*/ , NONE = 0 /*无锁*/, WRITE = 1 /*写*/};
- bool needWriteLock = c->locktype() == Command::WRITE;
- if ( ! needWriteLock ) {
- assert( ! c->logTheOp() );
- }
- mongolock lk( needWriteLock );//声明锁对象
- Client::Context ctx( dbname , dbpath , &lk , c->requiresAuth() );
- try {
- string errmsg;
- //运行当前command(本文中提到的count命令)
- if ( ! c->run(dbname, cmdObj, errmsg, result, fromRepl ) ) {
- result.append( "errmsg" , errmsg );
- return false;
- }
- }
- catch ( DBException& e ) {
- stringstream ss;
- ss << "exception: " << e.what();
- result.append( "errmsg" , ss.str() );
- result.append( "code" , e.getCode() );
- return false;
- }
- if ( c->logTheOp() && ! fromRepl ) {
- logOp("c", cmdns, cmdObj);
- }
- return true;
- }
到这里,流程基本就执行完毕了,之后它会将结果传给result(其传参为引用类型,即:"& result"方式).
#p#
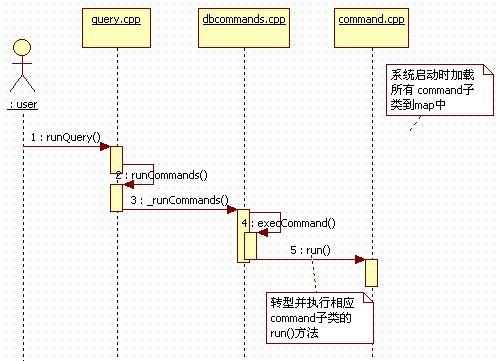
***用一张时间序来大体回顾一下这***程:
好了,今天的内容到这里就告一段落了。
参考链接:
http://www.mongodb.org/display/DOCS/Commands
http://www.10gen.com/reference
原文链接:http://www.cnblogs.com/daizhj/archive/2011/04/29/mongos_command_source_code.html
【编辑推荐】
- Mongodb源码分析--内存文件映射(MMAP)
- 走进MongoDB的世界 展开MongoDB的学习之旅
- 浅析Mongodb源码之游标Cursor
- 野心勃勃的NoSQL新贵 MongoDB应用实战
- MongoDB与CouchDB全方位对比


