


新手入门Nagios的安装
Nagios 安装
1.下载源软件
主要文件:
nagios-3.0.4.tar.gz
nagios-plugins-1.4.13.tar.gz
httpd-2.0.63.tar.gz
2.nagios 服务器端安装
(1)操作系统环境:
redhat AS5 64bit update5 kernel:2.6.9.55
- 1.
- 2.
(2) 安装步骤
  [root@wxserver2 nagios-3.0.4]# useradd nagios

  [root@wxserver2 nagios-3.0.4]# mkdir /usr/local/nagios

  [root@wxserver2 nagios-3.0.4]# chown nagios.nagios /usr/local/nagios

  tar zxvf nagios-3.0.4.tar.gz

  cd nagios-3.0.4

  ./configure –prefix=/usr/local/nagios

  make all

  make install

  make install-config

  make install-config

  ls /usr/local/nagios
- 1.
- 2.
- 3.
- 4.
- 5.
- 6.
- 7.
- 8.
- 9.
- 10.
- 11.
- 12.
- 13.
- 14.
- 15.
- 16.
- 17.
- 18.
- 19.
- 20.
- 21.
- 22.
  /usr/bin/htpasswd -c /usr/local/nagios/etc/htpasswd.users nagios

  New password:

  Re-type new password:

  Adding password for user nagios

  将nagios的信息加到apache中,打开/etc/httpd/conf/httpd.conf文件,在文件***添加如下代码:

  [table=95%,#f1f1f1][tr][td]ScriptAlias /nagios/cgi-bin /usr/local/nagios/sbin

  Options ExecCGI

  AllowOverride None

  Order allow,deny

  Allow from all

  AuthName "Nagios Access"

  AuthType Basic

  AuthUserFile /usr/local/nagios/etc/htpasswd.users

  Require valid-user

  Alias /nagios /usr/local/nagios/share

  Options None

  AllowOverride None

  Order allow,deny

  Allow from all

  AuthName "Nagios Access"

  AuthType Basic

  AuthUserFile /usr/local/nagios/etc/htpasswd.users

  Require valid-user

  [/td][/tr][/table]
- 1.
- 2.
- 3.
- 4.
- 5.
- 6.
- 7.
- 8.
- 9.
- 10.
- 11.
- 12.
- 13.
- 14.
- 15.
- 16.
- 17.
- 18.
- 19.
- 20.
- 21.
- 22.
- 23.
- 24.
- 25.
- 26.
- 27.
- 28.
- 29.
- 30.
- 31.
- 32.
- 33.
- 34.
- 35.
- 36.
- 37.
- 38.
- 39.
- 40.
- 41.
- 42.
- 43.
- 44.
- 45.
- 46.
- 47.
- 48.
至此,nagios的WEB配置部分完成。
安装Nagios插件:
  tar nagios-plugins-1.4.13

  cd nagios-plugins-1.4.13

  ./configure –prefix=/usr/local/nagios ###此步是指您的nagios的安装目录。

  make;make install
- 1.
- 2.
- 3.
- 4.
- 5.
- 6.
- 7.
- 8.
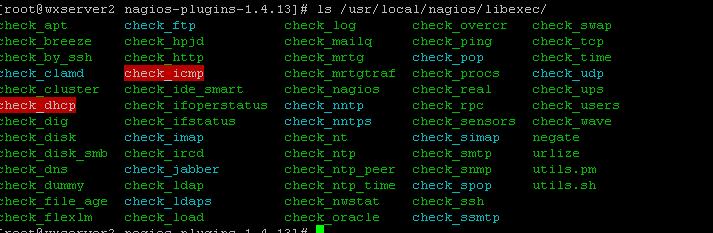
检查一下:
ls /usr/local/nagios/libexec
- 1.
- 2.
测试:
  ./check_icmp -H www.baidu.com

  OK - www.baidu.com: rta 33.632ms, lost 0%|rta=33.632ms;200.000;500.000;0; pl=0%;40;80;;
- 1.
- 2.
- 3.
- 4.
至此,插件安装完成,下面要修改配置文件:
由于我用的是3系列的版本,和网上田老师和loesprite.cublog.cn作者介绍的都是版本2的,不太一样,主要就是配置文件的目录有一点点区别,其他的配置都一样。
1.Nagios.cfg 文件,这是nagios的主要配置文件:
我修改以下内容:
  cfg_file=/usr/local/nagios/etc/objects/windows.cfg #将此行启用,前面的注释符号去掉。因为我要监控的服务器都是WINDOWS平台的。

  check_external_commands=0为check_external_commands=1
- 1.
- 2.
- 3.
这行的作用是允许在web界面下执行重启nagios、停止主机/服务检查等操作。版本3的,默认选项即可。
把command_check_interval的值从默认的1改成command_check_interval=10s(根据自己的情况定这个命令检查时间间隔,不要太长也不要太短)。为了测试需要,时间短些可以看到效果,要不等报警的邮件等的时间太长了。
2.Cgi.cfg文件:
  authorized_for_system_information=nagiosadmin,nagios

  authorized_for_configuration_information=nagiosadmin,nagios

  authorized_for_system_commands=nagios //多个用户之间用逗号隔开

  authorized_for_all_services=nagiosadmin,nagios

  authorized_for_all_hosts=nagiosadmin,nagios

  authorized_for_all_service_commands=nagiosadmin,nagios

  authorized_for_all_host_commands=nagiosadmin,nagios
- 1.
- 2.
- 3.
- 4.
- 5.
- 6.
- 7.
- 8.
- 9.
- 10.
- 11.
- 12.
- 13.
- 14.
##nagios 这个用户是之前用/usr/local/apache/bin/htpasswd –c /usr/local/nagios/etc/htpasswd nagios 所生成的,这个要注意,不能随便加没有存在的验证用户,为了安全起见,不要添加过多的验证用户
  [root@wxserver2 objects]# /usr/local/nagios/bin/nagios -v /usr/local/nagios/etc/nagios.cfg

  [root@wxserver2 objects]# /usr/local/nagios/bin/nagios -d /usr/local/nagios/etc/nagios.cfg
- 1.
- 2.
- 3.
- 4.
- 5.
启动发现,启动异常
查看share/nagios.log 文件,发现错误如下:
  [1224570550] Error: Could not create external command file '/usr/local/nagios/var/rw/nagios.cmd' as named pipe: (2) -> No such file or directory. If this file already exists and you are sure that another copy of Nagios is not running, you should delete this file.

  [1224570550] Bailing out due to errors encountered while trying to initialize the external command file... (PID=20619)

  mkdir rw

  chown nagios.nagios rw

  [1224570746] Error: Cannot open main configuration file '/usr/local/nagios/var/d' for reading!

  Mkdir d

  Chown nagios.nagios d
- 1.
- 2.
- 3.
- 4.
- 5.
- 6.
- 7.
- 8.
- 9.
- 10.
- 11.
- 12.
- 13.
- 14.
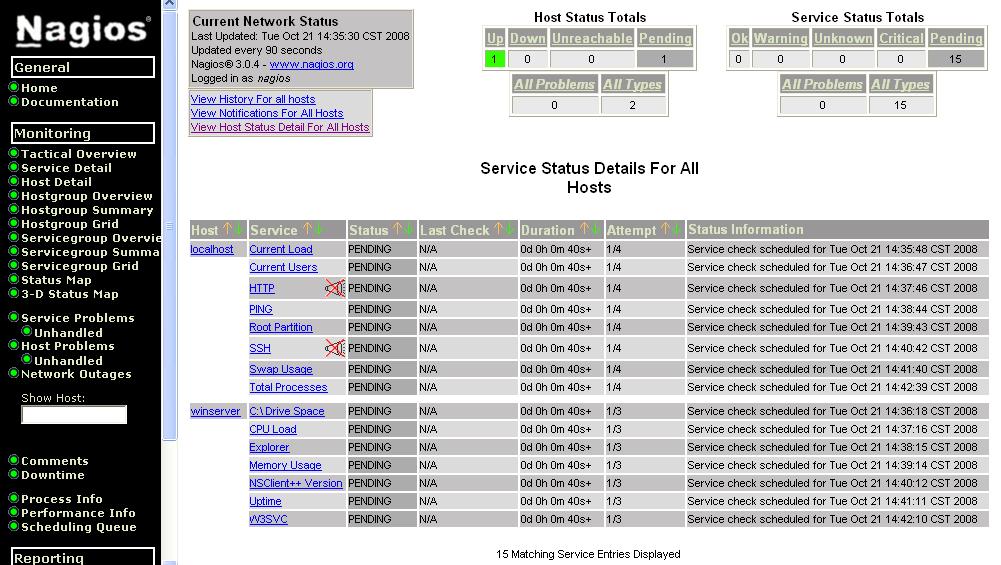
至此,nagios 可以暂时简陋的启动,可以看一下他的运行情况及状态。其他的进一步去设置:
需要过几分钟才能看到相关的状态信息。
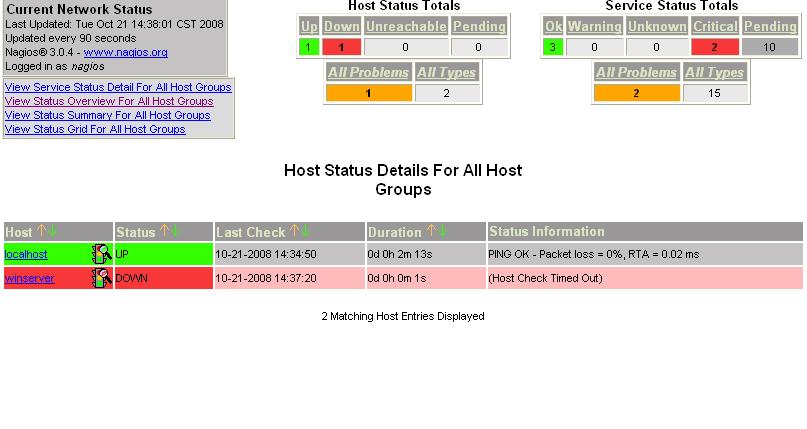
此服务器做的别用处,SENDMAIL我早就关掉了。现在不能正常启动,发送邮件的情况可能看不到了。
【编辑推荐】


