以前很少用RelativeLayout,但是这次笔者的项目用到了RelativeLayout。用起来才发现RelativeLayout太灵活了。很容易给人造成一些错误。
51CTO推荐专题:Mobile Widget
下面谈谈笔者的看法。
引用
- From Tutorials:
- If you find yourself using several nested LinearLayout groups, you may be able toreplace them with a single RelativeLayout
以上来自Tutorials,笔者理解的观点是,当有过个ViewGroup嵌套的时候,再去考虑用RelativeLayout,笔者觉得既然官方这么写,很程度是因为,RelativeLayout太灵活了,它的灵活性给我们对UI的控制多少回造成一定影响。
曾经有人跟笔者说过,RelativeLayout跟FrameLayout有一些相似,给人的感觉是分层的。有层的这个概念。
笔者觉得不是这样的,是没有层的概念的。从官方的解释上可以看出这东西就是可以设置相对布局的一个布局而已。没有层的概念。
先上段代码,更直观的看看。
Java代码
- <?xml version="1.0" encoding="utf-8"?>
- <RelativeLayout
- xmlns:android="http://schemas.android.com/apk/res/android"
- android:layout_width="fill_parent"
- android:layout_height="fill_parent"
- android:background="#CCFFFF">
- <LinearLayout
- android:id="@+id/linearLayout"
- android:layout_width="fill_parent"
- android:layout_height="200dp"
- android:background="#32000033"
- android:orientation="vertical">
- <Button
- android:id="@+id/button1"
- android:layout_width="fill_parent"
- android:layout_height="wrap_content"
- android:background="#FF3300"
- android:text="Button" />
- <TextView
- android:id="@+id/textView"
- android:layout_width="fill_parent"
- android:layout_height="wrap_content"
- android:layout_weight="1"
- android:text="Base"
- android:textColor="#6633FF"
- android:gravity="center" />
- <Button
- android:id="@+id/button2"
- android:layout_width="fill_parent"
- android:layout_height="wrap_content"
- android:background="#FF3300"
- android:text="Button" />
- </LinearLayout>
- <Button
- android:id="@+id/button3"
- android:layout_width="100dp"
- android:layout_height="50dp"
- android:layout_centerInParent="true"
- android:layout_alignBottom="@id/linearLayout"
- android:text="button" />
- </RelativeLayout>
只贴xml,activity没什么东西,就显示一下罢了。
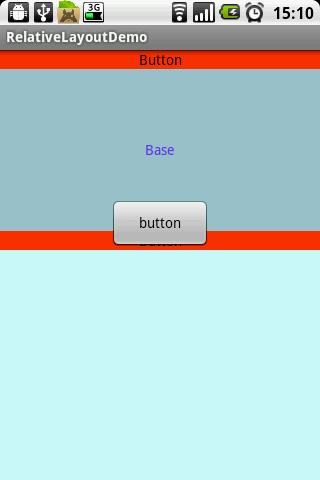
运行效果图

很明显可以看出button3的下边缘是跟lineLayout的下边缘在一条水平线上的。
Java代码
- android:layout_alignBottom="@id/button1"
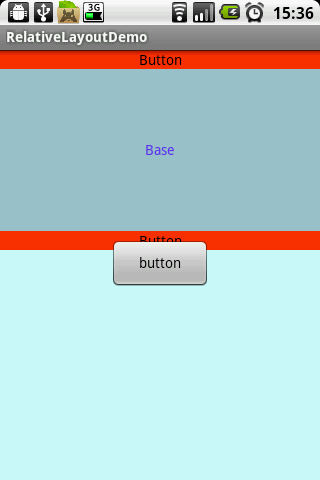
但是当像上面一样设置的时候,我们可能会是想让button3的下边缘跟button1的下边缘在一个水平线,但是这些写的效果却不是按我们所想的显示,如此设置根本不起作用。

这其中的原因,笔者是这样认为的,首先,linearLayout,Button这些组件都是在android.widget这个包中的。他们是同一级别的。只是说linearLayout是一个ViewGroup可以再包含其他的View而已。不存在其他的优先级关系。
所以,笔者的理解是,如果Button3这个控件要同其他控件产生相互关系的话,首先他们是要位于同一级别的。(此处说的级别不是说组件级别,而是在xml文件里面设置的级别,如:linearLayout和button3是一级的话,那button2,textView,button3既是二级)
只有同一级别的才能设置关系,否则的话设置相互之间的位置关系就不会起作用。
这就是笔者的理解,根本不存在层的概念。
【编辑推荐】


