本文为日文文献《Eclipse 3.4 対応 Eclipse 3.4 プラグイン開発 徹底攻略》第二部分的译文,在前文中给各位午饭奉献了《Eclipse插件***攻略:基本概念介绍》,在这个部分里我们将讲一下“Eclipse插件开发安装实例”。
51CTO推荐专题:Eclipse平台应用与开发详解
1.生成插件工程
通过选择[文件]->[新建]->[工程...]启动[新工程(New Project)]向导。在插件开发的时候我们就不能选择通常的java工程了,要选择新建一个插件工程。
选择[插件工程(Plug-in Project)]后点击[下一步(Next)](图2-1)。下一步,输入一个适当的项目名(图2-2)。习惯上项目名和插件的ID是相同的。插件ID和java包的命名方式相同,必须一个世界范围***的名称。在这里用cn.sf.amateras.sample作为项目名称(=插件ID)。点击[下一步(Next)]。
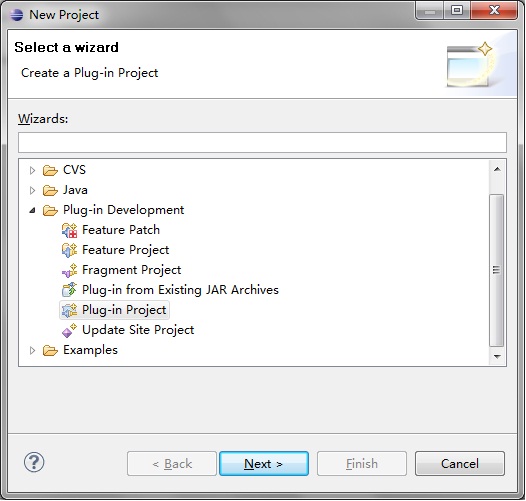
图2-1 生成插件工程
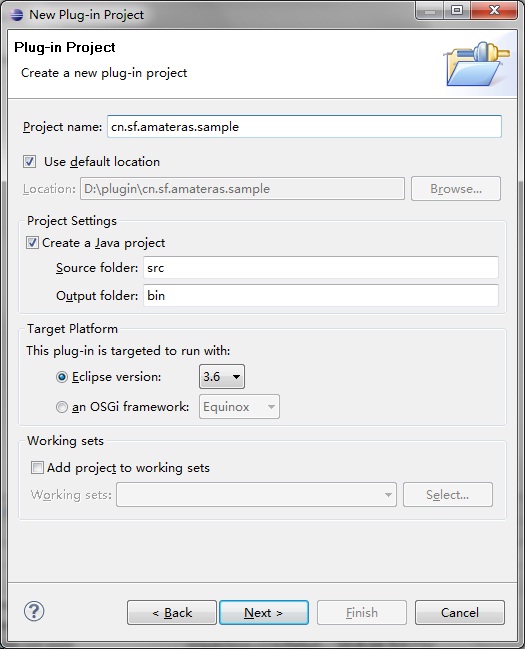
图2-2 输入插件信息
输入[插件ID]、[插件版本]、[插件属性(插件作者)](图2-3)等信息。[插件ID]会被自动设成之前输入的[工程名]。没有其他特别的设定的话继续点击[下一步(Next)]。
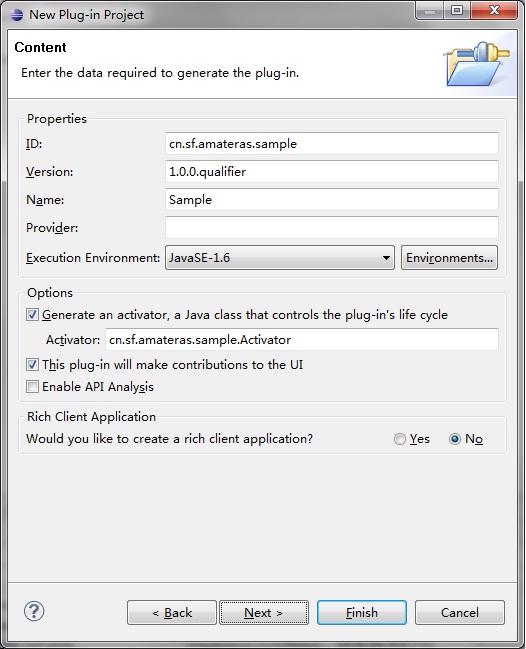
图2-3 输入生成工程必要的信息
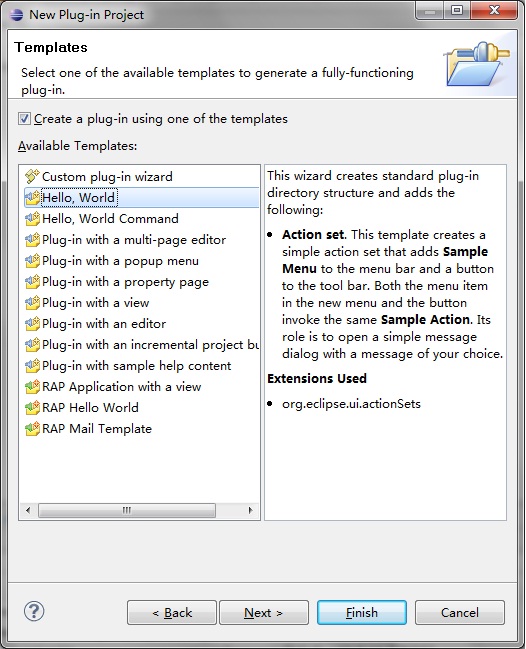
图2-4 模板选择
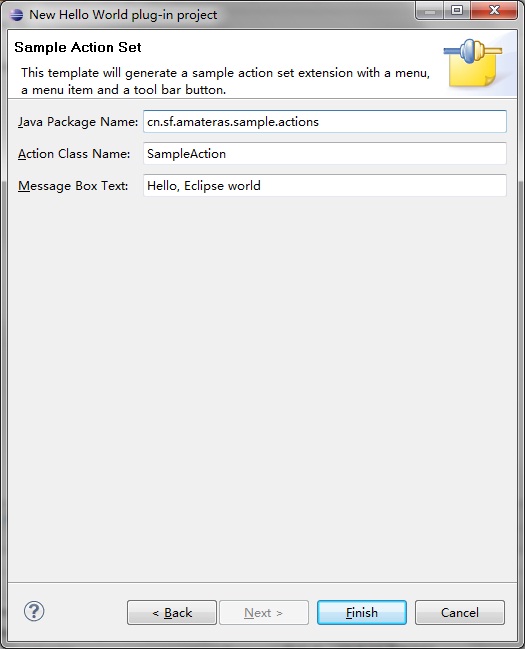
图2-5 输入模板信息
根据选择的模板生成的插件在(图2-5)的画面可以修改一些信息。如果没有特别需要设定的地方点击[完成(Finish)],生成工程。
PDE透视图
插件工程生成后,就会切换到PDE(插件开发)透视图。工程此时根据选择的[Hello,World]模板生成了插件的源代码,并且打开了manifest编辑器。
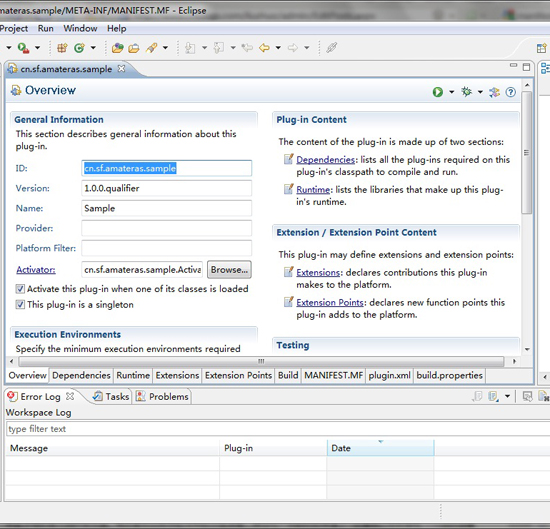
图2-6 PDE(插件开发)透视图
#p#
2. 插件的动作
接下来我们看一下插件的动作。manifest编辑器的[概要]页面右侧[启动Eclipse应用(Luanch an Eclipse application)](图2-7)。点击后,会启用一个新的Eclipse实例。这个新的实例被称为[运行时工作台]。运行工作台可以以嵌入当前正在开发的插件的状态启动,以使开发者可以对插件的动作进行确认。
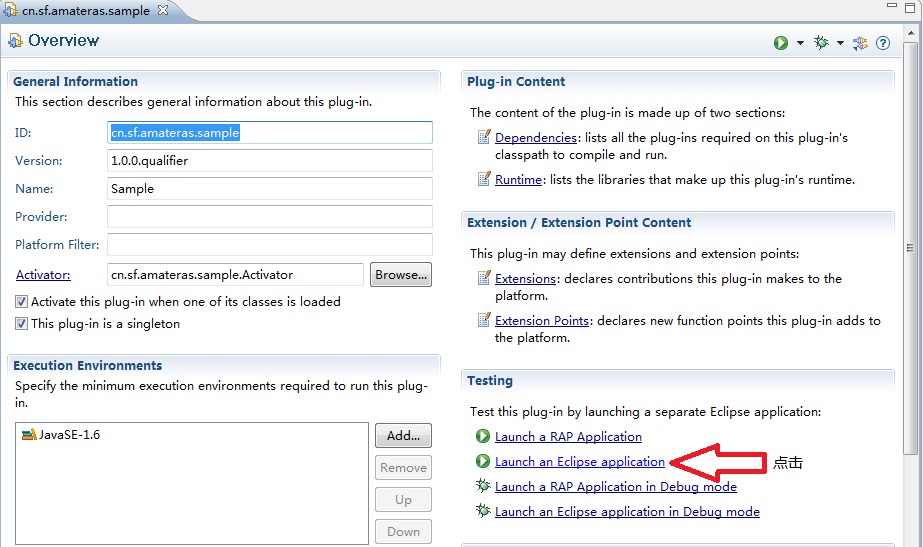
图2-7 启动运行时工作台
启动的运行时工作台,会在菜单栏上增加一个新的菜单项。这个菜单项就是插件的代码追加上去的。在工具栏上也增加了一个相应的按钮。
工具栏上的按钮和菜单项目效果相同,都会出现一个[Hello,Eclipse World]的对话框。
Eclipse版的Hello World就完成了。确认完这些动作后,就可以关闭当前的运行时工作台了。
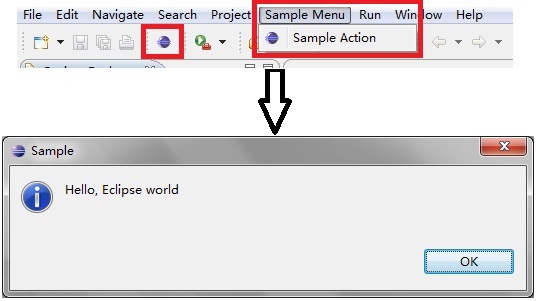
图2-8 示例中新增的菜单项和工具栏按钮以及相应的动作
MANIFEST.MF和plugin.xml
一个插件包含MANIFEST.MF和plugin.xml两个配置文件。MANIFEST.MF是OSGi的handler配置文件,记录了插件ID、名称、作者、和其他插件的依赖关系等。plugin.xml记录了插件的扩展和扩展点的定义等信息。
Eclipse3.1以前由于还没有采用OSGi技术,插件的所有信息都记录在plugin.xml里。所以应用在Eclipse3.1以前版本的插件如果要应用于Eclipse3.1和以后版本时要注意遵守OSGi的配置文件定义规范。
#p#
3. PDE的功能
PDE(插件开发环境·Plugin Development Enviromment)提供了插件开发的各种功能。因为插件的开发使用java语言,所以也会使用到java编码工具JDT。
Manifest编辑器
PDE提供的功能中最重要的就是Manifest编辑器。编辑器可以为插件的两个配置文件提供图形化的编辑功能。
编辑器的配置项目非常多,可以通过编辑器下面的tab页切换设定画面。

图2-9 Manifest编辑器
表1 Manifest编辑器各tab页
| 页面 | 说明 |
| Overview | 可以设定插件的概要信息。生成用于发布的文档以及启动运行时工作台。 |
| Dependencies | 设定插件间的依赖关系。 |
| Runtime | 可以设置导出包和ClassPath。 |
| Extensions | 管理当前插件对扩展点的扩展。 |
| Extension Points | 管理当前插件的扩展点。 |
| Build | 生成工程时的各种设定。 |
| MANIFEST.MF | 显示MANIFEST.MF的源代码 |
| plugin.xml | 显示plugin.xml的源代码 |
| build.properties | 显示build.properties的源代码 |
在Overview以外的tab页上部会显示一些快捷键按钮,使用这些按钮也可以进行启动运行时工作台,导出等操作。

图2-10 编辑器上部
下面介绍一下PDE题供的几种视图。在[Window]->[Show View]中可以找到没有被显示的视图。
[插件(Plug-ins)]视图
所有的插件列表,包含当前工作区内正在开发的插件。打开插件节点可以显示插件下包含的资源,但是以jar包提供出来的插件就显示不出来了。
在插件节点上点击右键选择[打开依赖关系(Open Dependencies)]可以打开后面要介绍的[依赖关系]视图,表现插件间的依赖关系。右键菜单中也可以把选中的插件作为一个工程引入到当前工作区内。
[依赖关系(Plug-in Dependencies)]视图
表现了插件间的依赖关系。可以分别表示当前插件依赖的插件和依赖当前插件的插件。
[插件注册(Plug-in Registry)]视图
当前工作台加载的所有插件列表。打开插件节点,显示插件提供的扩展和扩展点、依赖关系等。
[错误Log(Error Log)]视图
错误Log视图虽然不是PDE提供的功能,但是在插件开发的时候非常有用。它可以表现当前工作台内发生的错误,并且在错误上双击既可以导向到错误发生的地方。
Plugin-in Selection Spy
同时按下alt+shift+F1
Plugin-in Selection Spy是从Eclipse3.4开始加入的新功能,能够显示当前焦点所在的编辑器、视图、向导、对话框等的内部信息。把已有的插件作为参考,进行插件开发,使用这个功能是再合适不过了。
#p#
4. 解读示例插件的代码
让我们回到插件工程来,看一看插件工程生成的代码。首先看一下plugin.xml的代码。
代码2-1 plugin.xml
<?xml version="1.0" encoding="UTF-8"?>
<?eclipse version="3.4"?>
<plugin>
   <extension
         point="org.eclipse.ui.actionSets"> ①
      <actionSet
            label="Sample Action Set"
            visible="true"
            id="cn.sf.amateras.sample.actionSet">
         <menu
               label="Sample &Menu"
               id="sampleMenu">
            <separator
                  name="sampleGroup">
            </separator>
         </menu>
         <action
               label="&Sample Action"
               icon="icons/sample.gif"
               class="cn.sf.amateras.sample.actions.SampleAction"
               tooltip="Hello, Eclipse world"
               menubarPath="sampleMenu/sampleGroup"
               toolbarPath="sampleGroup"
               id="cn.sf.amateras.sample.actions.SampleAction">
         </action>
      </actionSet>
   </extension>
</plugin>
- 1.
- 2.
- 3.
- 4.
- 5.
- 6.
- 7.
- 8.
- 9.
- 10.
- 11.
- 12.
- 13.
- 14.
- 15.
- 16.
- 17.
- 18.
- 19.
- 20.
- 21.
- 22.
- 23.
- 24.
- 25.
- 26.
- 27.
- 28.
为了在菜单栏增加一个项目,文件中使用了extension元素。①的id指定了扩展点的名称org.eclipse.ui.actionSets。extension里的内容根据扩展点而不同。示例插件中包含了actionSet、menu、action等元素。
②中的class属性指定了cn.sf.amateras.sample.actions.SampleAction类作为响应菜单或者工具栏按钮的action类。
代码2-2 SampleAction.java
package cn.sf.amateras.sample.actions;

import org.eclipse.jface.action.IAction;
import org.eclipse.jface.viewers.ISelection;
import org.eclipse.ui.IWorkbenchWindow;
import org.eclipse.ui.IWorkbenchWindowActionDelegate;
import org.eclipse.jface.dialogs.MessageDialog;

/**
 * Our sample action implements workbench action delegate.
 * The action proxy will be created by the workbench and
 * shown in the UI. When the user tries to use the action,
 * this delegate will be created and execution will be
 * delegated to it.
 * @see IWorkbenchWindowActionDelegate
 */
public class SampleAction implements IWorkbenchWindowActionDelegate {
    private IWorkbenchWindow window;
    /**
     * The constructor.
     */
    public SampleAction() {
    }

    /**
     * The action has been activated. The argument of the
     * method represents the 'real' action sitting
     * in the workbench UI.
     * @see IWorkbenchWindowActionDelegate#run
     */
    public void run(IAction action) {   //......①
        MessageDialog.openInformation(
            window.getShell(),
            "Sample",
            "Hello, Eclipse world");
    }

    /**
     * Selection in the workbench has been changed. We
     * can change the state of the 'real' action here
     * if we want, but this can only happen after
     * the delegate has been created.
     * @see IWorkbenchWindowActionDelegate#selectionChanged
     */
    public void selectionChanged(IAction action, ISelection selection) {
    }

    /**
     * We can use this method to dispose of any system
     * resources we previously allocated.
     * @see IWorkbenchWindowActionDelegate#dispose
     */
    public void dispose() {
    }

    /**
     * We will cache window object in order to
     * be able to provide parent shell for the message dialog.
     * @see IWorkbenchWindowActionDelegate#init
     */
    public void init(IWorkbenchWindow window) {
        this.window = window;
    }
}
- 1.
- 2.
- 3.
- 4.
- 5.
- 6.
- 7.
- 8.
- 9.
- 10.
- 11.
- 12.
- 13.
- 14.
- 15.
- 16.
- 17.
- 18.
- 19.
- 20.
- 21.
- 22.
- 23.
- 24.
- 25.
- 26.
- 27.
- 28.
- 29.
- 30.
- 31.
- 32.
- 33.
- 34.
- 35.
- 36.
- 37.
- 38.
- 39.
- 40.
- 41.
- 42.
- 43.
- 44.
- 45.
- 46.
- 47.
- 48.
- 49.
- 50.
- 51.
- 52.
- 53.
- 54.
- 55.
- 56.
- 57.
- 58.
- 59.
- 60.
- 61.
- 62.
- 63.
- 64.
- 65.
①run()方法内记录了action执行时的处理。利用MessageDialog.openInformation方法打开了一个对话框。
咱们再看看生成的另外一个类--Activator类。这个类对插件的生命周期进行了管理,被称为插件类。
代码2-3 Activator.java
package cn.sf.amateras.sample;

import org.eclipse.jface.resource.ImageDescriptor;
import org.eclipse.ui.plugin.AbstractUIPlugin;  //....①
import org.osgi.framework.BundleContext;

/**
 * The activator class controls the plug-in life cycle
 */
public class Activator extends AbstractUIPlugin {

    // The plug-in ID
    public static final String PLUGIN_ID = "cn.sf.amateras.sample"; //$NON-NLS-1$

    // The shared instance
    private static Activator plugin;

    /**
     * The constructor
     */
    public Activator() {
    }

    /*
     * (non-Javadoc)
     * @see org.eclipse.ui.plugin.AbstractUIPlugin#start(org.osgi.framework.BundleContext)
     */
    public void start(BundleContext context) throws Exception {//....③
        super.start(context);
        plugin = this;
    }

    /*
     * (non-Javadoc)
     * @see org.eclipse.ui.plugin.AbstractUIPlugin#stop(org.osgi.framework.BundleContext)
     */
    public void stop(BundleContext context) throws Exception {//....④
        plugin = null;
        super.stop(context);
    }

    /**
     * Returns the shared instance
     *
     * @return the shared instance
     */
    public static Activator getDefault() {//....②
        return plugin;
    }

    /**
     * Returns an image descriptor for the image file at the given
     * plug-in relative path
     *
     * @param path the path
     * @return the image descriptor
     */
    public static ImageDescriptor getImageDescriptor(String path) {
        return imageDescriptorFromPlugin(PLUGIN_ID, path);
    }
}
- 1.
- 2.
- 3.
- 4.
- 5.
- 6.
- 7.
- 8.
- 9.
- 10.
- 11.
- 12.
- 13.
- 14.
- 15.
- 16.
- 17.
- 18.
- 19.
- 20.
- 21.
- 22.
- 23.
- 24.
- 25.
- 26.
- 27.
- 28.
- 29.
- 30.
- 31.
- 32.
- 33.
- 34.
- 35.
- 36.
- 37.
- 38.
- 39.
- 40.
- 41.
- 42.
- 43.
- 44.
- 45.
- 46.
- 47.
- 48.
- 49.
- 50.
- 51.
- 52.
- 53.
- 54.
- 55.
- 56.
- 57.
- 58.
- 59.
- 60.
- 61.
- 62.
示例中的插件类继承自AbstractUIPlugin(①)。如果没有UI的插件继承AbstractUIPlugin的父类Plugin就可以了。
插件类的方法如下表所示:
| getDefault() | 取得插件类的实例的方法。插件类是单例的,所以这个方法作为一个静态方法提供。 |
| start() | 插件开始时的处理。 |
| stop() | 插件停止时的处理。 |
| getLog() | log输出时取得ILog用的方法。 |
| getImageRegistry() | 取得管理插件内图像的ImageRegistry类。 |
| getPerferenceStore() | 取得保存插件设定的IPerferenceStore类。 |
| getDialogSettings() | 取得保存对话框设定的IDialogSettings类。 |
| getWorkbench() | 取得IWorkbench的实例。 |
以上就是根据[Hello World]模板生成的插件的代码讲解,在PDE中为我们准备了很多的模板,大家可以都试试看。
感谢大家关注51CTO《Eclipse插件开发基础教程:***攻略》。如果您对Eclipse有什么新的使用心得可以发Email:zhousn@51cto.com,51CTO将与您一起分享!
【编辑推荐】


