开始之前我们先来看看如下一些问题:
OPhone游戏开发的流程是怎么样的呢?
OPhone游戏开发采用什么样的框架?这种框架又有什么优缺点呢?
OPhone和传统的Java游戏开发一样吗?
OPhone如何设计UI界面呢?UI如何与逻辑之间进行交互呢?
OPhone如何开发游戏动画效果呢?
如果你在开发中也遇到同样的问题,那么本文肯定适合你,不要犹豫,看完之后肯定能一目了然,解决这些问题。开始吧...
本文所采用的开发环境
jdk-6u10-rc-bin-b28-windows-i586-p-21_jul_2008
eclipse-java-galileo-win32
OPhone-sdk_windows-1.5.beta
ODT-0.9.0
首先确保开发环境搭建正确,关于开发环境的搭建,网上很多教程,由于篇幅关系,在这里就不在讲述了,相信你在看这边文章时,也已经搭建好了环境。#t#
选择项目
在开发任何一款产品之前都需要先确定产品的创意,然后策划,对项目开发周期进行预算,然后在开发过程中需要书写项目发开日志,这里我们只是大概说说这个流程,大家在正式开发时就需要按照一个正规的流程来做,可能会对项目开发,调试起到巨大的作用。好了,先说到这里,下面介绍本文所选择的项目,由于本文的目的是做教程,所以在项目的选择上,我们选择了大家都熟悉而且很经典的俄罗斯方块,如图1所示。这样,我们就不必花很多的时间去介绍项目的逻辑规则,大家也更能理解。

项目建立
启动“Eclipse”->选择“File”菜单->选择“New”菜单项->选择“Project…”项,打开“NewProject”对话框->选择“OPhone”->“OPhoneProject”项->点击“Next”按钮,打开“NewOPhoneProject”对话框,填写项目相关信息,如图2所示。

项目开发
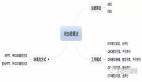
建立好项目之后,我们就要着手开发了,这时,我们可以先考虑一下,游戏需要哪些功能,有哪些界面构成,确定游戏的各个模块和游戏开发所采用的框架,至于框架嘛,笔者建议采用OPhone官方所推荐的MVC框架,这种方式相信大家都很熟悉了,将游戏逻辑和UI分隔开来,方便项目的管理和维护,所以我们这个《俄罗斯方块》也就采用这种MVC框架了。下面我们就在这样一个框架下来开发游戏的各个功能及界面。#p#
Logo界面
任何一款完整的游戏,可能至少需要使用一屏及以上的Logo,主要包括运营商、SP、企业、游戏等Logo。而我们都知道要在MM上销售应用,就需要显示MM的Logo,所以该游戏我们就确定显示两屏Logo,分别是MM和开发者的Logo,但是仅仅显示Logo感觉很单调,所以我们就打算给这个Logo制作一个动画效果,让Logo呈现一个淡淡浅出的效果,如图3所示;当动画执行完成之后,就进入游戏的主界面。

Logo界面的布局
关于Logo界面的布局很简单,就是在一个RelativeLayout布局中放置两个ImageView(分别是MM的Logo和开发者的Logo),都需要居中,但是两个不能同时显示,因为我们需要在MM的Logo动画播放完毕之后再播放开发者的Logo。这就需要在播放其中一个动画时,将另一个动画设置为不显示状态或者将其alpha设置为0代表完全透明。下面是Logo界面的布局文件,如代码清单1所示。
代码清单1logo.xml文件
- xmlversionxmlversion="1.0"encoding="utf-8"?>
- <RelativeLayout android:id=
- "@+id/RelativeLayoutLogo"
- android:layout_width="fill_parent"
- android:layout_height="fill_parent"
- android:background="#ffffffff" xmlns:android=
- "http://schemas.android.com/apk/res/android" >
- <ImageView android:id="@+id/ImageViewLogo1"
- android:layout_width="wrap_content"
- android:layout_height="wrap_content"
- android:src="@drawable/logo1"
- android:layout_centerVertical="true"
- android:layout_centerHorizontal="true" >
- ImageView> <ImageView android:id=
- "@+id/ImageViewLogo2"
- android:layout_width="wrap_content"
- android:layout_height="wrap_content"
- android:src="@drawable/logo2"
- android:layout_centerVertical="true"
- android:layout_centerHorizontal="true" >
- ImageView> RelativeLayout>
OPhone动画介绍
如何实现淡淡浅出的效果呢?OPhone为我们提供了Animation类,专门用来处理一些常用的动画。主要包括如下表1的一些动画效果,分别是XML文件和JavaCode中的写法。
表1Animation动画效果

因为该项目我们采用MVC的框架,所以我们就打算把动画定义在XML文件中(当然也可以采用硬编码的方式,有兴趣的大家可以试试,效果一样),从表1中我们可以看出,alpha则是我们需要的使用的效果。下面我们来看看如何在XML文件中定义一个动画。#p#
首先在项目的res目录中建立anim文件夹,用来存放项目中的动画效果。
然后编写动画文件anim_logo1.xml,如代码清单2所示。
代码清单2:anim_logo1.xml动画
- xmlversionxmlversion="1.0"encoding="utf-8"?
- <setxmlns:androidsetxmlns:android=
- "http://schemas.android.com/apk/res/android">
- <alpha android:fromAlpha="1.0"
- android:toAlpha="0.0"
- android:duration="3000"/>
- set>
从代码清单2中我们可以看出,该种方式的动画是通过改变视图的Alpha值来达到一个淡淡浅出的动画效果,其中
在Java代码中加载动画文件
Logo界面对应的Java文件为Logo.java,首先需要声如下所示的两组变量,分别代表动画和Logo图片。
- private Animation animLogo1, animLogo2;
然后在onCreate函数中装载动画文件和ImageView视图,加载动画的方法如下:
- animLogo1 = AnimationUtils.loadAnimation(this,
- R.anim.anim_logo1); animLogo2 =
- AnimationUtils.loadAnimation
- (this, R.anim.anim_logo2);
AnimationUtils.loadAnimation的第一个参数为Context,第二个为动画资源索引ID(即R。java文件中的常量),将先播放的一个ImageView的Alpha值设置为255,后播放的设置为0,当第一个播放完毕之后再交换。通过视图的startAnimation方法,来传入一个动画并播放,那么我们如何才能知道动画是否播放结束呢?那就需要为动画设置一个AnimationListener(动画监听),当动画播放完毕时就会触发onAnimationEnd函数,当两个动画都播放完毕之后我们就可以通过startActivity函数将界面转移到主菜单界面(MainMenu.java)。由于篇幅关系,这里就只贴出重点代码了,如代码请购单3所示,完整代码请参见本文所附代码。
代码清单3Logo.java片段
- animLogo1 = AnimationUtils.loadAnimation(this,
- R.anim.anim_logo1); animLogo2 =
- AnimationUtils.loadAnimation
- (this, R.anim.anim_logo2);
- imageViewLogo1 = (ImageView)findViewById(R.id.ImageViewLogo1);
- imageViewLogo2 = (ImageView)findViewById(R.id.ImageViewLogo2); /* 设置动画监听 */
- animLogo1.setAnimationListener(new AnimationListener()
- { //动画结束 public void onAnimationEnd(Animation arg0)
- { imageViewLogo1.setAlpha(0);
- imageViewLogo2.setAlpha(255); imageViewLogo2.startAnimation(animLogo2); }
- public void onAnimationRepeat(Animation arg0)
- {} public void onAnimationStart(Animation arg0){}
- imageViewLogo1.startAnimation(animLogo1);
注意:这里需要说明一下,项目中任何一个Activity,或者Service等,都需要在AndroidManifest.xml文件中进行申明。比如下面将出现的主菜单(MainMenu)设置界面(Preferences)以及游戏中的界面(Tetris)。#p#
主菜单界面
主菜单界面我们需要提供,开始游戏、设置游戏,高分榜、退出游戏等功能,并且包括一个游戏的名字(Title),先来看看我们为该游戏设计的主菜单界面,如图4所示。
主界面布局
大家可以看出我们的主界面布局很简单,主要有一张背景图片、一个游戏名字图片、和几个按钮构成。这里整个界面总体上使用一个线性布局(LinearLayout),在这个线性布局中放置一个ImageView和另一个线性布局(菜单选项),如代码清代4所示。

代码清单4mainmenu.xml
- xml version="1.0" encoding="utf-8"?>
- <LinearLayout android:id="@+id/LinearLayoutMainMenu"
- android:layout_width="fill_parent"
- android:layout_height="fill_parent"
- android:orientation="vertical"
- android:background="@drawable/menubg" xmlns:android=
- "http://schemas.android.com/apk/res/android" >
- <ImageView android:id="@+id/ImageViewTitle"
- android:layout_width="wrap_content"
- android:layout_height="wrap_content"
- android:layout_marginTop="20px"
- android:src="@drawable/title"
- android:layout_gravity="center_horizontal" >
- ImageView> <LinearLayout
- android:id="@+id/LinearLayoutMenu" android:layout_width="wrap_content"
- android:layout_height="wrap_content"
- android:layout_marginTop="40px"
- android:orientation="vertical"
- android:layout_gravity="center_horizontal" >
- <Button android:id="@+id/MenuStart"
- android:layout_width="wrap_content"
- android:layout_height="wrap_content"
- android:text="@string/start" android:type
- android:textStyle="bold|italic"
- android:background="@drawable/button1"
- android:gravity="center"
- android:layout_gravity="center_horizontal" >
- Button> <Button android:id="@+id/MenuSet"
- android:layout_width="wrap_content"
- android:layout_height="wrap_content"
- android:layout_marginTop="10px"
- android:text="@string/set" android:type
- android:textStyle="bold|italic"
- android:background="@drawable/button1"
- android:gravity="center"
- android:layout_gravity="center_horizontal" >
- Button> <Button android:id="@+id/MenuHS" android:layout_width="wrap_content"
- android:layout_height="wrap_content" android:layout_marginTop="10px"
- android:text="@string/highscores" android:type
- android:textStyle="bold|italic"
- android:background="@drawable/button1"
- android:gravity="center" android:layout_gravity="center_horizontal" >
- Button> <Button android:id="@+id/MenuHelp" android:layout_width="wrap_content" android:layout_height="wrap_content" android:layout_marginTop="10px" android:text="@string/help" android:type android:textStyle="bold|italic" android:background="@drawable/button1" android:gravity="center" android:layout_gravity="center_horizontal" >
- Button> <Button android:id="@+id/MenuAbout" android:layout_width="wrap_content" android:layout_height="wrap_content" android:layout_marginTop="10px" android:text="@string/about"
- android:type android:textStyle="bold|italic" android:background="@drawable/button1"
- android:gravity="center"
- android:layout_gravity="center_horizontal" >
- Button> <Button android:id="@+id/MenuExit" android:layout_width="wrap_content"
- android:layout_height="wrap_content"
- android:layout_marginTop="10px"
- android:text="@string/exit" android:type
- android:textStyle="bold|italic"
- android:background="@drawable/button1" android:gravity="center" android:layout_gravity="center_horizontal" >
- Button> LinearLayout>
- LinearLayout>
- xml version="1.0" encoding="utf-8"?>
- <LinearLayout android:id="@+id/LinearLayoutMainMenu" android:layout_width="fill_parent"
- android:layout_height="fill_parent"
- android:orientation="vertical"
- android:background="@drawable/menubg" xmlns:android="
- http://schemas.android.com/apk/res/android" >
- <ImageView android:id="@+id/ImageViewTitle" android:layout_width="wrap_content"
- android:layout_height="wrap_content"
- android:layout_marginTop="20px"
- android:src="@drawable/title"
- android:layout_gravity="center_horizontal" >
- ImageView> <LinearLayout
- android:id="@+id/LinearLayoutMenu" android:layout_width="wrap_content"
- android:layout_height="wrap_content"
- android:layout_marginTop="40px"
- android:orientation="vertical"
- android:layout_gravity="center_horizontal" >
- <Button android:id="@+id/MenuStart"
- android:layout_width="wrap_content"
- android:layout_height="wrap_content"
- android:text="@string/start" android:type
- android:textStyle="bold|italic" android:background="@drawable/button1"
- android:gravity="center"
- android:layout_gravity="center_horizontal" >
- Button> <Button android:id="@+id/MenuSet" android:layout_width="wrap_content" android:layout_height="wrap_content"
- android:layout_marginTop="10px"
- android:text="@string/set" android:type
- android:textStyle="bold|italic"
- android:background="@drawable/button1"
- android:gravity="center"
- android:layout_gravity="center_horizontal" >
- Button> <Button android:id="@+id/MenuHS" android:layout_width="wrap_content" android:layout_height="wrap_content" android:layout_marginTop="10px" android:text="@string/highscores"
- android:type android:textStyle="bold|italic" android:background=
- "@drawable/button1"
- android:gravity="center" android:layout_gravity="center_horizontal" >
- Button> <Button android:id="@+id/MenuHelp" android:layout_width="wrap_content"
- android:layout_height="wrap_content"
- android:layout_marginTop="10px"
- android:text="@string/help" android:type
- android:textStyle="bold|italic" android:background="@drawable/button1" android:gravity="center" android:layout_gravity="center_horizontal" >
- Button> <Button android:id="@+id/MenuAbout" android:layout_width="wrap_content" android:layout_height="wrap_content" android:layout_marginTop="10px" android:text="@string/about"
- android:type android:textStyle="bold|italic" android:background="@drawable/button1"
- android:gravity="center" android:layout_gravity="center_horizontal" >
- Button> <Button android:id="@+id/MenuExit" android:layout_width="wrap_content" android:layout_height="wrap_content" android:layout_marginTop="10px" android:text="@string/exit"
- android:type android:textStyle="bold|italic" android:background="@drawable/button1"
- android:gravity="center" android:layout_gravity="center_horizontal" >
- Button> LinearLayout> LinearLayout>
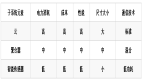
该布局中的所有组件都需要水平居中显示,当然你也可以选择相对布局(RelativeLayout)来完成该界面。下面我们来介绍一下常用的布局的属性,如表2所示。
表2布局属性

通过表2这些属性加上代码清单4的框架,相信你也能够完成主菜单一样的布局,关于布局的属性还有很多,大家可以查看OPhone的API文档,这里就不一一列举了。#p#
主菜单动画
同Logo界面一样,这里我们也为主菜单设计一个动画效果,让游戏的名字从下而上移动到顶部我们所指定的位置停下,然后在将菜单选项从左边屏幕之外移动到屏幕中间所指定的位置,这就需要使用我们前面所说的translate动画了,首先来看看translate动画在XML文件中如何定义,如代码清单5所示,为游戏名字(ImageView)视图的移动动画。另外的菜单选项的动画布局文件大家可以仿照这个例子做出来了。
代码清单5anim_title.xml
- xmlversionxmlversion="1.0"encoding="utf-8"?> <setxmlns:androidsetxmlns:android=
- "http://schemas.android.com/apk/res/android">
- <translate android:fromYDelta="50%p" android:toYDelta="0" android:duration="1500"/>
- set>
代码清单5中定义了一个translate动画,fromYDelta表示Y坐标从什么地方开始移动,这里使用的是50%,表示从我们在mainmenu.xml文件中定义的游戏名字(ImageView)的位置Y轴的正方向的50%的位置,如果为-50%则是想反方向(即Y轴的负方向)。toYDelta表示动画结束的Y的位置,这里的0为我们所定义的原始位置;duration同样表示动画执行的时间的毫秒数。到这里是不是觉得OPhone平台制作动画是非常简单的事情呢?当然OPhone
平台还有另一种方式的动画,就是帧动画(Frame),顾名思义就是一帧一帧的图片组成的动画,当然该游戏没有用到,我们暂时不讲解,如果有机会,以后我们会介绍的。
最后在Java代码中装载动画就和Logo界面一样了,这里我们就不在重复了,下面就开始介绍如何来实现菜单选项。
菜单选项
从代码清单4中我们可以看出,菜单选项其实就是几个按钮(Button)所组成的,那么要实现菜单选项就很容易了,对每一个按钮设置一个事情监听即可,当我们点击了某个按钮之后再进行相应的处理。可以通过setOnClickListener函数来设置按钮事件的监听,菜单选项的监听具体代码实现如代码清单5所示,为开始游戏项的监听,当点击之后,我们就将界面跳转到游戏界面。其他的都类似,完整代码请参见本文所附源代码。
代码清单5菜单选项监听
- startButton = (Button)findViewById(R.id.MenuStart); startButton.setOnClickListener
- (new View.OnClickListener()
- { public void onClick(View v)
- { Intent i = new Intent(MainMenu.this, com.yarin.OPhone.Tetris.Tetris.class);
- startActivity(i); MainMenu.this.finish(); } });
这里需要注意一个知识点,我们通过startActivity方法将当前的活动界面切换到另一个界面,这里起到一个连接作用的是Intent,他当前的活动界面和要跳转之后的界面。当跳转之后我们就将当前的界面给finish掉。
另外这里我们需要介绍一点扩展的内容,如果我们在从一个Activity跳转到另一个Activity时需要传递一些当前Activity的数据到另一个Activity中去,又该如何实现呢?这时我们就需要引入Bundle类了,我们可以通过Bundle的put...方法将要传递的数据放置到这个Bundle对象中,然后通过Intent的putExtras方法来将Bundle与Intent绑定,具体代码如下:
- Intent i = new Intent(MainMenu.this, com.yarin.OPhone.Tetris.Tetris.class);
- Bundle bundle = new Bundle();
- bundle.putInt("age",19);
- intent.putExtras(bundle); startActivity(intent);
当切换到另一个Activity之后我们可以通过Intent的getExtras方法得到Bundle对象,然后通过Bundle的get...方法将数据分别取出即可,获取数据的代码如下:
Bundlebunde=this.getIntent().getExtras();
intage=bunde.getInt("age");
到这里我们的菜单界面就差不多了,下面我们就开始设计一些二级菜单界面了,比如:帮助
关于、设置等等。#p#
帮助、关于界面
帮助和关于界面一般用来显示一些游戏说明,版权等信息等等,要显示这种信息OPhone平台可以选择的组件太多了,可以自己布局一个完整的界面,也可以选择系统提供的对话框(Dialog),这里我们就选择系统提供的对话框吧,在OPhone平台上这个对话框可谓是很强大哦,从最普通的对话框到开发者自己定义的一系列对话框,都能恰到好处的实现一个常用的功能。下面先来看看我们该游戏的帮助界面吧,如图5所示。

从图5可以看出帮助界面是一个没有按钮的对话框,用户点击除对话框以外的其他地方就可以关闭这个界面回到主菜单界面,该对话框功能比较少,所以实现也很简单,后面我们会讲带按钮的对话框以及如何对这些对话框按钮事件进行监听。帮助界面实现如代码清单6所示。
代码清单6帮助对话框
- public void HelpDialog()
- { TextView textView = new TextView(this); textView.setText
- (MainMenu.this.getResources().getString(R.string.help_text));
- new AlertDialog.Builder(MainMenu.this)
- .setTitle(MainMenu.this.getResources().getString(R.string.help)) .setView(textView)
- .show(); }
从代码清单6中我们可以看出,首先我们构建了一个TextView视图,来显示文字,然后将这个TextView和一个对话框(Builder)绑定,让这个对话框所显示的内容为TextView的内容,setText方法为该对话框添加一个标题(Title)。关于界面也一样。如果需要自定义对话框,就先将自定义的界面布局好,然后用setView方法来指定要显示的自定义视图(即替换掉这里的TextView)即可。
高分榜界面
高分榜界面主要用来显示玩家的积分中分数最高的一个,当然我们的游戏有简单、中等、困难3个等级,所以我们就需要对每一个等级进行一个最高分的显示,这里我们现实的方式就是如图6所示,一个等级对应一个最高分,在顶部有一个界面名称(Title),在底部出现两个按钮,供玩家点击,用以切换回到主菜单界面。

高分榜界面布局
从图6中我们可以看出,分数的显示是一行一行数据,OPhone中要通过这种方式显示数据的组件同样很多,比如:列表视图(ListView)和咋们这个游戏高分榜所使用的表单布局(TableLayout)。所以在OPhone平台上要实现某个功能,是有很多方法的,大家可以选择适合自己的方式。下面我们来看看如何通过表单布局来实现图6的效果呢?
首先,界面的名称我们使用TextView来显示。
然后,一个TableLayout布局中放置3个TableRow来显示最高分,而TableRow中又分别包含了两个TextView,分别显示等级和分数。
最后,两个按钮则是一个相对布局RelativeLayout,一个靠左对齐一个靠右对齐。
每一行分数中间我们显示了一个白色的横线,这个横线的就是一个View,我们设定了颜色、和宽度、高度即可,代码清单7是我们这个帮分帮界面的布局。
代码清单7highscores.xml
- xml version="1.0" encoding="utf-8"?>
- <LinearLayout
- android:id="@+id/widget31"
- android:layout_width="fill_parent"
- android:layout_height="fill_parent"
- android:orientation="vertical"
- android:background="@drawable/menubg"
- xmlns:android="http://schemas.android.com/apk/res/android"
- >
- <TextView
- android:id="@+id/widget29"
- android:layout_width="wrap_content"
- android:layout_height="wrap_content"
- android:layout_marginTop="20px"
- android:text="@string/highscores"
- android:textSize="20sp"
- android:textStyle="bold"
- android:gravity="center"
- android:layout_gravity="center_horizontal"
- >
- TextView>
- <TableLayout
- android:id="@+id/widget350"
- android:layout_width="fill_parent"
- android:layout_height="wrap_content"
- android:layout_marginTop="50px"
- android:orientation="vertical"
- android:stretchColumns="3"
- android:layout_gravity="center_horizontal"
- >
- <View
- android:id="@+id/widget587"
- android:layout_width="wrap_content"
- android:layout_height="3dip"
- android:background="#ffffffff"/>
- <TableRow
- android:id="@+id/widget375"
- android:layout_width="fill_parent"
- android:layout_height="wrap_content"
- android:orientation="horizontal"
- android:layout_gravity="center_horizontal"
- >
- <TextView
- android:id="@+id/widget396"
- android:layout_width="wrap_content"
- android:layout_height="wrap_content"
- android:text="@string/level1_text"
- android:layout_marginLeft="50px"
- android:textSize="15sp"
- >
- TextView>
- <TextView
- android:id="@+id/Score1"
- android:layout_width="wrap_content"
- android:layout_height="wrap_content"
- android:text=""
- android:layout_marginLeft="150px"
- android:textSize="15sp"
- >
- TextView>
- TableRow>
- <View
- android:id="@+id/widget597"
- android:layout_width="wrap_content"
- android:layout_height="3dip"
- android:background="#ffffffff"/>
- <TableRow
- android:id="@+id/widget235"
- android:layout_width="fill_parent"
- android:layout_height="wrap_content"
- android:orientation="horizontal"
- android:layout_gravity="center_horizontal"
- >
- <TextView
- android:id="@+id/widget365"
- android:layout_width="wrap_content"
- android:layout_height="wrap_content"
- android:text="@string/level2_text"
- android:layout_marginLeft="50px"
- android:textSize="15sp"
- >
- TextView>
- <TextView
- android:id="@+id/Score2"
- android:layout_width="wrap_content"
- android:layout_height="wrap_content"
- android:text=""
- android:layout_marginLeft="150px"
- android:textSize="15sp"
- >
- TextView>
- TableRow>
- <View
- android:id="@+id/widget545"
- android:layout_width="wrap_content"
- android:layout_height="3dip"
- android:background="#ffffffff"/>
- <TableRow
- android:id="@+id/widget345"
- android:layout_width="fill_parent"
- android:layout_height="wrap_content"
- android:orientation="horizontal"
- android:layout_gravity="center_horizontal"
- >
- <TextView
- android:id="@+id/widget359"
- android:layout_width="wrap_content"
- android:layout_height="wrap_content"
- android:text="@string/level3_text"
- android:layout_marginLeft="50px"
- android:textSize="15sp"
- >
- TextView>
- <TextView
- android:id="@+id/Score3"
- android:layout_width="wrap_content"
- android:layout_height="wrap_content"
- android:text=""
- android:layout_marginLeft="150px"
- android:textSize="15sp"
- >
- TextView>
- TableRow>
- <View
- android:id="@+id/widget587"
- android:layout_width="wrap_content"
- android:layout_height="3dip"
- android:background="#ffffffff"/>
- TableLayout>
- <RelativeLayout
- android:id="@+id/widget198"
- android:layout_width="fill_parent"
- android:layout_height="wrap_content"
- android:layout_marginTop="270px"
- android:layout_gravity="bottom"
- android:layout_alignParentBottom="true"
- >
- <Button
- android:id="@+id/HSButtonOK"
- android:layout_width="wrap_content"
- android:layout_height="wrap_content"
- android:text="@string/button_ok"
- android:gravity="center"
- android:background="@drawable/button1"
- android:layout_alignParentTop="true"
- android:layout_alignParentLeft="true"
- >
- Button>
- <Button
- android:id="@+id/HSButtonBack"
- android:layout_width="wrap_content"
- android:layout_height="wrap_content"
- android:text="@string/button_back"
- android:gravity="center"
- android:background="@drawable/button1"
- android:layout_alignParentTop="true"
- android:layout_alignParentRight="true"
- >
- Button>
- RelativeLayout>
- LinearLayout>
#p#
高分榜实现
高分榜的实现再简单不过了,懂得HelloOPhone的朋友都会,首先取得TextView对象,然后通过其setText函数来设置其显示的内容,如代码清单8所示。关于高分榜的记录实现,我们会在后面的游戏数据存储部分详细讲解。
代码清单8HighScores.java片段
- mTVScore1 = (TextView) findViewById(R.id.Score1);
- mTVScore2 = (TextView) findViewById(R.id.Score2);
- mTVScore3 = (TextView) findViewById(R.id.Score3);
- mTVScore1.setText(Integer.toString(mConfig.GetScore((byte)1)));
- mTVScore2.setText(Integer.toString(mConfig.GetScore((byte)2)));
- mTVScore3.setText(Integer.toString(mConfig.GetScore((byte)3)));
游戏设置界面
菜单选项中,完成了上面这些界面,最后我们来看看设置界面如何实现呢?设置界面主要把包括一些游戏配置信息的设置,包括游戏音效、难度、以及其他一些游戏的辅助功能。该游戏的设置界面如图7所示。

游戏设置界面布局
该游戏的配置信息主要包括了,音效设置、难度选择、背景选择、网格设置,其中除了背景选择之外,都是采用的单选的方式,而背景选择则是一个下拉列表效果。底部显示了两个按钮,整体为一个线性布局(LinearLayout)。#p#
首先我们来看看在OPhone平台中如何实现单选按钮,如代码清单9所示,为音效设置的单选按钮。
代码清单9单选按钮布局
- <RadioGroup
- android:id="@+id/RadioGroupMusic"
- android:layout_width="wrap_content"
- android:layout_height="wrap_content"
- android:orientation="horizontal"
- >
- <RadioButton
- android:id="@+id/MusicON"
- android:layout_width="wrap_content"
- android:layout_height="wrap_content"
- android:text="@string/set_on"
- android:textSize="15sp"
- >
- RadioButton>
- <RadioButton
- android:id="@+id/MusicOFF"
- android:layout_width="wrap_content"
- android:layout_height="wrap_content"
- android:layout_marginLeft="20px"
- android:text="@string/set_off"
- android:textSize="15sp"
- >
- RadioButton>
- RadioGroup>
一个单选组件(RadioGroup)有几个选项(RadioButton)组成,单选组件可以定义自己的布局方式为水平布局(horizontal)或者垂直布局(vertical),默认为垂直布局,关于单选组件的布局就先说到这里,下面我们来学习下拉列表的实现,首先观察一下该游戏的背景设置中的下拉列表,如图8所示。

在OPhone平台中下拉列表是通过Spinner来实现的,Spinner的定义也很简单,代码如下:
- <Spinner
- android:id="@+id/BackGroundSpinner"
- android:layout_width="wrap_content"
- android:layout_height="wrap_content"
- >
仅仅这样一个定义还不算完全实现了下拉列表,稍后我们还需要在Java代码中指定下拉列表的选择项,这时我们需要在项目的res下的values目录中建立一个arrays.xml文件(即数组),数组的内容则定义为可供下拉列表选择的项,如代码清单10所示。
代码清单10arrays.xml
- xml version="1.0" encoding="utf-8"?>
- <resources>
- <string-array name="background">
- <item>粉红浪漫item>
- <item>蓝色海岸item>
- <item>柳昏花螟item>
- <item>千年经典item>
- <item>夏日清凉item>
- <item>映日荷花item>
- string-array>
- resources>
代码清单10中,“
设置界面实现
首先,单选组件的实现,我们需要为每一个单选组件设置一个事件监听函数,当用户在点击选择了单选选项之后,我们的程序能够得到用户所选择的选项。实现单选的监听需要使用setOnCheckedChangeListener函数来设置一个OnCheckedChangeListener,即当单选菜单改变时系统就会触发onCheckedChanged方法,我们就可以通过onCheckedChanged的参数来取得用户的选择。示例如代码清单11所示。
代码清单11选单组件事件监听
- mRadioGroupMusic.setOnCheckedChangeListener(new RadioGroup.OnCheckedChangeListener()
- {
- public void onCheckedChanged
- (RadioGroup group, int checkedId)
- {
- if(checkedId==mRadioMusicON.getId())
- {
- }
- else if(checkedId==mRadioMusicOFF.getId())
- {
- }
- }
- });
- mRadioGroupMusic.setOnCheckedChangeListener
- (new RadioGroup.OnCheckedChangeListener()
- { public void onCheckedChanged
- (RadioGroup group, int checkedId)
- { if(checkedId==mRadioMusicON.getId())
- { } else
- if(checkedId==mRadioMusicOFF.getId()) { } } });
然后,我们来分析如何完成下拉列表,首先我们需要通过之前所创建的数组资源来构建一个ArrayAdapter对象,将数组的内容方式到ArrayAdapter中,然后通过setDropDownViewResource方法来设置ArrayAdapter的现实方式,最后通过Spinner的setAdapter方法来设置刚刚构建的ArrayAdapter对象,使得数组资源和下拉列表之前能够联系起来,我们可以通过setSelection方法来设置下拉列表当前选择的哪一项。
当然下拉列表在被用户选择时,我们要想知道用户选择的哪一项,还得为其设置(setOnItemSelectedListener)一个事件监听(OnItemSelectedListener),在这个事件监听中必须实现以下两个方法:
onItemSelected:当用户选择了某一项之后触发
onNothingSelected:当用户一项都没有选中时出发
这样我们就可以在用户选中时取得用户选择的项,没有选中时,为其设置一个默认的值,具体实现如代码清单12所示。
代码清单12下拉列表的实现
- mSpinnerBackGround = (Spinner)findViewById(R.id.BackGroundSpinner);
- ArrayAdapter<CharSequence> adapter = ArrayAdapter.createFromResource(this, R.array.background, android.R.layout.simple_spinner_item);
- adapter.setDropDownViewResource(android.R.layout.simple_spinner_dropdown_item);
- mSpinnerBackGround.setAdapter(adapter);
- mSpinnerBackGround.setSelection(mBBackGround-1);
- mSpinnerBackGround.setOnItemSelectedListener(new OnItemSelectedListener() {
- public void onItemSelected(AdapterView> parent,View view,int position,long id)
- {
- Spinner spinner = (Spinner) parent;
- mBBackGround = (byte)(spinner.getSelectedItemPosition()+1);
- }
- public void onNothingSelected(AdapterView> parent)
- {
- mBBackGround = 1;
- }
- });
- mSpinnerBackGround = (Spinner)findViewById(R.id.BackGroundSpinner); ArrayAdapter<CharSequence> adapter = ArrayAdapter.createFromResource(this, R.array.background, android.R.layout.simple_spinner_item); adapter.setDropDownViewResource(android.R.layout.simple_spinner_dropdown_item); mSpinnerBackGround.setAdapter(adapter); mSpinnerBackGround.setSelection(mBBackGround-1); mSpinnerBackGround.setOnItemSelectedListener(new OnItemSelectedListener() { public void onItemSelected(AdapterView> parent,View view,int position,long id) { Spinner spinner = (Spinner) parent; mBBackGround = (byte)(spinner.getSelectedItemPosition()+1); } public void onNothingSelected(AdapterView> parent) { mBBackGround = 1; } });
最后我们需要对确定和返回按钮作一个事件监听,即完成游戏设置界面的制作。到这里我们已经完成了游戏菜单的各个界面的设计,下面我们将进入游戏的核心界面开发,即游戏中的界面,下一篇文章我们会接着讲如何将这个游戏完整的开发出来。
最后还是小小的总结一下本文讲述的大概内容吧,总体上来说,本文主要完成了游戏的各个菜单界面,包括:Logo界面、主菜单、帮助、关于、高分榜、游戏设置等界面的实现,从这些界面的实现我们可以看出OPhone平台的应用开发目前面临的最主要的问题就是UI界面的设计,因为程序方面还是Java为基础,因此,笔者建议大家在学习OPhone时一定要把握好各种布局方式的优缺点,使得我们在开发过程中能够恰到好处的为某个功能选择一个布局方式。另外,在讲Logo和主菜单界面时我们讲述了OPhone平台中动画设计的一种,可以看出从界面的布局到动画设计以及各种系统组件的使用都体现出了一个核心的框架,那就是文章开始时所说的MVC,他将UI和逻辑完全完全分离开来,对于我们的项目后期维护有着举足轻重的地位,当然也不仅仅是后期的维护,对于开发过程来说同样很重要,比如我们可以很轻松的实现应用程序的多国语言化等等,见于这种情况,后面的文章我们会继续使用这种框架,并且更多的介绍应用的界面设计,关于该游戏的逻辑很简单,在完成之后我们也会公开源代码。