构建一个完全本地的语音激活的实用RAG系统 原创
本文将探讨如何构建一个RAG系统并使其完全由语音激活。
RAG(检索增强生成)是一种将外部知识用于额外上下文以馈入到大语言模型(LLM),从而提高模型准确性和相关性的技术。这是一种比不断微调模型可靠得多的方法,可以改善生成式AI的结果。
传统上,RAG系统依赖用户文本查询来搜索矢量数据库。然后将检索到的相关文档用作生成式AI的上下文输入,生成式AI负责生成文本格式的结果。然而,我们可以进一步扩展RAG系统,以便能够接受和生成语音形式的输出。
本文将探讨如何构建一个RAG系统并使其完全由语音激活。
构建一个完全由语音激活的RAG系统
我在本文中假设读者对LLM和RAG系统已有一定的了解,因此不会进一步解释它们。
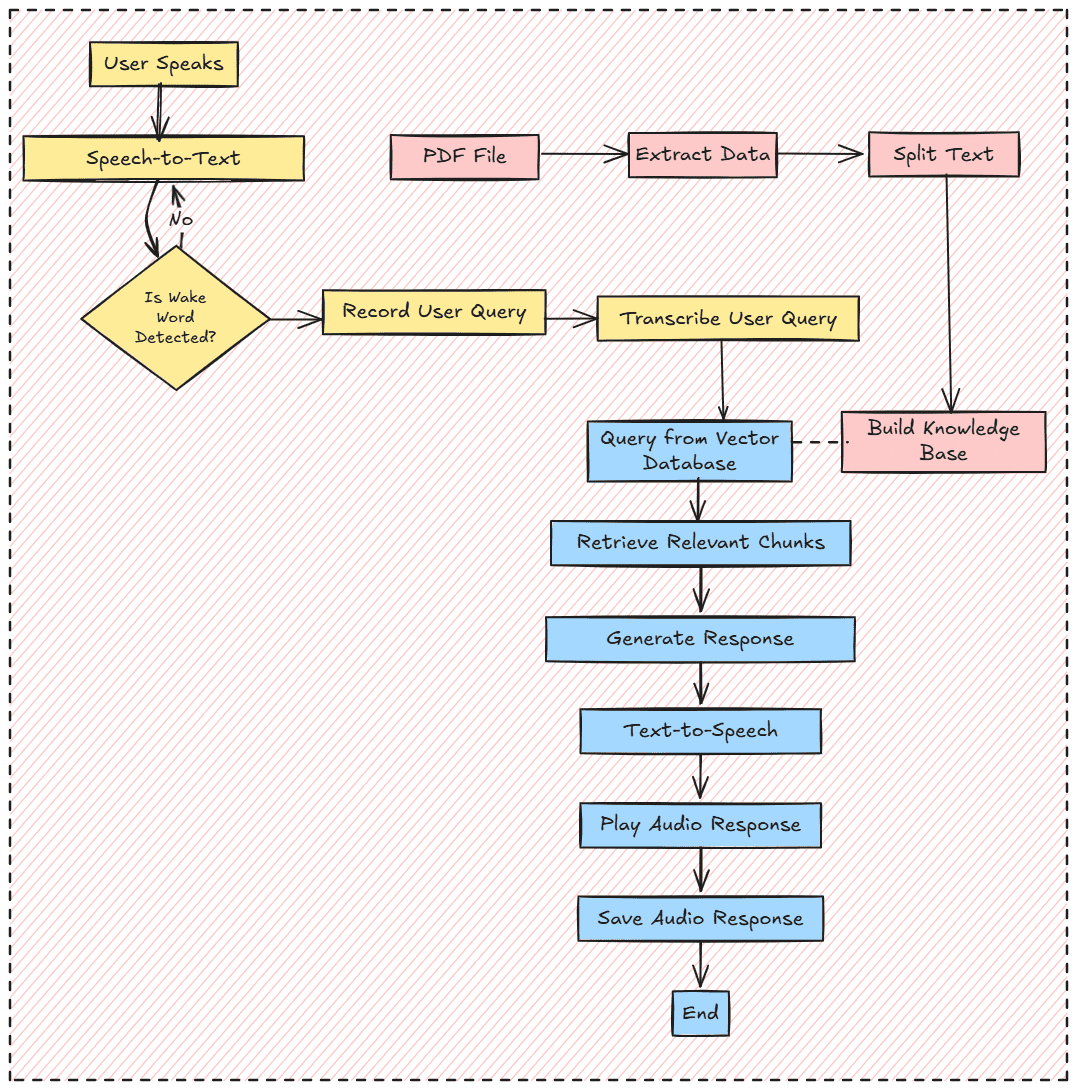
要构建具有完整语音功能的RAG系统,我们将围绕三个关键组件来构建它:
- 语音接收器和转录
- 知识库
- 音频文件响应生成
总的来说,项目工作流程如下图所示:

如果你已准备好,不妨开始准备这个项目成功所需要的一切。
首先,我们不会在这个项目中使用Notebook IDE,因为我们希望RAG系统像生产系统一样工作。因此,应该准备一个标准的编程语言IDE,比如Visual Studio Code(VS Code)。
接下来,我们还想为项目创建一个虚拟环境。你可以使用任何方法,比如Python或Conda。
python -m venv rag-env-audio准备好虚拟环境后,我们安装本教程所需的所有库。
pip install openai-whisper chromadb sentence-transformers sounddevice numpy scipy PyPDF2 transformers torch langchain-core langchain-community如果你可以访问GPU,也可以下载PyTorch库的GPU版本。
pip install torch torchaudio --index-url https://download.pytorch.org/whl/cu118一切准备就绪后,我们将开始构建一个语音激活的RAG系统。要注意的是,包含所有代码和数据集的项目存储库位于该存储库中:https://github.com/CornelliusYW/RAG-To-Know/tree/main/RAG-Project/RAG-Voice-Activated。
我们首先使用以下代码导入所有必要的库和环境变量。
import os
import whisper
import chromadb
from sentence_transformers import SentenceTransformer
import sounddevice as sd
import numpy as np
from scipy.io.wavfile import write
from sklearn.metrics.pairwise import cosine_similarity
from transformers import AutoModelForCausalLM, AutoTokenizer
from langchain_text_splitters import RecursiveCharacterTextSplitter
import torch

AUDIO_FILE = "user_input.wav"
RESPONSE_AUDIO_FILE = "response.wav"
PDF_FILE = "Insurance_Handbook_20103.pdf"
SAMPLE_RATE = 16000
WAKE_WORD = "Hi"
SIMILARITY_THRESHOLD = 0.4
MAX_ATTEMPTS = 5
将对各自代码中使用的所有变量进行解释。现在,暂且保持原样。
在导入所有必要的库之后,我们将为RAG系统设置所有必要的函数。我将逐个分析,这样你就能理解我们的项目中发生了什么。
第一步是创建一项功能来记录输入语音,并将语音转录成文本数据。我们将使用声音设备库用于记录语音,使用OpenAI Whisper用于音频转录。
# For recording audio input.
def record_audio(filename, duration=5, samplerate=SAMPLE_RATE):
    print("Listening... Speak now!")
    audio = sd.rec(int(duration * samplerate), samplerate=samplerate, channels=1, dtype='float32')
    sd.wait()
    print("Recording finished.")
    write(filename, samplerate, (audio * 32767).astype(np.int16))

# Transcribe the Input audio into text
def transcribe_audio(filename):
    print("Transcribing audio...")
    model = whisper.load_model("base.en")
    result = model.transcribe(filename)
    return result["text"].strip().lower()
上述函数将成为接受和返回作为文本数据的语音的基础。我们将在这个项目中多次使用它们,所以请牢记这一点。
我们将为RAG系统创建一个入口功能,准备好接受音频的功能。在下一段代码中,我们在使用WAKE_WORD(唤醒词)访问系统之前创建一个语音激活函数。这个唤醒词可以是任何内容,你可以根据需要进行设置。
上述语音激活背后的想法是,如果我们录制的转录语音与唤醒词匹配,RAG系统就会被激活。然而,如果转录需要完全匹配唤醒词,这将是不可行的,因为转录系统很有可能生成不同格式的文本结果。为此我们可以使转录输出实现标准化。然而我想使用嵌入相似度,这样即使唤醒词的组成略有不同,系统仍然会被激活。
# Detecting Wake Word to activate the RAG System
def detect_wake_word(max_attempts=MAX_ATTEMPTS):

    print("Waiting for wake word...")
    text_embedding_model = SentenceTransformer('all-MiniLM-L6-v2')
    wake_word_embedding = text_embedding_model.encode(WAKE_WORD).reshape(1, -1)

    attempts = 0
    while attempts = SIMILARITY_THRESHOLD:
            print(f"Wake word detected: {WAKE_WORD}")
            return True
        attempts += 1
        print(f"Attempt {attempts}/{max_attempts}. Please try again.")
    print("Wake word not detected. Exiting.")
    return False
通过结合WAKE_WORD和SIMILARITY_THRESHOLD变量,我们将最终获得语音激活功能。
接下来,不妨使用PDF文件构建知识库。为此,我们将准备一个函数,用于从该文件中提取文本并将其分割成块。
def load_and_chunk_pdf(pdf_file):
    from PyPDF2 import PdfReader
    print("Loading and chunking PDF...")
    reader = PdfReader(pdf_file)
    all_text = ""
    for page in reader.pages:
        text = page.extract_text()
        if text:
            all_text += text + "\n"

    # Split the text into chunks
    text_splitter = RecursiveCharacterTextSplitter(
        chunk_size=250,  # Size of each chunk
        chunk_overlap=50,  # Overlap between chunks to maintain context
        separators=["\n\n", "\n", " ", ""]
     )
    chunks = text_splitter.split_text(all_text)
    return chunks
你可以将块大小替换成你想要的。没有使用确切的数字,所以用它们进行试验,看看哪个是最好的参数。
然后来自上述函数的块被传递到矢量数据库中。我们将使用ChromaDB矢量数据库和SenteceTransformer来访问嵌入模型。
def setup_chromadb(chunks):
    print("Setting up ChromaDB...")
    client = chromadb.PersistentClient(path="chroma_db")
    text_embedding_model = SentenceTransformer('all-MiniLM-L6-v2')

    # Delete existing collection (if needed)
    try:
        client.delete_collection(name="knowledge_base")
        print("Deleted existing collection: knowledge_base")
    except Exception as e:
        print(f"Collection does not exist or could not be deleted: {e}")

    collection = client.create_collection(name="knowledge_base")

    for i, chunk in enumerate(chunks):
        embedding = text_embedding_model.encode(chunk).tolist()
        collection.add(
            ids=[f"chunk_{i}"],
            embeddings=[embedding],
            metadatas=[{"source": "pdf", "chunk_id": i}],
            documents=[chunk]
        )
    print("Text chunks and embeddings stored in ChromaDB.")
    return collection
Additionally, we will prepare the function for retrieval with the text query to ChromaDB as welll
def query_chromadb(collection, query, top_k=3):
    """Query ChromaDB for relevant chunks."""
    text_embedding_model = SentenceTransformer('all-MiniLM-L6-v2')
    query_embedding = text_embedding_model.encode(query).tolist()
    results = collection.query(
        query_embeddings=[query_embedding],
        n_results=top_k
    )

    relevant_chunks = [chunk for sublist in results["documents"] for chunk in sublist]
return relevant_chunks然后,我们需要准备生成功能来完成RAG系统。在本例中,我将使用托管在HuggingFace中的Qwen -1.5-0.5B-Chat模型。你可以根据需要调整提示和生成模型。
def generate_response(query, context_chunks):

    device = "cuda" if torch.cuda.is_available() else "cpu"
    model_name = "Qwen/Qwen1.5-0.5B-Chat"
    model = AutoModelForCausalLM.from_pretrained(
        model_name,
        torch_dtype="auto",
        device_map="auto"
    )
    tokenizer = AutoTokenizer.from_pretrained(model_name)

    # Format the prompt with the query and context
    context = "\n".join(context_chunks)
    messages = [
        {"role": "system", "content": "You are a helpful assistant."},
        {"role": "user", "content": f"Use the following context to answer the question:\n\nContext:\n{context}\n\nQuestion: {query}\n\nAnswer:"}
    ]

    text = tokenizer.apply_chat_template(
        messages,
        tokenize=False,
        add_generation_prompt=True
    )

    model_inputs = tokenizer(
        [text],
        return_tensors="pt",
        padding=True,
        truncation=True
    ).to(device)

    # Generate the response
    generated_ids = model.generate(
        model_inputs.input_ids,
        attention_mask=model_inputs.attention_mask,
        max_new_tokens=512,
        pad_token_id=tokenizer.eos_token_id
    )
    generated_ids = [
        output_ids[len(input_ids):] for input_ids, output_ids in zip(model_inputs.input_ids, generated_ids)
    ]
    response = tokenizer.batch_decode(generated_ids, skip_special_tokens=True)[0]
return response最后,令人兴奋的地方在于使用文本到语音模型将生成的响应转换成音频文件。就本例而言,我们将使用托管在HuggingFace中的Suno Bark模型。在生成音频之后,我们将播放音频响应以完成整条管道。
def text_to_speech(text, output_file):
    from transformers import AutoProcessor, BarkModel
    print("Generating speech...")

    processor = AutoProcessor.from_pretrained("suno/bark-small")
    model = BarkModel.from_pretrained("suno/bark-small")

    inputs = processor(text, return_tensors="pt")

    audio_array = model.generate(**inputs)
    audio = audio_array.cpu().numpy().squeeze()

    # Save the audio to a file
    write(output_file, 22050, (audio * 32767).astype(np.int16))
    print(f"Audio response saved to {output_file}")
    return audio

def play_audio(audio, samplerate=22050):
    print("Playing response...")
    sd.play(audio, samplerate=samplerate)
    sd.wait()
这就是完成完全由语音激活的RAG管道需要的所有功能。不妨把它们结合在一起,形成连贯有序的结构。
def main():
    # Step 1: Load and chunk the PDF
    chunks = load_and_chunk_pdf(PDF_FILE)

    # Step 2: Set up ChromaDB
    collection = setup_chromadb(chunks)

    # Step 3: Detect wake word with embedding similarity
    if not detect_wake_word():
        return  # Exit if wake word is not detected

    # Step 4: Record and transcribe user input
    record_audio(AUDIO_FILE, duration=5)
    user_input = transcribe_audio(AUDIO_FILE)
    print(f"User Input: {user_input}")

    # Step 5: Query ChromaDB for relevant chunks
    relevant_chunks = query_chromadb(collection, user_input)
    print(f"Relevant Chunks: {relevant_chunks}")

    # Step 6: Generate response using a Hugging Face model
    response = generate_response(user_input, relevant_chunks)
    print(f"Generated Response: {response}")

    # Step 7: Convert response to speech, save it, and play it
    audio = text_to_speech(response, RESPONSE_AUDIO_FILE)
    play_audio(audio)

    # Clean up
    os.remove(AUDIO_FILE)  # Delete the temporary audio file

if __name__ == "__main__":
    main()
我已将整个代码保存在一个名为app.py的脚本中,我们可以使用以下代码激活系统。
python app.py自己尝试一下,你将获得可用于审阅的响应音频文件。
这就是构建带有语音激活的本地RAG系统所需的全部内容。你可以为系统构建一个应用程序并将其部署到生产环境中,进一步完善项目。
结论
构建具有语音激活的RAG系统涉及一系列先进的技术以及协同工作如同一个模型的多个模型。本项目利用检索和生成函数来构建RAG系统,通过几个步骤嵌入音频功能,增添另一层。我们打下基础后,就可以根据需求进一步完善项目。
原文标题:Creating a Useful Voice-Activated Fully Local RAG System,作者:Cornellius Yudha Wijaya


