多模态RAG利器,带你跑通Qwen2-VL-7B-Instruct大模型 原创
详解Qwen2-VL-7B-Instruct模型,玩转多模态RAG。
想要玩转人工智能,特别是多模态数据处理,Qwen2-VL-7B-Instruct模型绝对是个得力助手。今天带你详细了解这个模型,并教你如何将其用在多模态RAG系统里,让信息检索和生成变得更加高效、准确。
1、Qwen2-VL-7B-Instruct:多模态AI的新高度
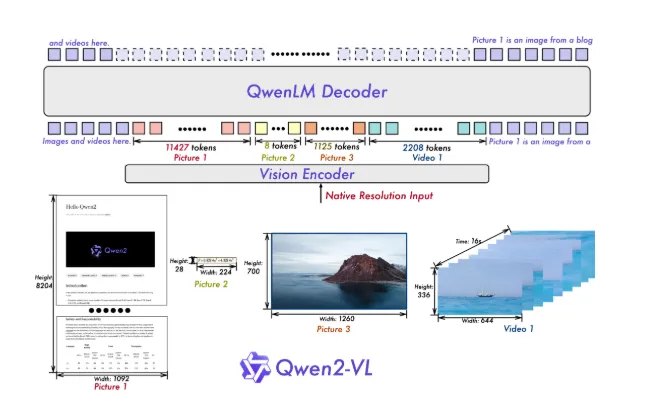
Qwen2-VL-7B-Instruct是一款先进的多模态AI模型,它在图像和视频的视觉理解与交互方面实现了重大突破。基于前代模型的优化,Qwen2-VL-7B-Instruct增添了多项强大功能,使其能够适应多变环境,执行复杂任务。
核心优势:
- 视觉理解:在MathVista、DocVQA和RealWorldQA等视觉理解测试中表现出色,能准确处理各种分辨率和比例的图像。
- 视频处理:擅长处理长视频,推动了视频问答等领域的发展。
- 设备兼容:与多种设备如手机、机器人等无缝集成,提供高级视觉和文本处理能力。
- 多语言识别:不仅支持英语和中文,还能识别图像中的欧洲语言、日语、韩语、阿拉伯语和越南语。
在架构上,Qwen2-VL-7B-Instruct进行了以下优化:
模型架构优化:
- 动态分辨率处理:能够动态地将图像映射到视觉标记,处理不同分辨率的图像,模拟人类的处理方式。

- 多模态旋转位置嵌入(M-ROPE):通过将位置嵌入分解为1D、2D和3D格式,分别代表文本、视觉和视频数据,优化了多模态数据处理。

快速上手Qwen2-VL-7B-Instruct:
使用Qwen2-VL-7B-Instruct模型,首先需要安装必要的库,然后通过Hugging Face Transformers库加载模型:
from transformers import Qwen2VLForConditionalGeneration, AutoProcessor

model = Qwen2VLForConditionalGeneration.from_pretrained("Qwen/Qwen2-VL-7B-Instruct")
processor = AutoProcessor.from_pretrained("Qwen/Qwen2-VL-7B-Instruct")
该模型支持图像、视频等视觉数据以及文本查询的输入,并便于同时处理多个输入,提高工作效率。

2、多模态RAG的逐步实施:
步骤1:设置你的环境
开始构建多模态RAG系统之前,需要通过Conda或Python虚拟环境配置开发环境:
- streamlit
- torch
- transformers
- byaldi
- accelerate
- flash-attn
- qwen_vl_utils
- pdf2image
- python-magic-bin
- extra-streamlit-components
- streamlit-option-menu
步骤2:导入库并配置应用
导入所需的库,并配置你的Streamlit应用:
import streamlit as st
import os
from byaldi import RAGMultiModalModel
from transformers import Qwen2VLForConditionalGeneration, AutoProcessor
from pdf2image import convert_from_path
from streamlit_option_menu import option_menu
from datetime import datetime

# 设置页面配置
st.set_page_config(page_title="多模态RAG系统", layout="wide")
这段代码初始化了你的Streamlit应用程序,设置了宽布局,并设置了标题。
步骤3:创建目录和加载模型
接下来,创建上传PDF的目录并加载处理查询所需的模型:
# 创建必要的目录
UPLOAD_DIR = "uploaded_pdfs"
if not os.path.exists(UPLOAD_DIR):
    os.makedirs(UPLOAD_DIR)

@st.cache_resource
def load_models():
    with st.spinner("正在加载模型... 这可能需要几分钟。"):
        rag_engine = RAGMultiModalModel.from_pretrained("vidore/colpali")
        model = Qwen2VLForConditionalGeneration.from_pretrained("Qwen/Qwen2-VL-7B-Instruct", torch_dtype=torch.float16, device_map="cuda")

        processor = AutoProcessor.from_pretrained("Qwen/Qwen2-VL-7B-Instruct", trust_remote_code=True)
    return rag_engine, model, processor
这一节设置了PDF文件的上传目录,并加载了处理查询所需的模型。
步骤4:文件上传功能
用户可以上传PDF文件,系统将对这些文件进行索引,以便后续检索:
def save_uploaded_file(uploaded_file):
    timestamp = datetime.now().strftime("%Y%m%d_%H%M%S")
    filename = f"{timestamp}_{uploaded_file.name}"
    file_path = os.path.join(UPLOAD_DIR, filename)
    with open(file_path, "wb") as f:
        f.write(uploaded_file.getvalue())
    return file_path

def main():
    if 'indexed_files' not in st.session_state:
        st.session_state.indexed_files = set()

    selected = option_menu(menu_title=None, optinotallow=["上传PDF", "查询文档"], icnotallow=["cloud-upload", "search"], default_index=0)

    rag_engine, model, processor = load_models()

    if selected == "上传PDF":
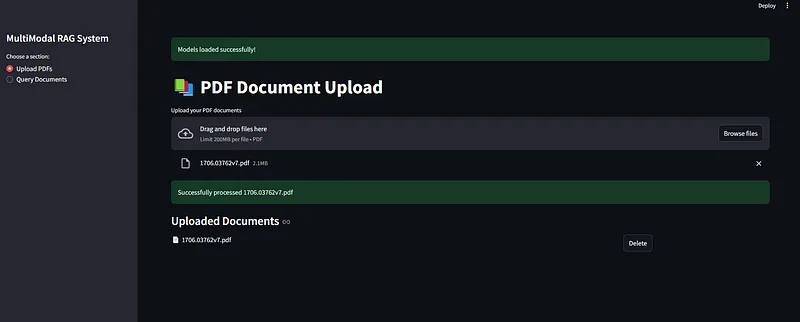
        st.title("PDF文档上传")
        uploaded_files = st.file_uploader("上传你的PDF文档", type=['pdf'], accept_multiple_files=True)

        if uploaded_files:
            for uploaded_file in uploaded_files:
                if uploaded_file.name not in [os.path.basename(f) for f in st.session_state.indexed_files]:
                    with st.spinner(f"正在处理{uploaded_file.name}..."):
                        file_path = save_uploaded_file(uploaded_file)
                        try:
                            rag_engine.index(input_path=file_path, index_name=os.path.basename(file_path), store_collection_with_index=True, overwrite=True)
                            st.session_state.indexed_files.add(file_path)
                            st.success(f"成功处理{uploaded_file.name}")
                        except Exception as e:
                            st.error(f"处理{uploaded_file.name}时出错:{str(e)}")
这段代码允许用户同时上传多个PDF文件。每个文件都被处理并索引以供检索。
步骤5:查询文档
PDF被上传和索引后,用户就可以查询:
elif selected == "查询文档":
    st.title("查询文档")

    if not st.session_state.indexed_files:
        st.warning("请先上传并索引一些文档!")
        return

    query = st.text_input("输入你的查询:", placeholder="你想知道什么?")

    if query:
        with st.spinner("正在处理查询..."):
            all_results = []
            for file_path in st.session_state.indexed_files:
                results = rag_engine.search(query, k=3, index_name=os.path.basename(file_path))
                all_results.extend([(file_path, r) for r in results])

            all_results.sort(key=lambda x: x[1].get('score', 0), reverse=True)

            if all_results:
                top_file, top_result = all_results[0]
                images = convert_from_path(top_file)
                image_index = top_result["page_num"] - 1

                # 在标签页中显示结果
                tab1, tab2 = st.tabs(["结果", "上下文"])

                with tab1:
                    col1, col2 = st.columns([1, 1])
                    with col1:
                        st.image(images[image_index], captinotallow=f"来自{os.path.basename(top_file)}的第{image_index + 1}页", use_column_width=True)
                    with col2:
                        messages = [{"role": "user", "content": [{"type": "image", "image": images[image_index]}, {"type": "text", "text": query}]}]
                        text = processor.apply_chat_template(messages)
                        inputs = processor(text=[text], images=[images[image_index]], padding=True, return_tensors="pt").to("cuda")

                        generated_ids = model.generate(**inputs, max_new_tokens=50)
                        output_text = processor.batch_decode(generated_ids[:, inputs.input_ids.shape[1]:], skip_special_tokens=True)

                        st.markdown("### 模型响应")
                        st.write(output_text[0])

                with tab2:
                    for file_path, result in all_results[:5]:
                        with st.expander(f"来自:{os.path.basename(file_path)} - 第{result['page_num']}页"):
                            st.write(result["content"])
                            st.caption(f"相关性得分:{result.get('score', 0):.2f}")
这一部分通过在索引文档中搜索来处理用户查询。结果与从文档中提取的相关内容一起以视觉方式显示。


3、结语
打造一个多模态RAG系统,就是把先进的AI技术应用到简化文档检索中。通过将Byaldi和Qwen模型等工具集成到易用的Streamlit应用里,我们能更高效地在海量信息中找到所需。在这个数据爆炸的时代,这样的系统变得不可或缺,它助力我们个人和组织更好地理解和利用信息。不管你是深入研究的学者,还是需要迅速获取报告的职场人,这个系统都能帮你轻松应对。
按照这个指南,搭建起你自己的多模态RAG系统,让检索信息变得既快速又准确,彻底改变你与数字内容的互动方式。让我们一起迈入更智能、更高效的信息检索新时代!
本文转载自公众号AI科技论谈


