GraphRAG + Ollama 本地部署全攻略:避坑实战指南 原创
1、为什么要对 GraphRAG 本地部署?
微软开源 GraphRAG 后,热度越来越高,目前 GraphRAG 只支持 OpenAI 的闭源大模型,导致部署后使用范围大大受限,本文通过 GraphRAG 源码的修改,来支持更广泛的 Embedding 模型和开源大模型,从而使得 GraphRAG 的更容易上手使用。

2、GraphRAG 一键安装
第一步、安装 GraphRAG

需要 Python 3.10-3.12 环境。
第二步、创建知识数据文件夹
安装完整后,需要创建一个文件夹,用来存储你的知识数据,目前 GraphRAG 只支持 txt 和 csv 格式。

第三步、准备一份数据放在 /ragtest/input 目录下

第四步、初始化工作区
首先,我们需要运行以下命令来初始化。

其次,我们第二步已经准备了 ragtest 目录,运行以下命令完成初始化。

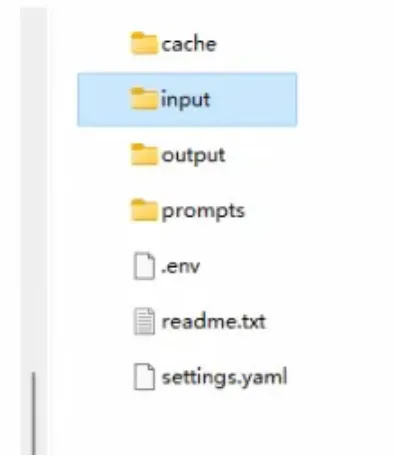
运行完成后,在 ragtest 目录下生成以下两个文件:.env 和settings.yaml。ragtest 目录下的结构如下:

.env 文件包含了运行 GraphRAG 管道所需的环境变量。如果您检查该文件,您会看到一个定义的环境变量,GRAPHRAG_API_KEY=<API_KEY>。这是 OpenAI API 或 Azure OpenAI 端点的 API 密钥。您可以用自己的 API 密钥替换它。
settings.yaml 文件包含了管道的设置。您可以修改此文件以更改管道的设置。
3、修改配置文件支持本地部署大模型
第一步、确保已安装 Ollama
如果你还没安装或者不会安装,可以参考我之前写的文章《Spring AI + Ollama 快速构建大模型应用程序(含源码)》。
第二步、确保已安装以下本地模型
Embedding 嵌入模型
  quentinz/bge-large-zh-v1.5:latest
LLM 大模型
  gemma2:9b
第三步、修改 settings.yaml 以支持以上两个本地模型,以下是修改后的文件
encoding_model: cl100k_base
skip_workflows: []
llm:
  api_key: ollama
  type: openai_chat # or azure_openai_chat
  model: gemma2:9b # 你 ollama 中的本地 llm 模型,可以换成其他的,只要你安装了就可以
  model_supports_json: true # recommended if this is available for your model.
  max_tokens: 2048
  api_base: http://localhost:11434/v1 # 接口注意是v1
  concurrent_requests: 1 # the number of parallel inflight requests that may be made


parallelization:
  stagger: 0.3


async_mode: threaded # or asyncio


embeddings:
  async_mode: threaded # or asyncio
  llm:
    api_key: ollama
    type: openai_embedding # or azure_openai_embedding
    model: quentinz/bge-large-zh-v1.5:latest # 你 ollama 中的本地 Embeding 模型,可以换成其他的,只要你安装了就可以
    api_base: http://localhost:11434/api # 注意是 api
    concurrent_requests: 1 # the number of parallel inflight requests that may be made
chunks:
  size: 300
  overlap: 100
  group_by_columns: [id] # by default, we don't allow chunks to cross documents

input:
  type: file # or blob
  file_type: text # or csv
  base_dir: "input"
  file_encoding: utf-8
  file_pattern: ".*\\.txt$"


cache:
  type: file # or blob
  base_dir: "cache"


storage:
  type: file # or blob
  base_dir: "output/${timestamp}/artifacts"


reporting:
  type: file # or console, blob
  base_dir: "output/${timestamp}/reports"


entity_extraction:
  prompt: "prompts/entity_extraction.txt"
  entity_types: [organization,person,geo,event]
  max_gleanings: 0


summarize_descriptions:
  prompt: "prompts/summarize_descriptions.txt"
  max_length: 500


claim_extraction:
  prompt: "prompts/claim_extraction.txt"
  description: "Any claims or facts that could be relevant to information discovery."
  max_gleanings: 0


community_report:
  prompt: "prompts/community_report.txt"
  max_length: 2000
  max_input_length: 8000


cluster_graph:
  max_cluster_size: 10


embed_graph:
  enabled: false # if true, will generate node2vec embeddings for nodes


umap:
  enabled: false # if true, will generate UMAP embeddings for nodes


snapshots:
  graphml: false
  raw_entities: false
  top_level_nodes: false


local_search:
  max_tokens: 5000


global_search:
  max_tokens: 5000
第四步、运行 GraphRAG 构建知识图谱索引

构建知识图谱的索引需要一定的时间,构建过程如下所示:

4、修改源码支持本地部署大模型
接下来修改源码,保证进行 local 和 global 查询时给出正确的结果。
第一步、修改成本地的 Embedding 模型
修改源代码的目录和文件:
.../Python/Python310/site-packages/graphrag/llm/openai/openai_embeddings_llm.py"
修改后的源码如下:
# Copyright (c) 2024 Microsoft Corporation.
# Licensed under the MIT License


"""The EmbeddingsLLM class."""


from typing_extensions import Unpack


from graphrag.llm.base import BaseLLM
from graphrag.llm.types import (
    EmbeddingInput,
    EmbeddingOutput,
    LLMInput,
)


from .openai_configuration import OpenAIConfiguration
from .types import OpenAIClientTypes
import ollama


class OpenAIEmbeddingsLLM(BaseLLM[EmbeddingInput, EmbeddingOutput]):
    """A text-embedding generator LLM."""


    _client: OpenAIClientTypes
    _configuration: OpenAIConfiguration


    def __init__(self, client: OpenAIClientTypes, configuration: OpenAIConfiguration):
        self.client = client
        self.configuration = configuration


    async def _execute_llm(
        self, input: EmbeddingInput, **kwargs: Unpack[LLMInput]
    ) -> EmbeddingOutput | None:
        args = {
            "model": self.configuration.model,
            **(kwargs.get("model_parameters") or {}),
        }
        embedding_list = []
        for inp in input:
            embedding = ollama.embeddings(model="quentinz/bge-large-zh-v1.5:latest",prompt=inp)
            embedding_list.append(embedding["embedding"])
        return embedding_list
        # embedding = await self.client.embeddings.create(
        #     input=input,
        #     **args,
        # )
        # return [d.embedding for d in embedding.data]
第二步、继续修改 Embedding 模型
修改源代码的目录和文件:
.../Python/Python310/site-packages/graphrag/query/llm/oai/embedding.py"
修改后的源码如下:
# Copyright (c) 2024 Microsoft Corporation.
# Licensed under the MIT License


"""OpenAI Embedding model implementation."""


import asyncio
from collections.abc import Callable
from typing import Any


import numpy as np
import tiktoken
from tenacity import (
    AsyncRetrying,
    RetryError,
    Retrying,
    retry_if_exception_type,
    stop_after_attempt,
    wait_exponential_jitter,
)


from graphrag.query.llm.base import BaseTextEmbedding
from graphrag.query.llm.oai.base import OpenAILLMImpl
from graphrag.query.llm.oai.typing import (
    OPENAI_RETRY_ERROR_TYPES,
    OpenaiApiType,
)
from graphrag.query.llm.text_utils import chunk_text
from graphrag.query.progress import StatusReporter


from langchain_community.embeddings import OllamaEmbeddings


class OpenAIEmbedding(BaseTextEmbedding, OpenAILLMImpl):
    """Wrapper for OpenAI Embedding models."""


    def __init__(
        self,
        api_key: str | None = None,
        azure_ad_token_provider: Callable | None = None,
        model: str = "text-embedding-3-small",
        deployment_name: str | None = None,
        api_base: str | None = None,
        api_version: str | None = None,
        api_type: OpenaiApiType = OpenaiApiType.OpenAI,
        organization: str | None = None,
        encoding_name: str = "cl100k_base",
        max_tokens: int = 8191,
        max_retries: int = 10,
        request_timeout: float = 180.0,
        retry_error_types: tuple[type[BaseException]] = OPENAI_RETRY_ERROR_TYPES,  # type: ignore
        reporter: StatusReporter | None = None,
    ):
        OpenAILLMImpl.__init__(
            self=self,
            api_key=api_key,
            azure_ad_token_provider=azure_ad_token_provider,
            deployment_name=deployment_name,
            api_base=api_base,
            api_versinotallow=api_version,
            api_type=api_type,  # type: ignore
            organizatinotallow=organization,
            max_retries=max_retries,
            request_timeout=request_timeout,
            reporter=reporter,
        )


        self.model = model
        self.encoding_name = encoding_name
        self.max_tokens = max_tokens
        self.token_encoder = tiktoken.get_encoding(self.encoding_name)
        self.retry_error_types = retry_error_types


    def embed(self, text: str, **kwargs: Any) -> list[float]:
        """
        Embed text using OpenAI Embedding's sync function.


        For text longer than max_tokens, chunk texts into max_tokens, embed each chunk, then combine using weighted average.
        Please refer to: https://github.com/openai/openai-cookbook/blob/main/examples/Embedding_long_inputs.ipynb
        """
        token_chunks = chunk_text(
            text=text, token_encoder=self.token_encoder, max_tokens=self.max_tokens
        )
        chunk_embeddings = []
        chunk_lens = []
        for chunk in token_chunks:
            try:
                embedding, chunk_len = self._embed_with_retry(chunk, **kwargs)
                chunk_embeddings.append(embedding)
                chunk_lens.append(chunk_len)
            # TODO: catch a more specific exception
            except Exception as e:  # noqa BLE001
                self._reporter.error(
                    message="Error embedding chunk",
                    details={self.__class__.__name__: str(e)},
                )


                continue
        chunk_embeddings = np.average(chunk_embeddings, axis=0, weights=chunk_lens)
        chunk_embeddings = chunk_embeddings / np.linalg.norm(chunk_embeddings)
        return chunk_embeddings.tolist()


    async def aembed(self, text: str, **kwargs: Any) -> list[float]:
        """
        Embed text using OpenAI Embedding's async function.


        For text longer than max_tokens, chunk texts into max_tokens, embed each chunk, then combine using weighted average.
        """
        token_chunks = chunk_text(
            text=text, token_encoder=self.token_encoder, max_tokens=self.max_tokens
        )
        chunk_embeddings = []
        chunk_lens = []
        embedding_results = await asyncio.gather(*[
            self._aembed_with_retry(chunk, **kwargs) for chunk in token_chunks
        ])
        embedding_results = [result for result in embedding_results if result[0]]
        chunk_embeddings = [result[0] for result in embedding_results]
        chunk_lens = [result[1] for result in embedding_results]
        chunk_embeddings = np.average(chunk_embeddings, axis=0, weights=chunk_lens)  # type: ignore
        chunk_embeddings = chunk_embeddings / np.linalg.norm(chunk_embeddings)
        return chunk_embeddings.tolist()


    def _embed_with_retry(
        self, text: str | tuple, **kwargs: Any
    ) -> tuple[list[float], int]:
        try:
            retryer = Retrying(
                stop=stop_after_attempt(self.max_retries),
                wait=wait_exponential_jitter(max=10),
                reraise=True,
                retry=retry_if_exception_type(self.retry_error_types),
            )
            for attempt in retryer:
                with attempt:
                    embedding = (
                        OllamaEmbeddings(
                            model=self.model,
                        ).embed_query(text)
                        or []
                    )
                    return (embedding, len(text))
        except RetryError as e:
            self._reporter.error(
                message="Error at embed_with_retry()",
                details={self.__class__.__name__: str(e)},
            )
            return ([], 0)
        else:
            # TODO: why not just throw in this case?
            return ([], 0)


    async def _aembed_with_retry(
        self, text: str | tuple, **kwargs: Any
    ) -> tuple[list[float], int]:
        try:
            retryer = AsyncRetrying(
                stop=stop_after_attempt(self.max_retries),
                wait=wait_exponential_jitter(max=10),
                reraise=True,
                retry=retry_if_exception_type(self.retry_error_types),
            )
            async for attempt in retryer:
                with attempt:
                    embedding = (
                        await OllamaEmbeddings(
                            model=self.model,
                        ).embed_query(text) or [] )
                    return (embedding, len(text))
        except RetryError as e:
            self._reporter.error(
                message="Error at embed_with_retry()",
                details={self.__class__.__name__: str(e)},
            )
            return ([], 0)
        else:
            # TODO: why not just throw in this case?
            return ([], 0)
5、GraphRAG 效果测试
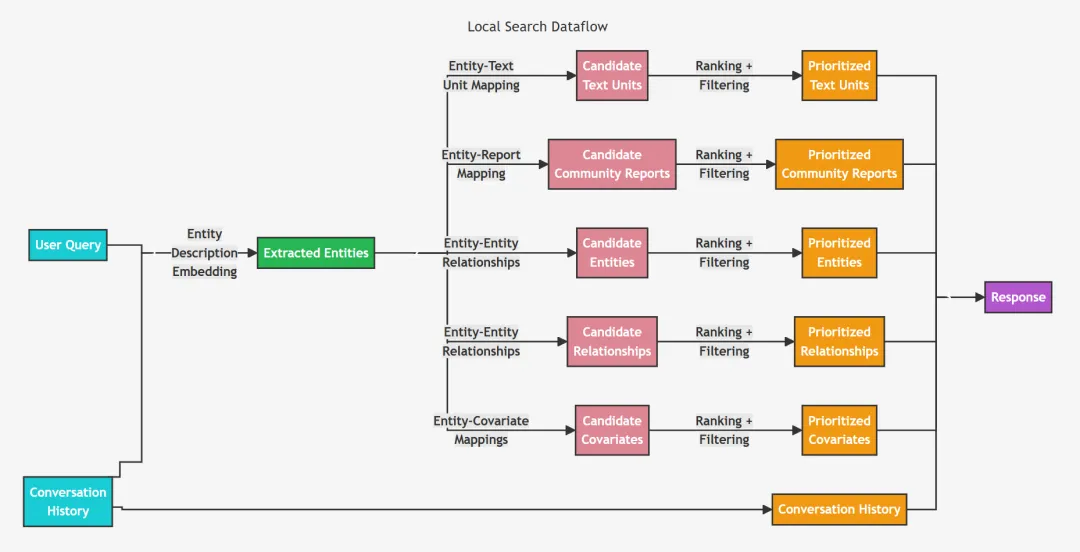
第一、local 查询


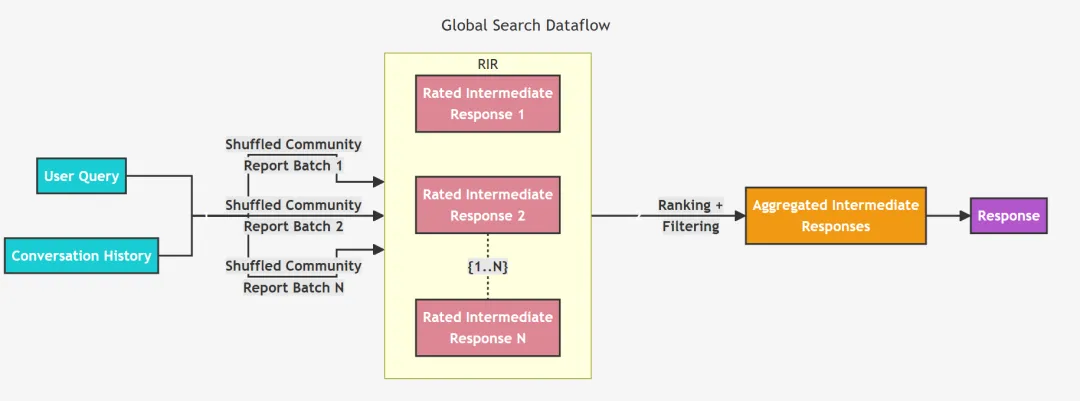
第二、global 查询


本文转载自公众号玄姐聊AGI 作者:玄姐
原文链接:https://mp.weixin.qq.com/s/n7r627644R_q-chLFADfDw


