从零实现大模型-GPT2指令微调 原创
The Annotated Transformer注释加量版
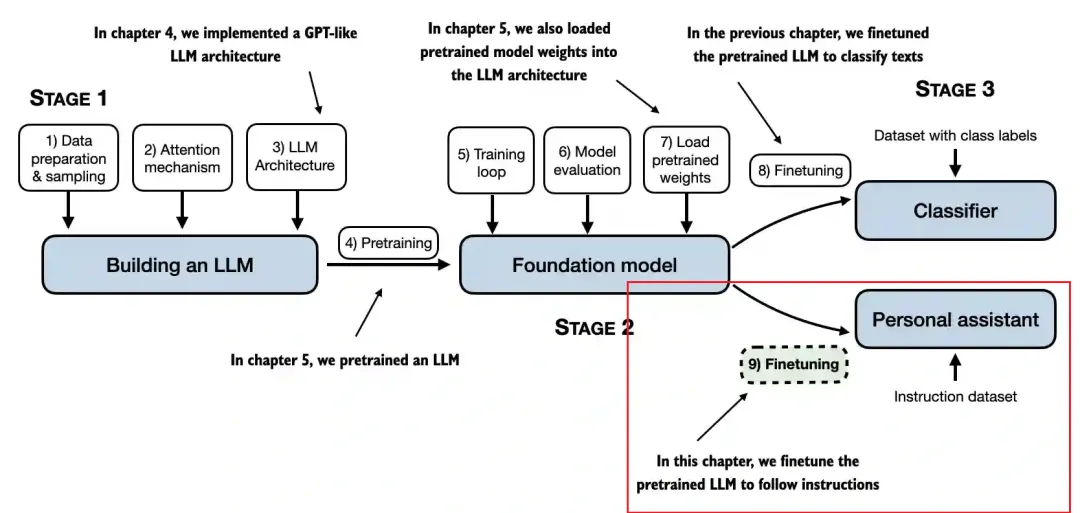
前面三篇文章实现了Transformer、BERT以及GPT2的预训练过程,也就是上图中的Stage1和Stage2,并通过打印数据信息可视化了预训练和推理过程。
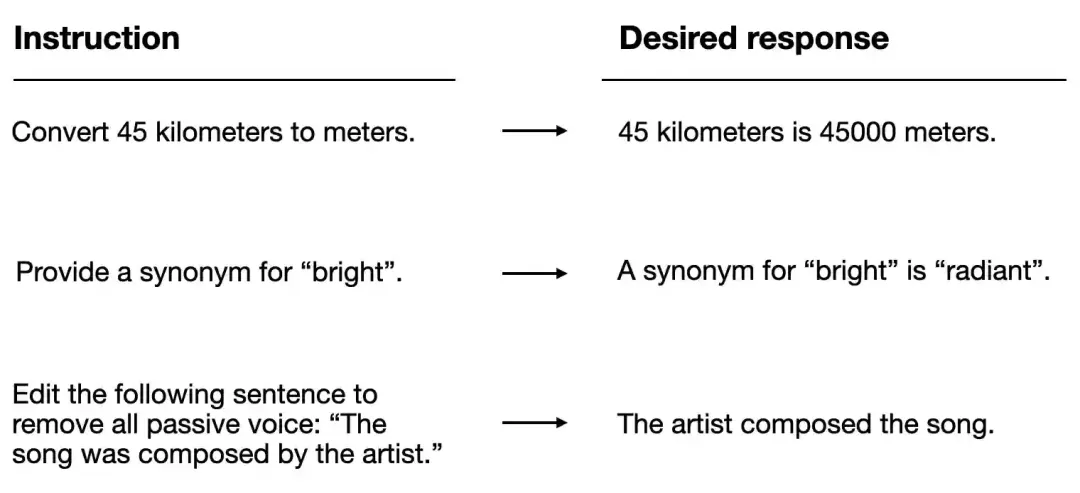
此时的GPT2虽然能预测下一个词,但并不能很好地跟随人类指令,如果想让它翻译就能翻译,想让它总结就能总结,接下来还要进行指令微调。
本文我们基于此前的GPT2预训练模型进行指令微调。
下图是本文的内容概括。
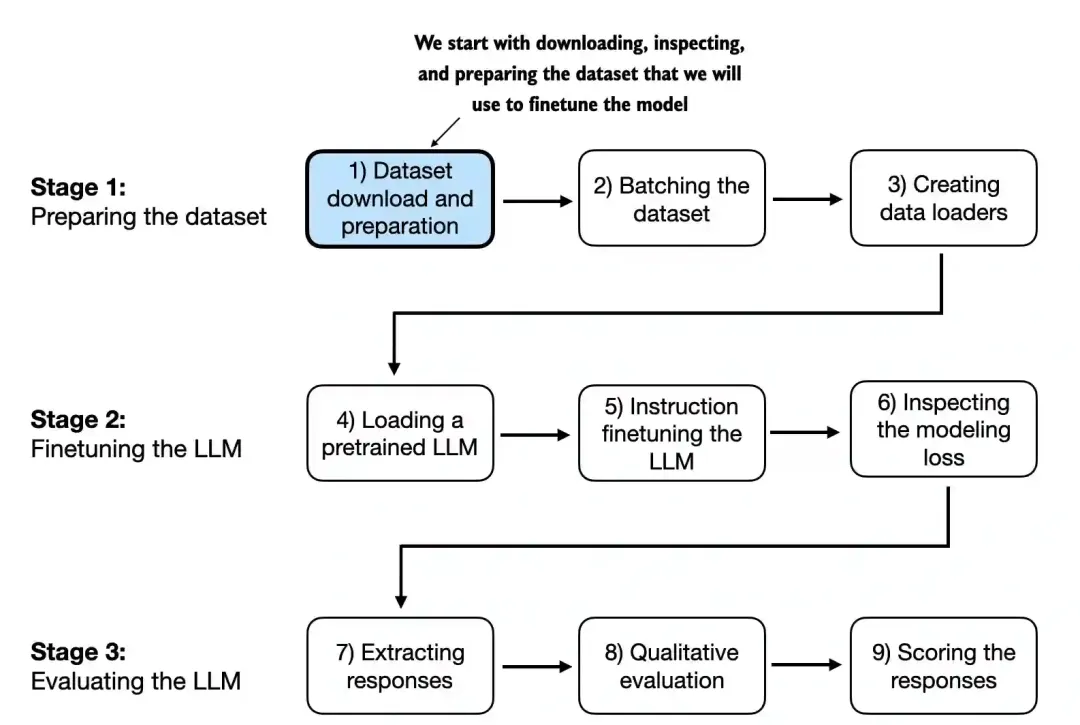
前三篇文章以及本文完整代码都已整理到一个路径下,请结合代码阅读本文内容。
ttps://github.com/AIDajiangtang/LLM-from-scratch
https://github.com/AIDajiangtang/LLM-from-scratch/blob/main/GPT2_instruction_finetuning_from_scratch.ipynb
0.下载训练数据
import json
import os
import urllib


def download_and_load_file(file_path, url):


    if not os.path.exists(file_path):
        with urllib.request.urlopen(url) as response:
            text_data = response.read().decode('utf-8')
        with open(file_path, "w", encoding="utf-8") as file:
            file.write(text_data)
    else:
        with open(file_path, "r", encoding="utf-8") as file:
            text_data = file.read()


    with open(file_path, "r") as file:
        data = json.load(file)


    return data


file_path = "instruction-data.json"
url = "https://raw.githubusercontent.com/rasbt/LLMs-from-scratch/main/ch07/01_main-chapter-code/instruction-data.json"


data = download_and_load_file(file_path, url)
print("Number of entries:", len(data))
该指令微调训练数据包含1100条训练样本,下面打印其中一条。
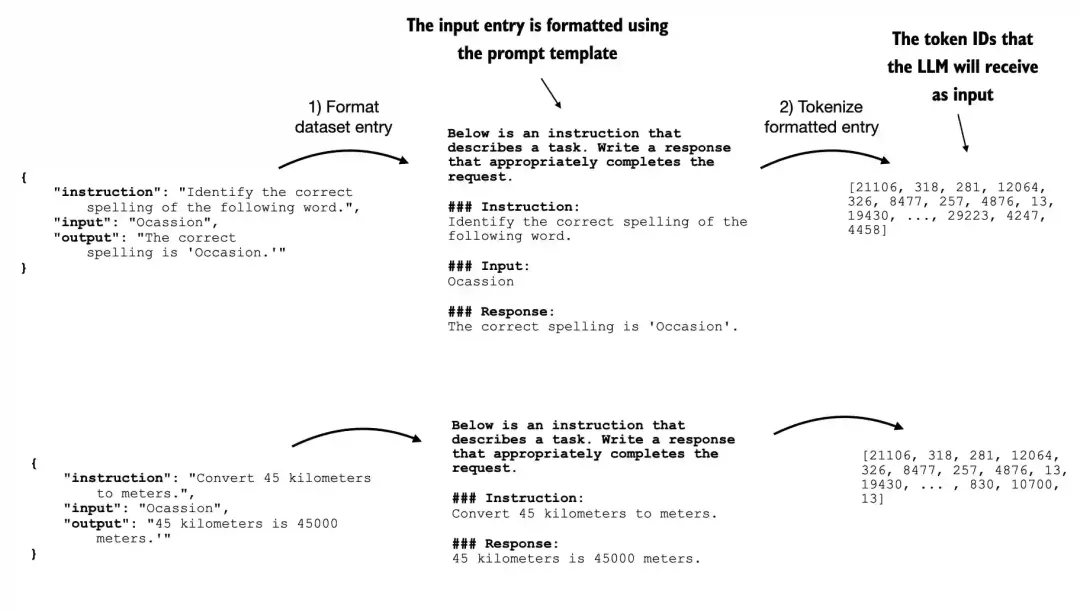
{'instruction': 'Identify the correct spelling of the following word.', 'input': 'Ocassion', 'output': "The correct spelling is 'Occasion.'"}指令微调是一种有监督学习方法,训练数据由指令、输入和输出组成,然后将这三部分格式化成某种prompt格式,下图是两种常见的格式化方法。
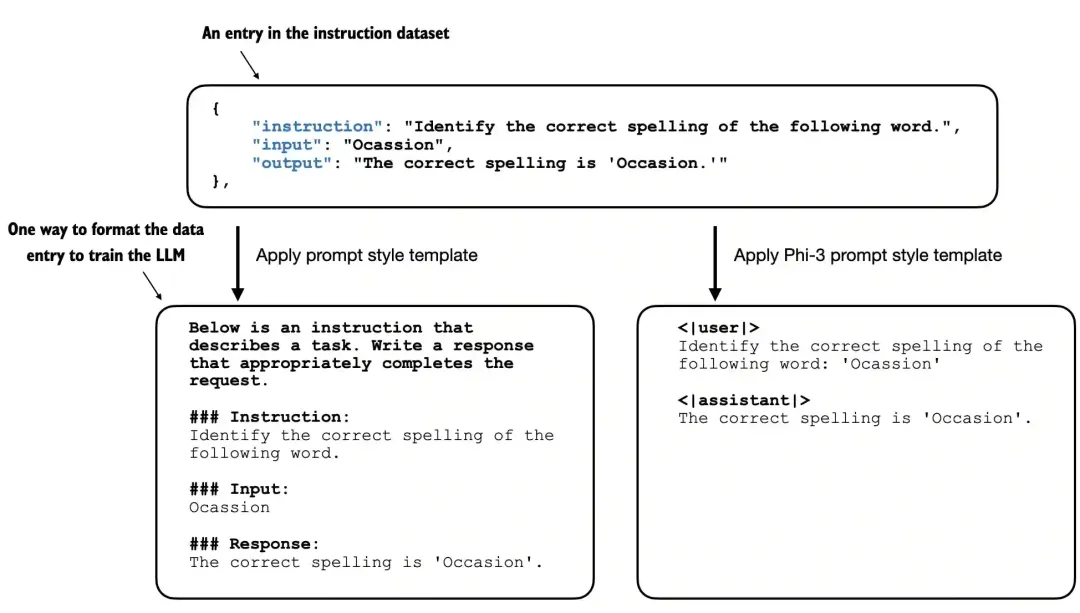
本文我们采用Alpaca-style prompt格式化方法。
指令微调与预训练,除了训练数据,其它基本一致。
def format_input(entry):
    instruction_text = (
        f"Below is an instruction that describes a task. "
        f"Write a response that appropriately completes the request."
        f"\n\n### Instruction:\n{entry['instruction']}"
    )


    input_text = f"\n\n### Input:\n{entry['input']}" if entry["input"] else ""


    return instruction_text + input_text
接下来我们打印一条格式化后的样本。
model_input = format_input(data[50])
desired_response = f"\n\n### Response:\n{data[50]['output']}"


print(model_input + desired_response)
Below is an instruction that describes a task. Write a response that appropriately completes the request.
### Instruction:
Identify the correct spelling of the following word.


### Input:
Ocassion


### Response:
The correct spelling is 'Occasion.'
其中输入并不是必须的。
### Instruction:
What is an antonym of 'complicated'?


### Response:
An antonym of 'complicated' is 'simple'.
接下来将这1100条训练数据划分为训练集、测试集和验证集。
train_portion = int(len(data) * 0.85)  # 85% for training
test_portion = int(len(data) * 0.1)   # 10% for testing
val_portion = len(data) - train_portion - test_portion  # Remaining 5% for validation


train_data = data[:train_portion]
test_data = data[train_portion:train_portion + test_portion]
val_data = data[train_portion + test_portion:]
1.准备训练数据
准备训练数据过程可分为下面几步。
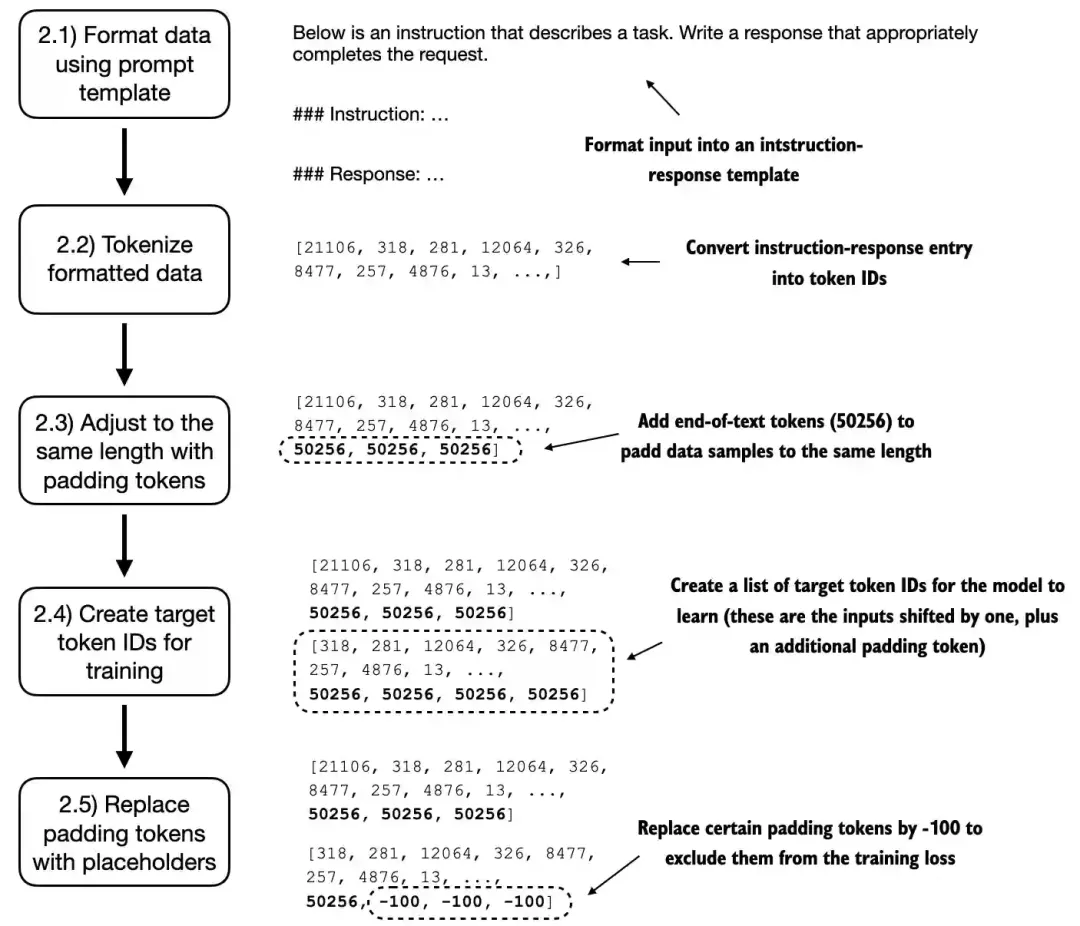
先格式化输入,然后转换为token id。
import torch
from torch.utils.data import Dataset


class InstructionDataset(Dataset):
    def __init__(self, data, tokenizer):
        self.data = data


        # Pre-tokenize texts
        self.encoded_texts = []
        for entry in data:
            instruction_plus_input = format_input(entry)
            response_text = f"\n\n### Response:\n{entry['output']}"
            full_text = instruction_plus_input + response_text
            self.encoded_texts.append(
                tokenizer.encode(full_text)
            )


    def __getitem__(self, index):
        return self.encoded_texts[index]


    def __len__(self):
        return len(self.data)
import tiktoken
tokenizer = tiktoken.get_encoding("gpt2")


print(tokenizer.encode("<|endoftext|>", allowed_special={"<|endoftext|>"}))
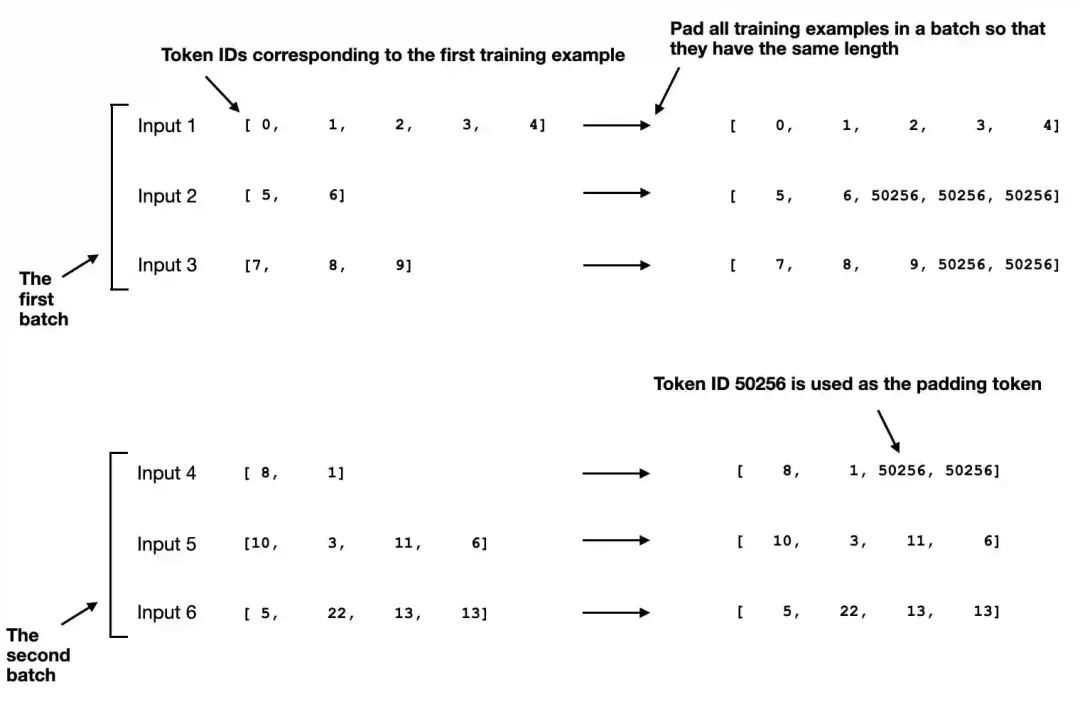
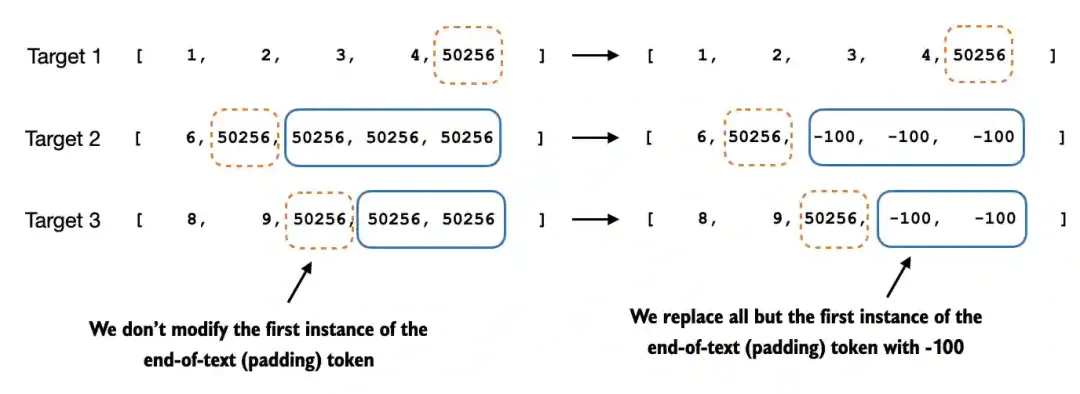
[50256]将样本划分成batches,找到每个batch中最长文本长度作为整个batch的长度,将其它数据padding到统一长度,<|endoftext|>(50256)作为padding token。
将输入向右移动一位构造标签。
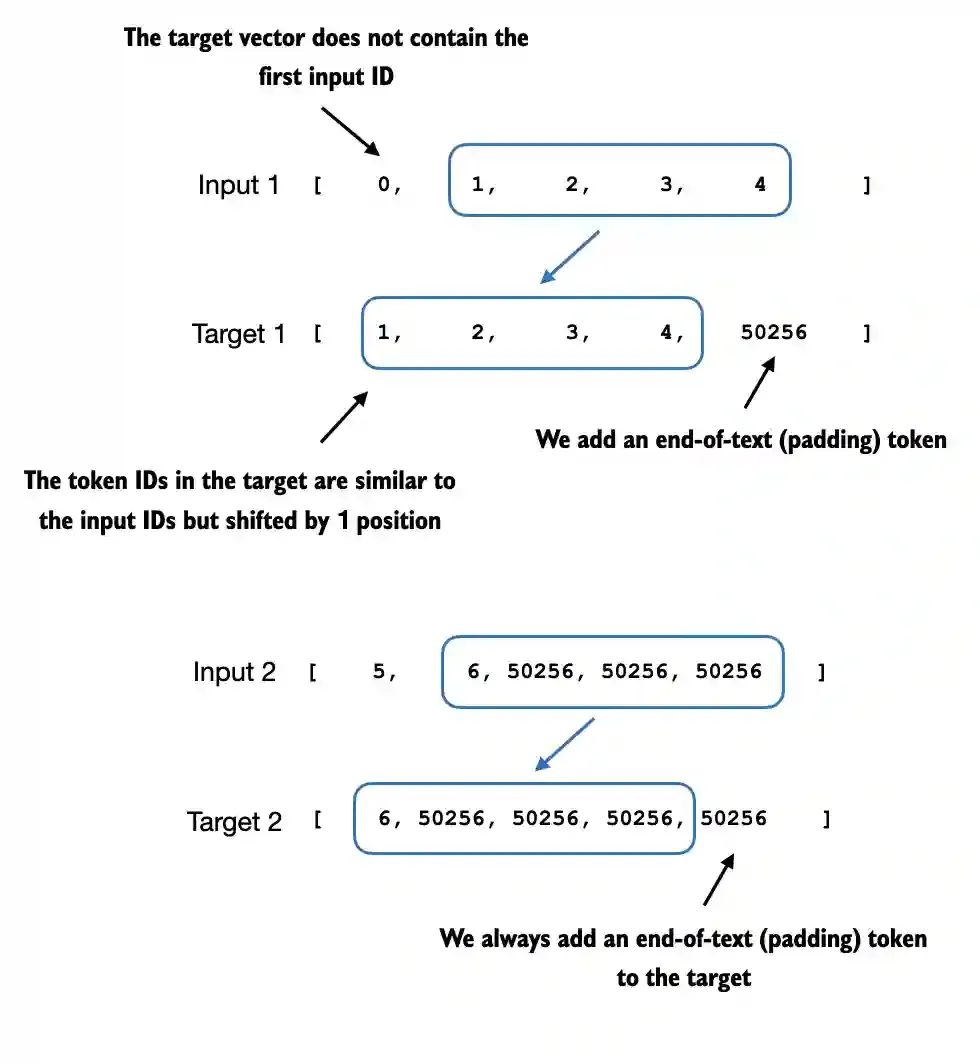
最后将标签中的padding token替换成-100,使其计算损失时忽略该padding token,但要保留一个<|endoftext|作为结束符,
def custom_collate_fn(
    batch,
    pad_token_id=50256,
    ignore_index=-100,
    allowed_max_length=None,
    device="cpu"
):
    # Find the longest sequence in the batch
    batch_max_length = max(len(item)+1 for item in batch)


    # Pad and prepare inputs and targets
    inputs_lst, targets_lst = [], []


    for item in batch:
        new_item = item.copy()
        # Add an <|endoftext|> token
        new_item += [pad_token_id]
        # Pad sequences to max_length
        padded = new_item + [pad_token_id] * (batch_max_length - len(new_item))
        inputs = torch.tensor(padded[:-1])  # Truncate the last token for inputs
        targets = torch.tensor(padded[1:])  # Shift +1 to the right for targets


        # New: Replace all but the first padding tokens in targets by ignore_index
        mask = targets == pad_token_id
        indices = torch.nonzero(mask).squeeze()
        if indices.numel() > 1:
            targets[indices[1:]] = ignore_index


        # New: Optionally truncate to maximum sequence length
        if allowed_max_length is not None:
            inputs = inputs[:allowed_max_length]
            targets = targets[:allowed_max_length]


        inputs_lst.append(inputs)
        targets_lst.append(targets)


    # Convert list of inputs and targets to tensors and transfer to target device
    inputs_tensor = torch.stack(inputs_lst).to(device)
    targets_tensor = torch.stack(targets_lst).to(device)


    return inputs_tensor, targets_tensor
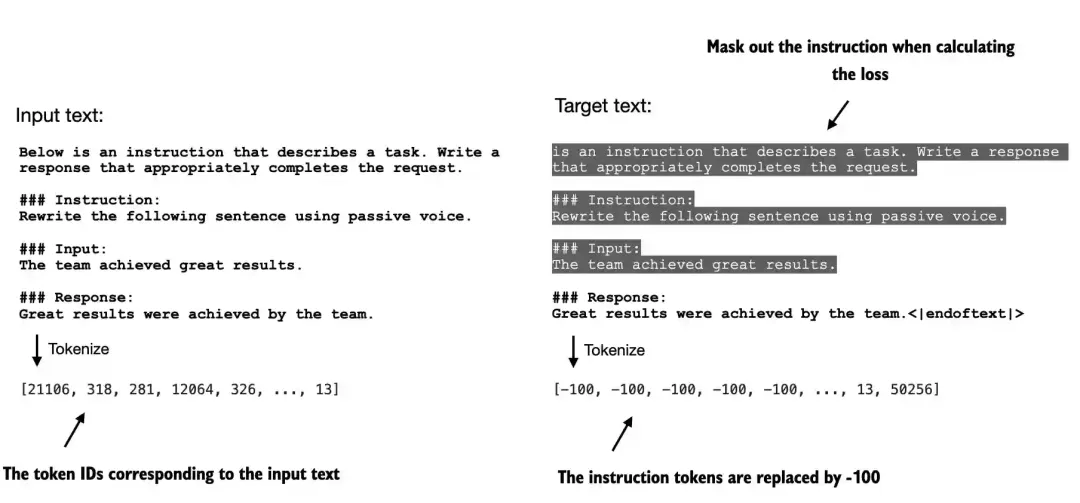
在实际中,通常还会将标签中非输出的内容替换成-100,使其不参与损失计算。
from torch.utils.data import DataLoader


num_workers = 0
batch_size = 8


torch.manual_seed(123)


train_dataset = InstructionDataset(train_data, tokenizer)
train_loader = DataLoader(
    train_dataset,
    batch_size=batch_size,
    collate_fn=customized_collate_fn,
    shuffle=True,
    drop_last=True
)
设置batch_size = 8,接下来查看每个batch的输入和标签的数据维度。
print("Train loader:")
for inputs, targets in train_loader:
    print(inputs.shape, targets.shape)
Train loader:
torch.Size([8, 61]) torch.Size([8, 61])
torch.Size([8, 76]) torch.Size([8, 76])
torch.Size([8, 73]) torch.Size([8, 73])
torch.Size([8, 68]) torch.Size([8, 68])
torch.Size([8, 65]) torch.Size([8, 65])
torch.Size([8, 72]) torch.Size([8, 72])
torch.Size([8, 80]) torch.Size([8, 80])
torch.Size([8, 67]) torch.Size([8, 67])
torch.Size([8, 62]) torch.Size([8, 62])
torch.Size([8, 75]) torch.Size([8, 75])
torch.Size([8, 62]) torch.Size([8, 62])
torch.Size([8, 68]) torch.Size([8, 68])
torch.Size([8, 67]) torch.Size([8, 67])
torch.Size([8, 77]) torch.Size([8, 77])
torch.Size([8, 69]) torch.Size([8, 69])
torch.Size([8, 79]) torch.Size([8, 79])
torch.Size([8, 71]) torch.Size([8, 71])
torch.Size([8, 66]) torch.Size([8, 66])
torch.Size([8, 83]) torch.Size([8, 83])
打印一个样本,查看是否正确。
输入:
tensor([21106,   318,   281, 12064,   326,  8477,   257,  4876,    13, 19430,
          257,  2882,   326, 20431, 32543,   262,  2581,    13,   198,   198,
        21017, 46486,    25,   198, 30003,  6525,   262,  6827,  1262,   257,
          985,   576,    13,   198,   198, 21017, 23412,    25,   198,   464,
         5156,   318,   845, 13779,    13,   198,   198, 21017, 18261,    25,
          198,   464,  5156,   318,   355, 13779,   355,   257,  4936,    13,
        50256, 50256, 50256, 50256, 50256, 50256, 50256, 50256, 50256],
       device='cuda:0')
标签:
tensor([  318,   281, 12064,   326,  8477,   257,  4876,    13, 19430,   257,
         2882,   326, 20431, 32543,   262,  2581,    13,   198,   198, 21017,
        46486,    25,   198, 30003,  6525,   262,  6827,  1262,   257,   985,
          576,    13,   198,   198, 21017, 23412,    25,   198,   464,  5156,
          318,   845, 13779,    13,   198,   198, 21017, 18261,    25,   198,
          464,  5156,   318,   355, 13779,   355,   257,  4936,    13, 50256,
         -100,  -100,  -100,  -100,  -100,  -100,  -100,  -100,  -100],
       device='cuda:0')
2.加载预训练模型
加载GPT2预训练模型。
from gpt_download import download_and_load_gpt2
from previous_chapters import GPTModel, load_weights_into_gpt


BASE_CONFIG = {
    "vocab_size": 50257,     # Vocabulary size
    "context_length": 1024,  # Context length
    "drop_rate": 0.0,        # Dropout rate
    "qkv_bias": True         # Query-key-value bias
}


model_configs = {
    "gpt2-small (124M)": {"emb_dim": 768, "n_layers": 12, "n_heads": 12},
    "gpt2-medium (355M)": {"emb_dim": 1024, "n_layers": 24, "n_heads": 16},
    "gpt2-large (774M)": {"emb_dim": 1280, "n_layers": 36, "n_heads": 20},
    "gpt2-xl (1558M)": {"emb_dim": 1600, "n_layers": 48, "n_heads": 25},
}


CHOOSE_MODEL = "gpt2-medium (355M)"


BASE_CONFIG.update(model_configs[CHOOSE_MODEL])


model_size = CHOOSE_MODEL.split(" ")[-1].lstrip("(").rstrip(")")
settings, params = download_and_load_gpt2(model_size=model_size, models_dir="gpt2")


model = GPTModel(BASE_CONFIG)
load_weights_into_gpt(model, params)
model.eval();
在开始指令微调前,先验证下预训练模型的效果。
torch.manual_seed(123)


input_text = format_input(val_data[0])
print(input_text)
Below is an instruction that describes a task. Write a response that appropriately completes the request.

### Instruction:
Convert the active sentence to passive: 'The chef cooks the meal every day.'
from previous_chapters import (
    generate,
    text_to_token_ids,
    token_ids_to_text
)


token_ids = generate(
    model=model,
    idx=text_to_token_ids(input_text, tokenizer),
    max_new_tokens=35,
    context_size=BASE_CONFIG["context_length"],
    eos_id=50256,
)
generated_text = token_ids_to_text(token_ids, tokenizer)


response_text = generated_text[len(input_text):].strip()
print(response_text)
### Response:

The chef cooks the meal every day.

### Instruction:

Convert the active sentence to passive: 'The chef cooks the
通过结果可知,预训练模型并没有跟随人类指令,虽然有输出,但只是简单的复制了输入和指令内容。
3.指令微调
前面我们说过,除了构造训练数据外,指令微调过程和预训练过程基本一致。
3.1词嵌入
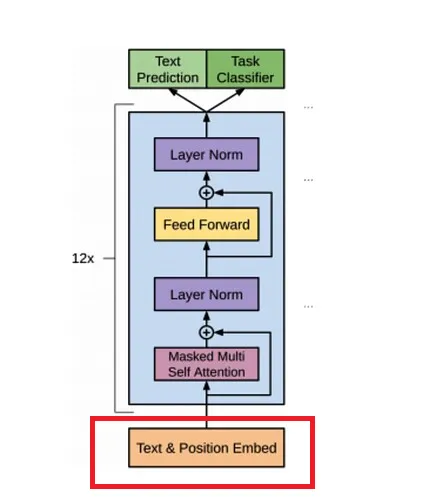
假设第一个batch的输入X和标签的维度[8, 61],接下来将[8, 61]个token ids转换成词嵌入,根据超参数设置:"emb_dim": 768,词嵌入层输出[8, 61,768]。
另外,在计算注意力时,没有考虑token之间的相对位置,所以要在词嵌入上加一个位置编码,位置编码向量维度与词嵌入维度相同。
最终输出[8, 61,768]维词嵌入。
3.2.TransformerBlock
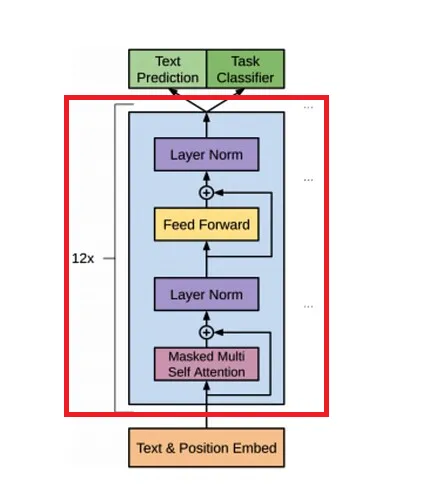
根据超参数设置"n_layers": 12,模型会经过12个结构相同,但参数独立的TransformerBlock模块。
TransformerBlock是由MultiHeadAttention、FeedForward和LayerNorm构成。
接下来我们看看数据是如何流经这些层的。
3.3.MultiHeadAttention
输入的词嵌入[8, 61,768]先经过三个矩阵[768, 768]变换,分别得到q、k、v,维度都是[8, 61,768]。
根据超参数设置"n_heads": 12,将q、k、v reshape成[8, 61, 12,64],再转置成[8, 12,61, 64]。将原始768维词嵌入划分到12个头中,每个头64维,这就实现了多头注意力机制。

然后计算每个头的注意力,注意力分数矩阵维度[8, 12, 61, 61]。
为了防止看到未来时刻的内容,构造一个上三角掩码矩阵[61, 61],其对角线以上的部分设置True, 再将注意力分数矩阵中对应掩码矩阵为True的位置设置为负无穷,这样softmax 之后接近于零,以屏蔽未来位置的注意力得分。
self.register_buffer(
        'mask',
        torch.triu(torch.ones(
            context_length,             # 61
            context_length,             # 61
          ), diagnotallow=1)
    )
    mask_bool = self.mask.bool()[:num_tokens, :num_tokens]


    # Mask the attention scores
    attention_scores.masked_fill_(mask_bool, -torch.inf)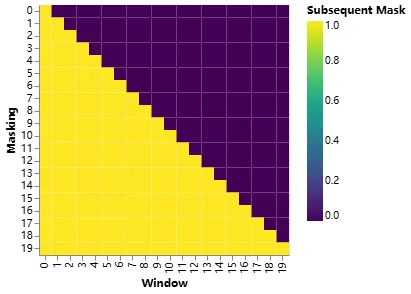
然后将注意力分数矩阵[8, 12, 61, 61]与值矩阵v[8, 12,61, 64]相乘,输出[8, 12,61, 64]。
最后将多个头的输出通过转置,reshape成[8, 61, 768],再经过一个线性层[768, 768]输出[8, 61, 768],最终与输入进行残差链接输出[8, 61, 768]。
3.4.LaynerNorm
LaynerNorm的目的是为了计算稳定,不改变维度,LaynerNorm层的输入输出维度均是[8, 61, 768]。
3.5.FeedForward
FeedForward是一个MLP层,前面LaynerNorm层的输出[8, 61, 768],8*61个词嵌入并行通过MLP层,先升维到4*768,再恢复到768,中间使用GELU非线性激活函数。
MLP层不会改变输入维度[8, 61, 768],但会通过非线性变换会进一步修改词嵌入的值,以次提升模型的表示能力,生成更高层次的抽象特征。
3.6.输出
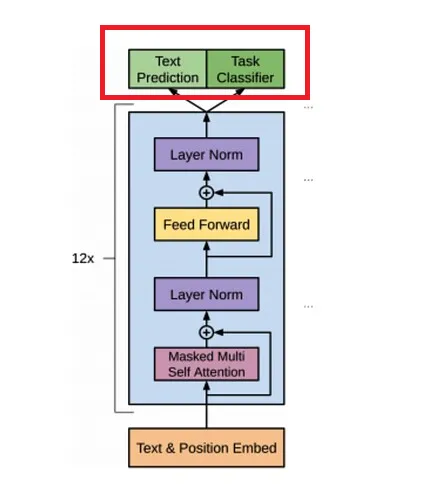
MLP层的输出[8, 61, 768]先经过一个LaynerNorm进行平滑操作。
最后8*61个token并行经过一个输出线性层[768, n_vcab],将[8, 61, 768]映射成[8, 61, n_vcab],n_vcab为词表大小。
也就是每个token都会输出一个概率分布,这n_vcab个概率值表示下一个token属于词表中n_vcab个词的概率。
3.7.计算损失
训练过程中需要通过计算损失来更新参数,如何根据输出[8, 61, n_vcab]计算损失呢?
在准备训练数据时已经构造了标签,维度与输入X一致,也是[8, 61]。
def calc_loss_batch(input_batch, target_batch, model, device):
  """
  Calculates the loss for a single batch.
  """
  input_batch = input_batch.to(device)
  target_batch = target_batch.to(device)


  # Run the model
  logits = model(input_batch)
  print("target_batch loss")
  print(target_batch.flatten().shape)
  print("logits.flatten(0, 1)")
  print(logits.flatten(0, 1).shape)
  # Calculate the loss
  loss = torch.nn.functional.cross_entropy(
      logits.flatten(0, 1),
      target_batch.flatten(),
  )
  return loss
input_batch是输入X,维度[8, 61],target_batch是标签,维度[8, 61],输入经过模型后输出[8, 61, n_vcab],展平后[488, n_vcab],标签展平后[488],每个元素表示词表中位置。
cross_entropy估计是根据这[488]位置构造one-hot编码,然后与输出logits计算损失值。
本文转载自公众号人工智能大讲堂


